

There's a moment every boat owner knows: that slight lean as passengers move to one side, or the stubborn bow-rise that blocks your view when you hit the throttle. You've probably felt it and maybe even asked about a fix on your favorite boat forum. The answer, often whispered with a nod toward performance, usually points in one direction: trim tab install. While the project might seem like a marine technician's secret, the truth is, with some care and the right steps, fitting Bennett hydraulic trim tabs is a rewarding DIY project that changes how your boat meets the water.
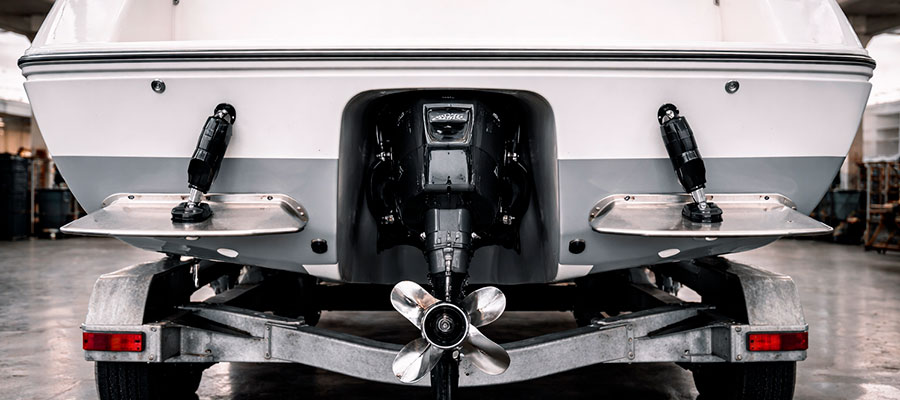
The heart of the system lies in two sleek stainless steel bracket and hinge assemblies that will live on your stern. The actuator mount connects to a robust piston, which is the muscle of the entire setup. The mission? To securely fasten these components onto the transom, matching the starboard and port sides with precision.
You'll be spending quality time at the bottom of the transom, marking and preparing to drill the holes through the hull. Whether you have an outboard or inboard setup, the principle is the same: a clean, well-planned installation on the bottom of the boat ensures those hydraulic trim mechanisms work their magic seamlessly. Following the guidance from Bennett Marine and taking your time to measure three times before any cutting or drilling will lead you to a professional-grade result. This process isn't about reinventing the wheel; it's about thoughtfully integrating smart engineering into your vessel's transom to unlock a smoother, more efficient, and safer ride.
Getting to Know Bennett Trim Systems
Before diving into the toolbox, it's a great idea to spend a few moments with the components laid out on a clean surface. You'll see that the Bennett tabs aren't just pieces of metal; they're a thoughtfully engineered balance of strong hinges and precise hydraulic rams. Understanding this harmony is the first step to appreciating how a simple button-press can level your ride. Think of it as meeting the quiet, capable crew that's about to join your boat's team.
Differences between Bennett trim and Lenco systems
When you're comparing trim tabs, the most noticeable difference is in how they move. Bennett systems use a classic hydraulic trim setup where a pump pushes fluid through lines to extend a strong piston in the actuator mount. This provides a smooth, powerful, and steady push that many associate with traditional marine muscle. In contrast, Lenco systems use electric actuators that operate more like a car's power seat, moving in and out with a quiet whir. The core choice is between fluid power and electric speed. Hydraulics are celebrated for their raw strength in challenging conditions, while electrics offer lightning-fast adjustments. Your decision often comes down to whether you value the proven, resilient feel of hydraulic pressure or prefer the instant, digital response of an electric motor.
Why boat owners choose Bennett trim tabs
Many boat owners are drawn to Bennett's reputation for unwavering toughness in harsh saltwater environments. The system's hydraulic nature delivers a powerful, fluid action that simply feels more robust under load.
- A legacy of reliability that adds confidence and resale value.
- The powerful, steady force is ideal for heavier, hard-working hull designs.
Components included in a Bennett trim tab kit
You’ll also find a tube of marine sealant, which is vital for creating a permanent, waterproof bond. The comprehensive manual provides clear, step-by-step guidance for the entire process.
- Marine-grade sealant for a leak-proof installation on the bottom of the hull.
- Detailed instructions covering trim tab install from start to finish.
Preparing the Boat for Installation
This step is all about creating a perfect, clean canvas for your project. Give the bottom of the hull at the stern a thorough cleaning and degreasing so the adhesive sealant can form a watertight bond. It's also the moment for a final, careful check of your measurements against the actual boat. A clean, measured start prevents headaches later, ensuring every bolt and screw will land exactly where it should.
Choosing the right location for each trim tab
Picking the perfect spot is a mix of art and science, directly impacting how well your bennett tabs perform. You need a flat, clean section of the transom, typically just outside the bottom of the boat's chine, where the bracket can sit completely flush. Location dictates the quality of the lift. It must be clear of any strakes, drains, or hull irregularities that could disrupt water flow. For an outboard motor, ensure there's ample room for the full sweep of the actuator without interference. A well-chosen location ensures the tab meets solid, pressurized water, translating your adjustments into immediate hull response.
Marking and drilling holes for the actuators
Use the provided template or the actuator mount itself as a guide, marking hole centers with a sharp pencil or paint pen. When you drill the holes, use a sharp bit and keep the drill perfectly perpendicular to the transom surface.
- Prevents misalignment that could bind the actuator piston.
- Creates clean, straight pathways for the bolt and screw fasteners.
Tools and safety equipment needed for installation
| Category | Specific Items | Its Role in the Process |
|---|---|---|
| Making the Mark | Grease Pencil, Measuring Tape, Painter's Tape, Straight Edge | Allows for precise, visible layout on the hull and creates clean guides for drilling, preventing slips. |
| Creating the Mount | Variable-Speed Drill, Recommended Drill Bits, Hex Key Set, Socket Wrench Set | Provides the controlled power and specific drivers to create clean holes and tighten fasteners to the proper spec. |
| Sealing it Tight | Marine-Grade Sealant (e.g., 3M 5200 or Sikaflex 291), Caulking Gun, Denatured Alcohol & Rags | Ensures a permanent, waterproof barrier between your hardware and the boat, preventing leaks and corrosion. |
| Staying Safe | Safety Glasses, Protective Gloves, Dust Mask, Stable Work Platform | Protects your eyes from debris, hands from sharp edges and chemicals, and provides a secure footing to work from. |
Mounting the Trim Tabs
Now, with your templates or careful marks in place, it's time for the moment that feels most permanent: drilling. After you drill the pilot holes, the real satisfaction comes from fitting the tab plates against the transom, feeling that solid contact. Securing them feels like a milestone as you hand-tighten each stainless steel screw and bolt, knowing you're literally adding a new capability to your vessel's form.
Aligning and securing each Bennett trim tab plate
Hold the stainless steel plate firmly against the transom, double-checking that the hinge line is parallel to the waterline. Begin threading the fasteners by hand to pull the plate snug onto the transom.
- Guarantees the tab will deploy evenly into the water flow for balanced control.
- Prepares the assembly for the final, even torquing of all fasteners.
Ensuring proper positioning for balance and efficiency
This step is where your project shifts from a simple installation to a true performance upgrade. It's all about achieving perfect symmetry between the port and starboard sides; imagine your boat's hull as a perfectly balanced scale. If one bennett tab is mounted even slightly forward or aft of the other, you'll create a built-in bias that forces you to constantly correct with the controls. Symmetry is the silent partner of smooth performance. Use a measuring tape from fixed points on the stern, like the drain plug or a transducer, to each hinge location, double and triple-checking your numbers.
Getting this right means your boat will track straight with the tabs neutral, allowing the system to work for you, not against you, which translates directly into better fuel economy and a more relaxed ride.
Tips to avoid damage during the install process
| Focus Area | Pro Insight | The Direct Benefit |
|---|---|---|
| Hull Surface Prep | Devote time to a deep clean of the transom area with a marine wax remover. Lightly scuff the mounting zones with fine sandpaper. | This critical step removes contaminants and creates an ideal surface for the sealant to bond, ensuring a lifetime of protection against water intrusion. |
| Pilot Hole Practice | Before drilling the final mounting holes, use a smaller pilot bit to establish an exact guide. Test-fit the hardware after this step. | This technique grants unparalleled control, prevents the larger bit from "walking" on the curved hull, and lets you confirm alignment is perfect. |
| Sealant Strategy | Apply a generous bead of sealant to the base plate and also inject a small amount into each drilled hole before inserting the fastener. | This dual-layer sealing method is the absolute best defense, creating a complete gasket and filling the screw threads themselves to block any water path. |
| Torque Discipline | Tighten all fasteners in a cross-pattern, like tightening a car tire, stopping at a firm, snug fit. Avoid the urge to over-tighten. | This ensures even pressure on the sealant and prevents warping the metal brackets. Over-tightening can compromise the seal and strip threads. |
Installing the Hydraulic System and Actuators
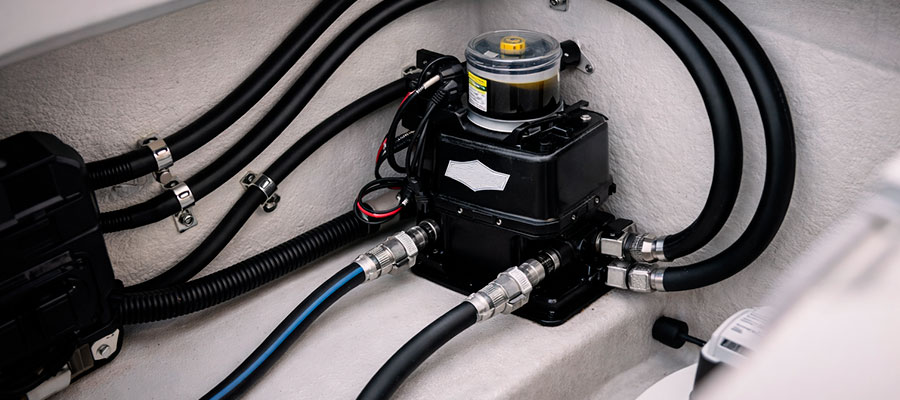
This is where the system comes to life, connecting muscle to wing. Attaching the actuator arms to the tabs and mounting the pump in a dry, accessible spot feels like doing the boat's internal wiring. The gentle hum you'll hear later starts with routing these hydraulic lines neatly. The connection point is where power meets purpose, turning mechanical parts into a responsive system ready for your command.
Connecting hydraulic lines to the actuator units
Push the firm hydraulic hoses onto the actuator fittings until they seat with a solid, satisfying click. Secure each connection with the provided stainless steel clamps, ensuring they are tight and properly oriented.
- Prevents high-pressure fluid leaks under operation.
- Creates a reliable, solid link between pump power and tab movement.
Mounting the hydraulic pump inside the boat
Find a dry, secure spot in a bilge or locker, ideally near the stern to keep hose runs short. Use its integrated bracket to fasten the pump securely, ensuring it's mounted upright as the Bennett Marine guide specifies.
- Protects the pump from water immersion and allows for easy access.
- Shortens hydraulic line runs for optimal system responsiveness.
Testing the actuator movement before sealing connections
Consider this your system's "dress rehearsal" before the big show. With the hydraulic lines connected to the actuator but before you apply any thread sealant, momentarily power up the pump from the helm. Watch the piston inside the actuator mount extend and retract with a smooth, confident motion. This dry run builds installer confidence. It’s your chance to verify there's no binding in the hinge or misalignment that could strain the unit.
Seeing both bennett tabs move in response to your switch commands confirms your wiring is correct. Catching an issue now, when a connection is just a quick pull away, saves you from a much messier fix after everything is sealed and tightened down.
Wiring and Control Setup
Running wires from the pump to your helm is a chance for some tidy, thoughtful cable management. Choosing the perfect spot for the control switch—within easy, instinctive reach of the captain—makes all the difference in everyday use. This final link makes it yours, as you connect the wires and imagine your first press of that button to correct a list.
Installing the Bennett control switch at the helm
Choose a spot on the dash that feels natural and within effortless reach while your hand is on the wheel. Connect the wiring harness from behind the dash for a clean, factory-like installation.
- Puts intuitive control right at your fingertips for constant adjustment.
- Integrates the system seamlessly into your helm's layout.
Routing hydraulic and electrical connections safely
Secure all hoses and wires with an abundance of cushioned clamps, keeping them neatly tucked away from sharp edges and moving parts. Follow the natural pathways of existing cables for the most professional and protected result.
- Shields the system's vital lines from chafe and potential damage.
- Ensures a tidy, safe installation that’s easy to inspect during routine checks.
Checking trim response and calibration
With the boat still safely on the trailer, this is your final systems check before hitting the water. Power up the helm switch and watch the bennett tabs dance to your command. Ensure the port switch controls only the port tab and that each one travels its complete journey, from fully tucked against the bottom of the hull to fully deployed. Calibration turns parts into a coordinated system. Listen for the healthy hum of the pump and watch for any hesitation in the actuator movement.
This static test confirms that all your hard work—the wiring, the plumbing, the mounting—has come together into a responsive, ready-to-use tool, giving you peace of mind before you ever back down the ramp.
Testing and Adjusting the Trim System
The real magic happens with the boat in the water. Start with the tabs fully retracted and take a slow run, then gently experiment with deploying them one side at a time. You'll see and feel the hull's attitude change before your eyes. Fine-tuning reveals the true benefit as you dial in the exact amount of tab needed for perfect level running in your usual conditions.
Performing the first test run on the water
Start with the tabs fully retracted and bring your boat onto plane, then gently tap the switch to lower just the starboard tab and feel the hull respond. This initial run is about discovery, not precision, so enjoy feeling the new control you have over the boat's attitude.
- Experience the transformative effect of the trim tab install firsthand.
- Begin to understand how your specific hull reacts to the new bennett tabs.
How to fine-tune your Bennett trim for best results
Fine-tuning is an art of subtlety, where the smallest adjustments yield the most rewarding changes in ride and efficiency. Start from a level plane and make tiny, incremental changes, noting how each click of the switch affects the helm feel and the view over the bow.
- The magic lives in the smallest increments.
- Dial
Maintenance advice every boat owner should follow
Think of this not as a chore, but as a quick chat with your equipment to ensure many more years of partnership. Once a season, take a moment to wipe down the stainless steel brackets and hinges with fresh water, and give the actuator piston rod a quick look for any new nicks or corrosion. Proactive care is the antidote to surprise repairs. Pop the lid off the hydraulic pump reservoir—often tucked away in a stern locker—and check the fluid level, topping it up with the recommended type if it’s low.
Run the tabs through a full cycle and feel the hydraulic lines for any unusual softness or leaks. These five minutes of attention are the best guarantee that your bennett hydraulic system remains a reliable asset, not a source of worry.

