

Buying a used boat is one of the smartest ways to get on the water without paying the premium price of a brand-new vessel. Whether you're looking for a fishing boat, center console, pontoon, cruiser, sailboat, or family bowrider, the used market offers thousands of opportunities to find an excellent boat at a fraction of its original cost.

A leaky or corroded deck hatch undermines your boat’s integrity. The Lewmar Ocean series offers a definitive marine-grade solution. Its rugged construction and anodized aluminum frame withstand harsh conditions. A new Lewmar hatch restores security and comfort aboard. This guide helps you recognize when an upgrade is essential. Discover why the Ocean Series is trusted by sailors worldwide.
Considering a Lewmar Ocean Hatch for Your Boat
A new Lewmar hatch enhances your vessel. It offers reliable marine performance. The anodized aluminum frame fights corrosion. Rugged construction defines these hatches. Lewmar Ocean is a trusted name. Sailing is safer with one. It protects your sailboat from water. This boat hatch is a smart upgrade.

Your Johnson wash down pump has quit. This leaves you with a key question: can it be fixed? Many failures are repairable with some know-how. This guide provides clear steps to find your answer. We will help you diagnose common issues. You'll learn to identify if a simple rebuild kit is the solution. We'll cover when a pressure switch or other replacement parts are needed. You'll also see when buying a new one is wiser. Follow our process to save time and money. Turn this breakdown into a successful fix.
Understanding Johnson Washdown Pumps
A wash down pump supplies water for deck cleaning. These pumps are designed for marine environments. They often use raw water from nearby sources. This means they draw directly from the sea or lake. The system creates pressure for a strong hose stream. Johnson models are known for their reliable performance. They are a common choice for boat owners.
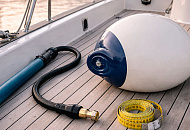
That dependable Polyform sphere in your hands isn't ready for duty until it's filled with air. This isn't just about making it round; it's about awakening its ability to absorb impact and provide security. The true goal is to reach that sweet spot where the material is fully engaged yet retains a forgiving flexibility, ready to do its job without fail.
Ditch the old method of pumping until it feels hard. Your success lies in a more precise partnership between your tools and the manufacturer's data. The critical step is to cross-reference your live measurements with the official Polyform inflation chart for your specific product. Locate this chart on the Polyform US support site before you start—this single reference turns inflation from an art into a repeatable science, especially when you’re miles from a calibrated gauge.
Execution is straightforward. Begin by mating the correct inflation adapter to your pump's hose, if needed, then insert the inflation adapter into the valve opening on the ball with a firm, straight push. Use your hand pump in a steady rhythm, stopping every few strokes to assess progress. Don't just feel it; measure it. Wrap your tape around the widest part and compare it to the chart measurement. You've reached perfection when the numbers match and you can still depress the wall of the buoy or fender about an inch with moderate thumb pressure, signaling it's firm but not strained.

A reliable battery monitor is essential. The Victron BMV-700 series provides trusted solutions. But which version fits your needs? The core choice is simple: direct access or smart control. The Victron BMV-700 offers unwavering precision on its display. In contrast, the BMV-712 Smart brings your battery data wirelessly to your phone. For specialized setups, the BMV-702 adds vital diagnostics. This guide moves past technical terms. We focus on real use. We'll help you match a monitor's capability to your daily routine, ensuring you choose a true partner for your energy system. Let's find your perfect match.
Overview of Victron Battery Monitors
Victron battery monitors track battery bank health precisely. They show real-time battery voltage and power consumption. High precision battery monitors provide accurate state of charge. This prevents deep discharge damage. Users trust data from Victron Energy products. These devices are easy to install. They are essential for system awareness.

So, you've got that familiar feeling – one hand on the mainsheet, the other firmly gripping the helm, while a gust catches the sail. Suddenly, leaning out to balance your small boat or dinghy feels like a stretch. That's where the simple genius of a tiller extension comes into play. It's not just an accessory; it's your key to better control and comfort, letting you shift your weight aft or to the windward side without losing the ability to steer. For owners of boats like a Sunfish or any spirited dinghy, this tool transforms the sailing experience from a constant wrestling match into a more graceful dance with the wind.When we talk about the Ronstan Battlestick, we're discussing a standout piece of kit designed for exactly these moments. Its construction speaks to thoughtful engineering: a lightweight alloy section forms its core, while its unique fluted profile adds extra rigidity to this lightweight structure, preventing unwanted flex when you need precise control.
The connection point is where the magic of easy handling happens, typically through a urethane universal joint. This component, made from durable urethane or a rubber universal alternative, creates a flexible yet responsive link between the tiller and extension, allowing it to pivot smoothly without compromising your direct feel of the rudder.

Getting a secure, leak-free system on your boat is essential. Whether it's for fresh supplies or waste management, a proper setup ensures safety and prevents problems. This guide breaks down the installation into clear, manageable steps. We’ll cover everything from selecting parts to final testing. Follow along to complete a reliable and professional-quality job with confidence.
Understanding Vetus Tank Fitting Systems
Vetus designs specialized marine tank fittings. These systems manage waste water and drinking water. They are also suitable for diesel fuel storage. The components ensure secure and leak-free connections. Their design is robust for the marine environment. This makes them ideal for sailing applications. Installation often follows detailed YouTube guides.

As a system owner, you value reliable power. The question of leaving your inverter on arises naturally. Instant power access offers clear convenience. Yet, this constant readiness uses energy quietly. This idle drain can impact your battery bank over time. Finding the right balance is essential. This guide explores smart operation for your needs. We will help you maximize both performance and longevity.
Understanding How Victron Inverters Operate
Victron inverters change dc power into ac power. They provide clean pure sine wave output. This is safe for sensitive power electronics. The system draws from your battery bank. It can also connect to shore power. Solar charging can feed them too. Their operation is very efficient.

That small dial on your dash holds great power. The VDO temperature gauge is your engine's translator. It deciphers the silent language of heat. A rising needle is a direct warning cry. This system relies on a simple physical principle. Its sensor acts like a thermal storyteller. Head temp becomes a clear electrical signal. We will explain this elegant, vital communication. You will learn to trust your VDO temp gauge fully. It's the key to preventing costly breakdowns. Let's explore how it protects your engine every day.
Basics of a VDO Temperature Gauge
A VDO temperature gauge reads vital engine heat. It uses a dedicated temperature sensor. This sensor is often a thermistor. Its electrical resistance changes with heat. This change is sent to the gauge and sender unit. The gauge translates this into a clear reading. Drivers can then monitor their engine's thermal state.

Pairing your Lofrans windlass with the right anchor rode transforms your ground tackle from a collection of parts into a unified, dependable system. This partnership allows your electric windlass to work as designed, effortlessly managing the heavy lifting so you can focus on positioning. Getting this match right brings a satisfying simplicity to anchoring, whether you're preparing a weekend cruiser or a liveaboard vessel. A well-chosen anchor rode safeguards your windlass from strain, streamlines every retrieval, and builds confidence whenever you set the anchor.
From the commanding Lofrans Tigres windlass to the steadfast Lofrans Royal, each model is built with distinct components for specific tasks. The entire operation centers on two key parts at the bow: the windlass gypsy and the drum. Think of the gypsy as a tailored chain wheel; its notches are precision-cut to fit one specific chain size. Alongside it, the drum is dedicated to managing rope rode. Ignoring this engineered pairing invites trouble—slippage, rapid wear, or a groaning electric motor that can’t perform.

There's a certain rhythm to a day on the water—the steady hum of the engine, the feel of the hull cutting through the waves. That rhythm depends on a symphony of parts working together, and the marine ZF gearbox is a key player. Just like you wouldn't ignore your engine oil, giving attention to the transmission fluid and filter is what keeps everything in tune. This isn't about a complex repair; it's a straightforward act of preventative care, similar to a routine oil filter swap, that safeguards your investment and your peace of mind.Maybe you've noticed a subtle shift in performance, or you're simply following the sage advice to change the transmission fluid every 500 hours.
Whether you're a seasoned DIY enthusiast or embarking on your first transmission oil change, the process is within reach. The single most valuable tool on your workbench won't be a wrench—it will be your specific ZF manual. That booklet holds the blueprint, telling you exactly which Dexron-spec ATF your model needs and the nuances of checking the fluid level correctly.
Think of this service as giving your trans a refresh. You'll drain the old oil, replace the filter element (often housed in a filter housing on the transmission housing), and refill with pristine fluid. The goal is simple: to ensure that the next time you shift into gear, the response is as smooth as the day it left the factory. By following the steps laid out here and, most essentially, in your ZF manual, you’re not just performing maintenance—you’re preserving the joy of every future voyage.

Of all the sounds that define life on the water—the creak of lines, the slap of waves—there’s one that speaks of self-reliance and simple comfort: the dependable thump-thump of a manual galley pump. In the tight confines of a sailboat cabin or a cozy van conversion, where every component must earn its keep, a reliable source of fresh water is non-negotiable. Whether you're looking to replace a tired old water pump or install a brand-new system, taking on this DIY project connects you directly to the vital systems that make off-grid living not just possible, but pleasant.This guide will walk you through installing a Whale Gusher foot pump, a favorite among mariners and van life enthusiasts for its robust design and straightforward mechanics.
Unlike an electric pump, which hides silently behind a panel, this manual workhorse puts you in direct control, using a foot pedal to draw water from your water tank with satisfying mechanical certainty. The process is less about complex plumbing and more about careful positioning and secure connections. You’ll learn how to plumb the intake and outlet lines, where to tap into your cold water supply, and how to securely mount the unit underneath a cabinet in your galley.
Before you pick up a drill or a screwdriver, you’ll need to locate the ideal spot for your new pump, ensuring the foot pedal is accessible and the side of the pump ports are easy to reach for tubing. We’ll cover how to properly drain your system, install the necessary valve, and connect everything from the Gusher foot to the galley gusher spout. By the end, you’ll confidently know how to get water flowing with every press of your foot, mastering a key piece of galley pump craftsmanship.

Preparing for Victron Multiplus Installation
Begin by carefully selecting your installation location. Ensure proper ventilation for your victron multiplus inverter. Consider its weight and required clearances. Mount it securely to a solid chassis or wall. Verify the area is dry and clean. This prevents overheating and damage. Plan all dc wiring and ac wiring routes beforehand.

For anyone who has spent time on the water or on the road, the hum of a well-tuned power system is the sound of freedom. At the heart of this modern independence lies the Mastervolt system, an intelligent network where components converse seamlessly to manage energy. The magic happens on the Masterbus network, a dedicated communication protocol that allows devices to talk to each other and to you. It transforms a collection of individual parts into a cohesive, smart power system for your boat or RV, where information about voltage, battery status, and shore power flows effortlessly.So, which devices serve as the key communicators, putting essential data onto this digital backbone?
Central to this dialogue is the Mastervolt Mass Combi, a sophisticated inverter/charger that constantly reports on its operation and the state of your battery bank. For connecting the Masterbus communication line to the wider world of digital tools, the Masterbus to USB interface is indispensable.

Stepping aboard a vessel, there’s a subtle, reassuring rhythm to the sounds of the water. But a steady, unwanted gurgle from the lowest part of the hull tells a different story. That’s the distinct call of bilge water, a reminder that every boat relies on a silent, diligent guardian. Installing a reliable automatic bilge pump, like a Rule model, isn’t just a maintenance task; it’s an act of seamanship that provides real peace of mind, ensuring you stay afloat and dry whether you’re aboard or away.The process starts with choosing the right guardian for your bilge area.
Consider the volume you need to move—measured in gallons per hour—and the type of automatic operation you prefer, be it a unit with a built-in float switch or one paired with a separate float switch. Proper bilge pump mounting is the foundation for reliable performance, demanding a thoughtful approach to placement and attachment. You’ll be working in the often-confined space at the very bottom of the boat, so preparation is key. Begin by disconnecting the power supply and removing an old pump, if present, cleaning the surface thoroughly to ensure a solid base for the new Rule pump.

There's a moment every boat owner knows: that slight lean as passengers move to one side, or the stubborn bow-rise that blocks your view when you hit the throttle. You've probably felt it and maybe even asked about a fix on your favorite boat forum. The answer, often whispered with a nod toward performance, usually points in one direction: trim tab install. While the project might seem like a marine technician's secret, the truth is, with some care and the right steps, fitting Bennett hydraulic trim tabs is a rewarding DIY project that changes how your boat meets the water.
The heart of the system lies in two sleek stainless steel bracket and hinge assemblies that will live on your stern. The actuator mount connects to a robust piston, which is the muscle of the entire setup. The mission? To securely fasten these components onto the transom, matching the starboard and port sides with precision.
You'll be spending quality time at the bottom of the transom, marking and preparing to drill the holes through the hull. Whether you have an outboard or inboard setup, the principle is the same: a clean, well-planned installation on the bottom of the boat ensures those hydraulic trim mechanisms work their magic seamlessly. Following the guidance from Bennett Marine and taking your time to measure three times before any cutting or drilling will lead you to a professional-grade result. This process isn't about reinventing the wheel; it's about thoughtfully integrating smart engineering into your vessel's transom to unlock a smoother, more efficient, and safer ride.

Your Johnson outboard relies on a simple, self-powered genius: its fuel pump system. This critical component doesn't need batteries or complex electronics. Instead, it harnesses the engine's own rhythm to move johnson fuel from the tank to the carburetor. This guide will reveal the elegant mechanics behind this dependable workhorse, showing you exactly how a few small parts ensure your boat's reliable performance. Understanding this process is key to smarter maintenance and confident troubleshooting on the water.
Basic Role of the Fuel Pump
The mechanical fuel pump ensures proper fuel delivery. It moves fuel from the tank. This component creates essential pump pressure. A consistent pump pressure maintains engine operation. It overcomes system resistance for fuel to flow. The diaphragm pump action regulates the amount of fuel. This prevents fuel starvation in the outboard engine.

There's a special kind of peace found in a well-kept cabin, but stale, damp air can quickly disrupt it. Managing moisture and ensuring a steady stream of fresh air below deck is a common challenge for boat owners. This is where a self-sufficient solution comes into play: installing a Marinco solar vent. This compact, solar powered fan works silently to extract stale air, helping to prevent mildew and that closed-up smell, all without drawing from your vessel's main power supply.The process centers on creating a single, clean opening in your deck or cabin top to house the unit.
You'll be using a hole saw of the correct diameter to make this cut, a step that requires care but is straightforward with the right tools. The heart of the system is the integrated fan motor and solar cell, which are neatly packaged within a stainless steel housing designed to withstand the marine environment. Proper installation is key to its function and, critically, to preventing any future water intrusion around the fitting.

Feeling that winter chill inside your vehicle? Starting your Webasto heater shouldn’t be a puzzle. Whether you have a diesel heater for your camper van or an aux heater in your truck, the right steps ensure instant comfort. This guide cuts through the confusion. We’ll walk you through the simple process of turning on your Webasto air top or coolant heater, adjusting the temp, and troubleshooting common hiccups. Forget searching through endless forum posts—here’s everything you need to know for a smooth, warm start every time
Basics of Webasto Heater Operation
A Webasto heater provides independent cabin heating. This auxiliary heater burns diesel or gasoline fuel. Its key heating process involves a combustion chamber and glow plug. A dedicated pump supplies fuel from your vehicle's tank. The control unit manages the entire startup sequence and temperature. Proper installation and wiring are critical for safe operation. It efficiently warms the interior or engine coolant.
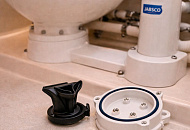
Your boat's reliable Jabsco manual marine toilet is a study in simple, functional design. Unlike its Jabsco electric counterpart, this system gives you complete command through its classic lever and sturdy pump assembly. This guide will help you master the essential twist and lock operations, understand the critical seacock, and ensure your holding tank works flawlessly. Let's get you comfortable with this vital piece of onboard equipment.
Understanding Your Jabsco Manual Marine Toilet System
Your Jabsco manual marine toilet is reliable. It uses a simple manual head pump. Operate the lever to flush. This action pulls sea water inside. It also pushes waste out. Proper use prevents common issues. Regular maintenance keeps it working.