

Sailors cherish reliable onboard hydration. This guide explores practical ways to handle pliable liquid holders from Plastimo. Discover steps for setup, daily use, and care. Navigate seas confidently with fresh water always. Essential boating hydration guide unlocks tank mastery. Follow these tips to avoid common pitfalls. Ensure smooth voyages with proper techniques. Your adventure awaits with knowledge.
Choosing the Right Tank for Your Vessel
Selecting the ideal flexible water bladder for your sailboat requires careful planning. First, measure the available space in your boat's hull accurately. Ensure that the inlet and outlet match your hose connections perfectly. Plastimo tanks provide flexible options for efficient water storage solutions. Opt for a triangular shape to fit odd corners effectively. This design helps maintain potable water quality onboard reliably. Flexible water bladder tanks offer versatile storage for sailboats. Check the weld on fittings for durability and strength. Routine cleaning prevents contamination issues from occurring.

Assessing Capacity and Shape for Your Space
Evaluate the gallon capacity needed for extended sail trips thoughtfully. A 13 gallons tank works well for small sailboats comfortably. Consider the hull shape to choose the best fitting option. Flexible designs adapt better than rigid water tanks easily. Use a triangular layout for maximizing odd spaces efficiently.
PVC water storage solutions enhance onboard efficiency.
This approach optimizes water storage without wasting room. Inlet fitting should align with your hose size precisely. PVC materials offer durability in marine settings reliably. Double envelope construction provides added protection against damage.
The Importance of the Drinking Water Safe Inner Bladder
The inner water bladder ensures potable water stays clean and safe. It protects against contamination during long voyages effectively. This feature is crucial for onboard health and well-being. Safe inner water bladder maintains purity onboard. Plastimo tanks incorporate high-grade PVC for safety standards. Routine cleaning extends the tank's useful life significantly.
- Shields against algae and bacteria buildup reliably.
- Allows easy access through inlet and outlet points.
- Offers a low cost solution for storage needs.
- Adapts to various hull shapes seamlessly and flexibly.
- Keeps water pure without rigid structures limiting options.
Benefits of a Flexible Tank Over a Rigid One
Flexible tanks bend to conform to irregular hull storage spaces easily. Unlike rigid tank options, they save valuable room onboard. This makes them perfect for sailboat applications practically. Flexible tanks for sailboats optimize space usage. Plastimo designs feature a double envelope system for protection. They provide superior shock resistance on the water reliably.
- Simplifies installation in tight hull areas without hassle.
- Reduces overall weight versus rigid water choices noticeably.
- Enables custom shapes like triangular for better fit.
- Eases routine cleaning and upkeep tasks conveniently.
- Delivers a cost-effective water container alternative affordably.
Initial Setup and Installation
Start by inspecting your new Plastimo flexible water tank carefully. Ensure all fittings are intact before use. Measure the space in your boat's hull precisely. Match the inlet to your hose size exactly. Flexible water bladder tanks adapt to irregular shapes easily. Connect hoses securely to avoid leaks. Test for any air bubbles in the system. Place the tank in a stable position initially.
Unpacking and Preparing Your New Tank
Open the package and remove the pvc water chamber gently. Check for any manufacturing defects immediately.
Rinse the inner bladder with clean water thoroughly.
Avoid using harsh chemicals during cleaning. Inflate the tank slightly to check for holes. Dry it completely before installing. Ensure the bow tank area is clean. Label the inlet and outlet for easy access. Store in a cool place until ready.
Finding the Perfect Location in the Galley or Bilge
Choose a spot away from heat sources. Ensure good ventilation in the galley area. Avoid placing near sharp objects. The bilge offers space for larger tanks. PVC water storage solutions fit odd corners well.
- Select flat surfaces for stability.
- Prioritize areas with easy hose routing.
- Consider proximity to water pumps.
- Check for bilge drainage access.
- Opt for dry, shaded locations.
Securing the Tank to Prevent Movement at Sea
Use straps to hold the tank firmly. Tie down to boat fixtures securely. Prevent shifting during rough waves. Check straps regularly for wear. Flexible tanks for sailboats reduce damage risks.
- Employ velcro for quick attachment.
- Add padding under straps.
- Test stability with gentle rocking.
- Secure near the bow tank.
- Monitor for leaks post-installation.
Filling and Using Your Water Tank
Begin by locating your vessel's refill point carefully. Ensure the pouch is empty before starting. Open the cap on the storage bag slowly. Pour in pure liquid from a clean source. Pliable liquid holders conform to tight spaces perfectly. Monitor the level to avoid overfilling. Seal everything tightly after adding. Use the contents for daily needs onboard.
Connecting to Deck Fills and Water Lines
| Step | Description | Tip |
|---|---|---|
| Prepare Tools | Gather hose clamps, connectors, and sealant. Ensure all parts are clean. Secure connection essentials ready for assembly. | Wipe fittings with a damp cloth first. |
| Locate Deck Inlet | Find the onboard entry point for liquids. Check alignment with your vessel's layout. Deck access points guide proper linking. | Measure distances to avoid kinks. |
| Attach Hose | Connect flexible tubing to the tank's port. Tighten fittings without overdoing force. Tubing linkage process ensures smooth flow. | Use pliers for stubborn nuts gently. |
| Secure to Deck Fill | Link the hose end to the deck opening. Apply sealant around joints for tightness. Fill port integration prevents drips. | Test for leaks with low pressure initially. |
| Connect Water Lines | Join to pump or faucet systems onboard. Ensure valves are open for testing. Line attachment steps complete the setup. | Label connections for future reference. |
| Verify Flow | Run a small amount of water through. Observe for any blockages or seepage. Flow verification routine confirms functionality. | Adjust clamps if needed promptly. |
| Final Check | Inspect all junctions after dry run. Store extras in a safe spot. Setup completion check boosts reliability. | Note any unusual smells immediately. |
The Correct Procedure for Filling with Fresh Water
Start by choosing a reliable pure liquid source. Position the vessel near the fill area. Open valves slowly to prevent splashing. Fill gradually while watching for overflow. Adaptable storage pouches fit various refill methods easily.
- Use a funnel for narrow openings.
- Stir gently to remove air pockets.
- Close valves once full.
- Wipe away any spills immediately.
- Store in a shaded spot post-fill.
Drawing Water for Galley and Drinking Use
Access the vessel from the kitchen area. Open the tap on the line carefully. Let liquid flow into your container. Taste a small sample for quality. Versatile onboard reservoirs provide easy access anytime.
- Use filtered cups for safety.
- Monitor usage to avoid depletion.
- Close taps when not in use.
- Clean dispensers after each draw.
- Refill as needed during voyages.
Maintenance and Cleaning Best Practices
Start by emptying the pouch completely each time. Rinse with mild soap and clean water thoroughly. Dry it fully in a breezy spot outdoors. Pliable liquid holders need regular upkeep for longevity. Store in a cool, dry area away from sunlight. Check seals often to spot early issues. Avoid harsh chemicals that might damage materials. Wipe surfaces gently with a soft cloth always.
How to Keep Your Drinking Water Supply Fresh
Begin by using only pure sources for filling. Add a bit of vinegar occasionally to inhibit growth. Store in shaded areas to prevent warming.
Versatile onboard reservoirs stay cool longer in cool spots.
Rotate contents by using older supplies first. Inspect for any unusual odors regularly. Seal openings tightly after each use. Change filters if connected to lines. Keep an eye on temperature changes onboard.
Winterizing and Storing Your Flexible Bladder
Prepare by draining all liquid before cold weather. Rinse with antifreeze solution gently inside. Fold neatly to save space in storage. Adaptable storage pouches handle winter prep easily. Keep away from freezing temperatures completely.
- Use non-toxic antifreeze for safety.
- Inspect for tears before folding.
- Store upright in a dry shed.
- Label with dates for tracking.
- Unfold slowly when reusing.
Inspecting for Wear and Potential Leaks
Look closely at seams for any thinning. Feel for damp spots around edges carefully. Test pressure by filling partially and checking. Durable liquid carriers withstand regular checks well. Replace worn parts promptly to avoid issues.
- Shine a light inside for visibility.
- Press gently on surfaces for bulges.
- Note any unusual smells immediately.
- Dry thoroughly after inspection.
- Record findings in a logbook.
Troubleshooting Common Issues
Begin by checking all connections for tightness. Listen for unusual sounds during use. Feel surfaces for unexpected warmth or dampness. Reliable onboard containers often face basic hiccups. Test flow rates at different times. Note any changes in water taste. Inspect hoses for kinks or blockages. Consult manuals for specific model advice.
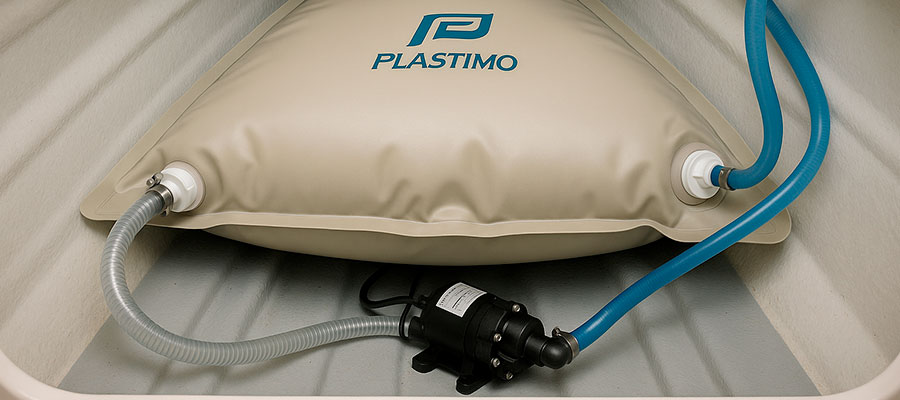
Dealing with Airlocks in the Water System
Start by priming the pump manually if possible. Open faucets fully to release trapped air. Tilt the unit slightly to help bubbles escape.
Efficient liquid storage units minimize air buildup.
Run water in short bursts repeatedly. Install vents at high points for prevention. Use a small tool to tap lines gently. Monitor pressure gauges for imbalances. Refill gradually after clearing airlocks.
What to Do If the Tank Develops a Smell
First, empty and rinse with vinegar solution. Scrub interiors using a soft brush carefully. Dry fully in open air afterward. Odor-free sailing essentials require thorough cleaning. Add baking soda for extra freshness.
- Soak in diluted bleach briefly.
- Rinse multiple times with pure water.
- Ventilate storage area well.
- Replace filters if odors persist.
- Test smell after a week.
Identifying and Fixing Connection Leaks
Locate drips by running water slowly. Tighten fittings with a wrench gently. Apply thread tape for better seals. Leak-proof marine holders ensure safe voyages. Check gaskets for wear regularly.
- Mark wet spots with chalk.
- Replace damaged parts promptly.
- Test seals under pressure.
- Use silicone caulk on joints.
- Reassemble and monitor closely.
Maximizing the Lifespan of Your Tank
Start by rinsing after every voyage gently. Store in a shaded spot to avoid fading. Handle with care during setup always. Durable marine pouches last years with attention. Clean seals regularly to prevent wear. Avoid overfilling to reduce strain. Inspect monthly for minor issues. Use soft cloths for wiping surfaces. Capacity up to 13 gal helps plan trips.
Proper Stowage When Not in Use
Empty completely before long-term storage. Fold neatly to save precious space. Place in a dry, cool shed.
Space-saving liquid carriers fit tight compartments.
Label with dates for easy tracking. Keep away from heat sources entirely. Cover with a cloth for dust. Check periodically for moisture buildup. Unfold slowly when ready again.
Protecting the Bladder from Sharp Objects
Keep away from tools and gear edges. Pad surroundings with soft materials. Inspect storage areas before placing. Sharp-object-safe vessels endure rough handling. Move cautiously in tight spots.
- Line shelves with foam mats.
- Avoid stacking heavy items nearby.
- Use protective wraps during transit.
- Check for protrusions regularly.
- Store in dedicated padded bins.
When to Consider Replacing Your Flexible Water Tank
Watch for persistent leaks despite fixes. Note if material feels thin or brittle. Check for odors that won't vanish. Time-for-new units signal end of life. Evaluate after major repairs frequently.
- Count visible wear on seams.
- Test capacity drops over time.
- Monitor taste changes in contents.
- Consult experts for deep damage.
- Budget for upgrades annually.

