

Boating enthusiasts know that maintaining a vessel means prioritizing safety features to handle unexpected challenges on the water. One such essential component is the bilge pump, which automatically removes accumulated water from the boat's hull to prevent flooding and potential sinking. Installing this device isn't just a technical task - it's a proactive step that can make the difference during storms or leaks. In the following guide, we'll explore the detailed process for setting up a bilge pump, tailored for both beginners and experienced boat owners. From gathering the necessary materials to securing proper electrical connections, each step is designed to ensure reliability and longevity. Remember, a well-installed bilge pump not only protects your investment but also gives you peace of mind when venturing into unpredictable marine environments. Let's begin by equipping you with the knowledge to transform your boat into a more seaworthy craft.
Planning Your Bilge Pump Installation
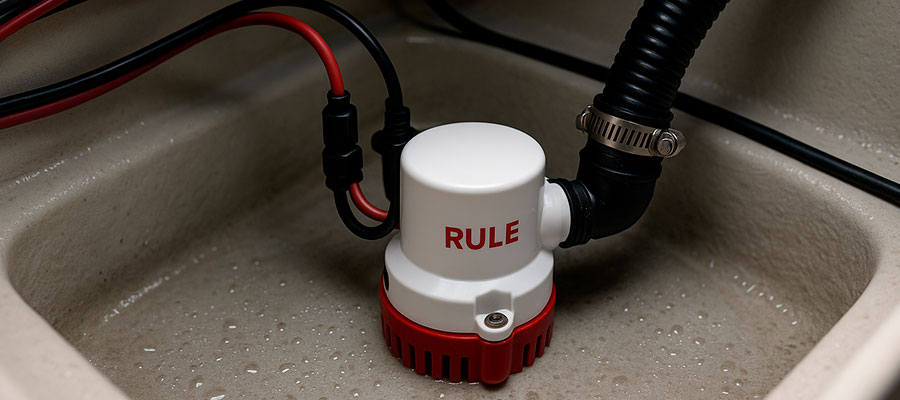
Kicking off your bilge pump install demands careful preparation to avoid mishaps on the water. First, inspect your boat thoroughly for any issues with the old pump before introducing a new one. If you're eyeing a rule automatic model, ensure it fits your vessel's needs seamlessly. Discuss options on a boating forum to gather real-world insights from fellow boaters. Think through whether you want a primary bilge system or to add a backup for extra peace of mind. Powering it directly to the battery simplifies setup and boosts reliability. Don't overlook pump wiring details to prevent electrical glitches. Finally, gather all materials upfront, including a mounting pad for secure placement.
Selecting the Optimal Location in the Bilge
Picking the right spot for your pump in the bilge can make or break its performance. Start by examining the bilge floor to find a flat, accessible area. Avoid placing it near fuel lines or sharp objects that could cause damage. A central location helps draw in bilge water more evenly. Under an open hatch improves accessibility for maintenance.
A key step is securing the pump to a mounting pad coated in epoxy to withstand vibrations and moisture.
Position the float switch away from hull curves for accurate readings. If it's a rule automatic setup, angle it slightly for better efficiency. Consider bilge depth to ensure enough water reaches the pump. Test different spots virtually before drilling holes. Double-check with forum tips from experienced boaters. This thoughtful choice keeps your boat drier and safer.
Choosing the Correct GPH Rating for Your Boat
Figuring out the ideal GPH for your automatic bilge pump starts with boat size. Smaller boats like dinghies might need under 500 GPH. Larger yachts could benefit from rates over 1500. Think about typical bilge water volumes in rough weather. A 12V system pairs well with higher ratings for speed. Factor in whether you prefer auto mode or manual switch control.
- Opt for 500 GPH if your boat is under 20 feet and sees light use.
- Choose 750 GPH for mid-sized vessels needing quick drainage in storms.
- Go with 1100 GPH for cruisers handling heavier loads or choppy seas.
- Select 1500 GPH as a premium pick for big yachts with constant water challenges.
- Include a backup bilge pump at half capacity for emergency support.
Gathering Necessary Tools and Materials
| Item | Brief Clarification | Approximate Count | Rationale for Inclusion |
|---|---|---|---|
| Marine-grade bilge pump unit | A waterproof submersible pump engineered to evacuate liquids efficiently, often featuring an automatic switch for convenience. | 1 | This core device is foundational, ensuring the system automatically kicks in when water levels rise. |
| Multi-gauge wiring harness | Insulated electrical cables with varied thicknesses, designed to handle marine moisture without corrosion. | 1 set | Essential for linking the pump to the boat's power supply while safeguarding against short circuits in salty environments. |
| Inline fuse assembly | A protective circuit interrupter that blocks excessive current flow, typically 10 to 20 amps rated for aquatic protection. | 1 | Acts as a safety net to avert system damages or fire hazards from electrical surges on board. |
| Hose tubing with clamps | Flexible, durable conduits accompanied by securing fasteners, resistant to seawater degradation. | 3-5 meters | Channels extracted water away from the hull, requiring firm attachments to prevent leaks during operation. |
| Sealant compound for joints | Non-toxic adhesive material that creates waterproof bonds, ideal for submerged use. | 1 tube | Guards against seepage at connection points, maintaining the integrity of the drainage pathway. |
| Voltage tester gadget | A handheld diagnostic tool for verifying electrical continuity and output in marine circuits. | 1 | Confirms proper setup before activation, reducing risks of improper installations. |
| Mount bracket and fasteners | Adjustable mounting hardware with stainless steel screws and washers for stable fixation. | 1 kit | Ensures the pump remains securely positioned in the bilge area, enduring vibrations from waves. |
| Personal protective gear kit | Items like gloves and safety goggles tailored for wet, messy DIY tasks in confined spaces. | 1 set | Protects the installer from sharp edges, slippery surfaces, and potential irritants in a boat's underbelly. |
Mounting the Pump Securely
Begin by placing the new pump on the bottom of the bilge for stability. Ensure the surface is clean and ready before starting. Attach the pump base firmly to avoid shifts. Use screws that suit your boat's material. Double-check for leaks after fastening. Test the fit by gently shaking the setup. Add sealant if needed for waterproofing. This secure step keeps your boating safe.
Preparing the Mounting Surface
Getting the surface ready ensures a smooth bilge pump install. Start by cleaning the bottom of the bilge thoroughly. Remove any old debris or residue from previous parts. Sand the area lightly for better adhesion. Dry it completely to prevent moisture issues. Always choose a spot that's flat and accessible.
- Wipe down with a damp cloth first.
- Use sandpaper to roughen the surface gently.
- Apply primer if the material needs it.
- Allow everything to dry fully before proceeding.
- Inspect for cracks that might need repair.
Securing the Pump to Prevent Movement
Sticking the pump tightly stops unwanted shifts during rough seas. Position it centered for balance. Fasten with bolts that don't corrode quickly. Wrap connections with tape for extra hold. Shake the boat model to simulate waves. These steps give you peace of mind on the water.
- Use stainless steel anchors for durability.
- Add rubber washers to absorb vibrations.
- Tighten screws in a star pattern.
- Seal edges with marine-grade adhesive.
- Verify tightness with a tool check.
Ensuring Proper Alignment for Efficient Operation
Proper setup improves how the new rule drains water. Angle the pump slightly toward the lowest point. Check the float for clear movement range. Position wires to avoid kinks or bends. Test suction by simulating water flow. Ensure outlets face the discharge hole. This careful placement boosts overall performance.
A critical detail is aligning the intake screen at the lowest bilge level for guaranteed suction.
Adjust the chain if it's too tight loose. Confirm no obstructions block water entry. Reassess after a trial run on land. Experienced boaters swear by this finetuning step. This alignment keeps your vessel dry and ready.
Electrical Connections and Wiring
Hooking up the wires is a key part in your rule bilge pump setup. First, gather your 12v power supply and tools. Strip the ends of wires carefully. Connect the positive wire to the red lead. Attach the negative to a ground point. Use pump wiring that's marine-rated for safety. Double-check polarity to avoid sparks. Seal joints with tape for protection. Test connections before powering on. This ensures reliable operation on the water.
Running Wires to the Battery with Correct Fuse
Laying wires from the pump to the battery requires careful routing. Choose a path that avoids sharp bends. Shield wires with conduit for extra security. Install a fuse near the battery for safety. Use thick gauge wires to handle 12v loads. Route them away from hot engine parts.
A crucial step is verifying the fuse amperage matches your pump's draw.
Test continuity with a multimeter beforehand. Secure wires with clips every few feet. Label connections for easy future checks. This setup protects against electrical mishaps. Experienced sailors recommend this wired approach. You'll gain peace of mind at sea.
Creating Waterproof Connections with Heat Shrink
Making waterproof links is vital for outdoor pump installations. Heat shrink tubing protects wires from moisture. It shrinks tightly when heated. Choose marine-grade options for durability. Apply it over soldered joints for sealing. This method prevents corrosion in wet areas. Always use a heat gun cautiously. Proper shrinkage creates a snug fit.
- Strip wire ends about half an inch.
- Join wires with solder cleanly.
- Slide tubing over the connection fully.
- Apply even heat until it seals.
- Inspect for gaps after cooling.
- Use multiple layers for high exposure.
Using the Provided Connector for Easy Service
The included plug simplifies future maintenance on your pump. It allows quick disconnection without tools. Attach it directly to the pump wires first. Ensure the pin alignment is correct. Push it firmly into place. This setup lets you service without splicing. Store the connector cap when not in use. It protects contacts from moisture. Sailors like this for hassle-free upgrades. Detach it during winter storage too. Reconnect by matching the keyway. Always clean contacts before plugging back in. This feature saves time and frustration.
Installing the Discharge System
The discharge setup moves water out of your boat effectively. Start by selecting fittings that match your pump size. Connect the outlet directly to the hose end. Use clamps for a tight seal around joints. Position components away from moving parts. Test the flow by adding water manually. Check for drips after a trial run. This reliable system keeps your hull dry during trips.
Attaching and Routing the Discharge Hose
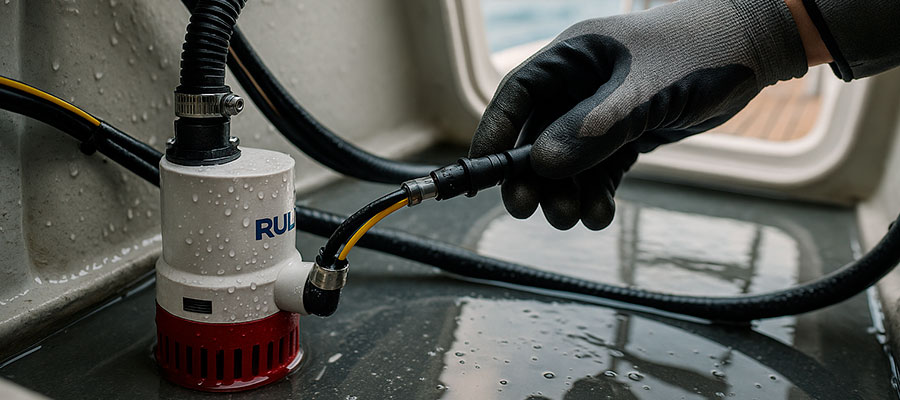
Secure the hose firmly to the pump outlet first. Choose a flexible material that bends easily. Route it upward to avoid pooling spots. Fasten it along the hull with ties every foot. Keep bends gentle to maintain water flow.
Position the hose high enough above the waterline to block backflow.
Avoid sharp kinks that could slow drainage. Extend it to your chosen exit point. Seal connections with rubber gaskets. Inspect the path for rubbing against edges. This careful routing ensures smooth operation every time.
Drilling the Through-Hull for the Waterline
Choose a spot on the hull above the lowest water level. Mark the center precisely with a pencil. Use a hole saw bit suited for fiberglass. Drill slowly to prevent cracking the surface. Wear safety glasses during the process. Insert the fitting snugly into the new hole. Apply sealant around the edges for waterproofing. Tighten the nut from inside the boat. Smooth any rough spots with sandpaper. Test for leaks by filling the area. This step creates a clean pathway for water exit.
Preventing Siphoning with Proper Loop Installation
A high loop in the hose stops water from flowing back in. It breaks the suction path effectively. Place it near the highest point in the route. Secure it firmly to maintain the shape. Use supports to keep it elevated.
- Measure the height needed for your boat's design.
- Form the loop using hose clamps.
- Position it before the discharge exit.
- Check it stays above sea level always.
- Test by tilting the setup sideways.
- Adjust if water still pulls back.
Integrating the Automatic Switch
Adding a self-activating sensor keeps things simple on your boat. Connect the sensor to the main unit carefully. Place it at the right depth for detection. Ensure it floats freely in the well. Check alignment with the float level. Secure it without restricting movement. Test the link with a quick press. This sensor starts pumping when water builds up. It stops once levels drop safely.
Understanding How the Built-In Switch Works
The built-in mechanism senses rising fluid in the compartment. It uses a floating element to trigger activity. When water reaches the float, it tilts and closes contacts. This sends power to the motor for operation. The design prevents constant running without need. It resets when lows are below the trigger point. Materials resist rust in damp environments. This keeps battery consumption low during use. Sailors trust it for uninterrupted trips. It adapts to gentle waves without false starts. Overall, it protects against flooding quietly.
Testing Automatic Activation
Verify the system before full use on the water. Fill the compartment slowly with water. Watch for the float to react as it rises. Listen for the motor to kick in promptly. Note how long it takes from start to finish. Empty manually and repeat the check. Observe if it shuts off at the right level. Adjust position if needed for accuracy. Record battery drain during operation. This step confirms reliability in real scenarios.
Ensure the float trips consistently every time tested.
Run it multiple times to spot issues. Use a container to simulate boat conditions.
Adding a Manual Override Switch
A manual control gives you extra options during trips. Connect it parallel to the self-activating setup. Position it in an easy reach spot. Use two leads for simple on-off action. Label it clearly for quick identification. This helps in case auto sensors fail.
- Strip and join the leads securely.
- Attach to a panel for accessibility.
- Run power through with a breaker addon.
- Toggle to test independent function.
- Seal against spray for durability.
- Combine with auto for flexible operation.
Final System Verification
Gather all components to double-check your setup. Look over connections for loose spots. Ensure the float mechanism moves smoothly. Confirm all clamps hold tightly. Test switches for easy activation. Check for any debris in pathways. Run a dry mock test. This step prevents surprises on the water.
Testing Pump Operation Before Final Use
Power up the unit with an external source. Allow it to prime if possible. Monitor the flow in a bucket. Time how quickly water moves. Adjust angle for best results. Let it run for several minutes. Stop and inspect internals. Repeat to ensure consistency.
The key is observing uninterrupted function under load.
This confirms reliability in varied conditions. Make notes on noise levels. Clean after each trial.
Checking for Leaks and Proper Water Flow
Inspect joints after assembly for any wetness. Fill the system with fluid to pressurize. Observe for drips over time. Listen for unusual sounds indicating issues. Pace yourself to spot all points thoroughly.
- Tighten any loose fittings immediately.
- Use tape on threads if seepage persists.
- Redirect flow if paths seem blocked.
- Refill and recheck in a calm spot.
- Document findings for future reference.
Verifying Electrical System Performance
Plug in the power supply safely. Watch voltage display for stability. Test amperage draw during brief runs. Ensure connections feel solid. Practice turning on and off. Measure draw under simulated load. Confirm no heat buildup at joints. Check for erratic power drops. Use meters to validate readings. Run diagnostics with voltmeter. This guards against electrical mishaps. Record all values for logs.

