
Your Johnson wash down pump has quit. This leaves you with a key question: can it be fixed? Many failures are repairable with some know-how. This guide provides clear steps to find your answer. We will help you diagnose common issues. You'll learn to identify if a simple rebuild kit is the solution. We'll cover when a pressure switch or other replacement parts are needed. You'll also see when buying a new one is wiser. Follow our process to save time and money. Turn this breakdown into a successful fix.
Understanding Johnson Washdown Pumps
A wash down pump supplies water for deck cleaning. These pumps are designed for marine environments. They often use raw water from nearby sources. This means they draw directly from the sea or lake. The system creates pressure for a strong hose stream. Johnson models are known for their reliable performance. They are a common choice for boat owners.
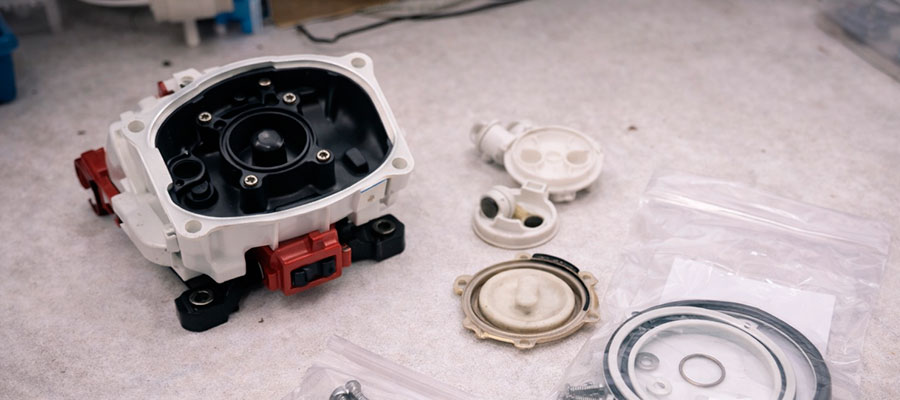
How a washdown pump works on a boat wash system
The pump is connected to a through-hull intake. It pulls raw water inside when activated. A pressure switch automatically controls the pump's operation. Opening the deck hose nozzle drops the pressure.
This signals the pump motor to start running.
Closing the nozzle makes it stop. The water flows through a filter first. This protects the internal parts from debris.
Common Johnson pump models used as washdown pumps
Specific Johnson models are favored for this duty. They share traits with brands like Jabsco and Shurflo. Many boaters find them at retailers like West Marine. Popular models are often discussed on any boating forum.
Common models include:
- Johnson Pump Ultima
- Johnson Pump Aqua Jet
- Older rubber impeller models
Typical symptoms that suggest a repair is needed
Listen for unusual noises from the pump. Check for a lost prime or low water pressure. The pump may run but not move water. A tripped breaker can indicate a serious fault. Often, a simple rebuild is possible.
Key signs include:
- Continuous cycling or rapid clicking
- Visible leaks from the housing
- No power at the wire connections
- Corrosion on the pump housing
- Need for a new pressure switch
- Assessing Whether Repair Is Possible
When a Johnson washdown pump can be repaired vs. replaced
Start by diagnosing the exact issue. A repair is often best for minor problems. Common failures include worn seals or a bad pressure switch. A corroded housing may still be salvageable. Replacement is needed for a seized motor. A full rebuild may not be cost-effective. Check the availability of specific replacement parts. A very old model might need a new one.
Inspecting the motor, pump head, and hose connections
First, disconnect all electrical power. Visually check the entire water pump housing. Look for obvious cracks or deep corrosion. Listen for a humming motor without movement. Feel all hose connections for leaks.
Key inspection points are:
- Motor terminals for green corrosion
- The pump head gasket condition
- Impeller wear inside the head
- Cracks on either side of the pump
- Loose or cracked inlet/outlet fittings
Safety checks before starting any repair work
Safety is your absolute first priority. Always disconnect the boat's battery. Verify the pump's circuit breaker is off. Confirm you have the correct rebuild kit. Ensure you work in a dry, stable area.
Essential checks include:
- No power at the pump wires
- Water intake seacock is closed
- You have protective gloves and eyewear
- All tools are ready and organized
- The work area has good ventilation
- Using a Repair or Service Kit
Using a Repair or Service Kit
A service kit restores function to your pump. It contains essential wear items. Using the correct kit ensures proper fit. This is more economical than buying a new one. Always match the kit to your exact model. The kit targets internal components that fail. This approach saves money and time.
What’s usually included in a Johnson pump service kit
A typical kit has several crucial parts. You will find new seals and gaskets inside. Many kits include a fresh diaphragm or impeller. Small hardware like screws is often provided. Check for valve flaps if your model uses them. Some kits contain a new housing cover gasket. These parts address common leaks and pressure loss.
A proper service kit solves most mechanical failures.
Replacing valves, diaphragms, or seals in the pump
Clean the pump head thoroughly first. Carefully remove the old, worn components. Note the exact orientation of each part. Lay the new parts next to the old ones. Ensure every surface is clean and dry. Apply a light film of silicone grease. This lubricates and protects the new seals. Always follow the specific kit instructions precisely.
Key steps for replacement are:
- Gently pry out old valve flaps
- Inspect the sealing surfaces for grooves
- Carefully stretch the new diaphragm into place
- Press seals evenly into their channels
- Avoid twisting or bending new components
Reassembling the washdown pump after installing new parts
Work slowly and double-check alignment. Ensure every gasket sits perfectly in its groove. Tighten screws evenly in a criss-cross pattern. Do not over-tighten the small fasteners. Finally, reconnect the wires and hoses.
Key reassembly steps include:
- Verifying the diaphragm is not pinched
- Confirming all seals are seated properly
- Checking the impeller spins freely by hand
- Ensuring the housing halves mate evenly
- Reconnecting the outlet hose securely
Motor and Electrical Troubleshooting
Electrical issues are a common pump problem. Start by checking the simplest causes first. Work methodically from the power source. This process is straightforward for most boaters. Patience is key during electrical diagnosis. A multimeter is your best friend here. Avoid jumping to conclusions about the motor.
Checking power supply, switches, and fuse protection
First, locate the pump's circuit breaker or fuse. Ensure the battery switch is fully on. Test for voltage directly at the pump's terminals. Corroded wires can interrupt the connection. Check any dash-mounted toggle switches for function. A bad ground connection mimics a dead motor. Clean all electrical contact points you find.
Use a multimeter to confirm power is arriving.
Testing the motor for overheating or failure signs
A motor can fail mechanically or electrically. Smell for a distinct burnt odor first. Feel the motor housing for excessive, recent heat. Listen for a humming sound without movement. A seized shaft will not turn freely. Look for water intrusion inside the motor housing. Corrosion on the armature is a bad sign. These indicate potential motor failure.
- A seized impeller can overload the motor.
- Check for continuity in the motor windings.
- Look for blackened or melted wire insulation.
Repair options when the motor no longer runs
Sometimes the motor itself is the problem. A simple brush replacement might fix it. Severe overheating usually requires a new motor. Check if a replacement motor assembly is sold. Often, buying a new pump is easier.
Key options to consider:
- Purchase a new motor from the manufacturer.
- Swap the entire unit for a new model.
- Use a compatible motor from another brand.
- Evaluate the cost versus a full pump.
- Ensure the new motor's specifications match.
Hose, Fittings, and System Maintenance
Many problems start outside the pump housing. Always check the full water flow path. A blocked hose reduces pressure dramatically. Debris often enters during a raw water wash. Regular visual checks prevent major issues. Simple maintenance ensures long pump life. Start at the through-hull fitting first.
Inspecting the hose, strainer, and inlet side for blockages
First, ensure the water intake seacock is closed. Remove the hose from the pump's inlet side. Check the strainer basket for leaves or sand. Shine a light into the hose itself. Feel for any soft debris blockages.
Inspect the through-hull fitting from outside.
Marine growth often clogs this area. A clean strainer is crucial for operation.
Fixing leaks at hose clamps and threaded fittings
Leaks cause air suction and pressure loss. Tighten hose clamps with a screwdriver first. Check if the rubber hose is cracked or hardened. Replace any old, brittle hose sections. Use marine sealant on threaded fittings if needed. Always use double clamps below the waterline. Ensure the pump housing connections are dry. Never overtighten plastic or brass fittings.
- Inspect all hose clamps for rust.
- Look for salt crystallization at joints.
- Replace any stripped or cross-threaded fittings.
- Use a wrench to check nut tightness.
Routine maintenance tips to keep the washdown pump reliable
Flush the system with fresh water occasionally. This prevents salt and mineral buildup. Operate the pump briefly every few weeks. Listen for any new or strange sounds. Store your boat with a dry pump system. A simple routine prevents most failures.
- Close the intake seacock after each use.
- Visually inspect the pump monthly.
- Keep the strainer basket clean and clear.
- Check wire terminals for green corrosion.
- Lubricate any visible o-rings annually.
When Replacement Is the Better Option
Sometimes, a full replacement is smarter. An old, heavily corroded housing suggests this. Multiple simultaneous failures also indicate replacement. Severe internal damage is often not repairable. Newer models offer better efficiency and performance. Your time has significant value too. Weigh all factors before deciding.
Cost comparison between repair, kit parts, and a new pump
| Consideration | Repair with a Rebuild Kit | Buying a New Pump |
|---|---|---|
| Upfront Parts Cost | Low to Moderate. Kit price is typically lower. | Higher. You pay for a complete, new unit. |
| Labor & Time Cost | High. Requires your skill, tools, and time. | Low. Simple removal and installation. |
| Scope of Fix | Limited. Only addresses parts in the kit (seals, gaskets). | Comprehensive. Every component is new and warranted. |
| Resulting Reliability | Variable. Depends on wear of non-kit parts like the motor. | High. Starts a new lifespan with full performance. |
| Best For... | Pumps with a single, known fault and recent motor. | Older pumps, multiple failures, or corroded pump housing. |
Upgrading to a newer Johnson washdown pump model
Newer pumps often have improved motor designs. They may offer higher pressure or better flow. Modern materials resist corrosion more effectively. Electrical connections are frequently more user-friendly. Upgrading can solve chronic performance issues. Research current Johnson pump specifications online. Ensure the new model fits your existing space. Always check the required amp draw first.
- Compare the GPM (gallons per minute) rating.
- Verify the new pump's voltage matches your system.
- Check the physical mounting footprint size.
Environmentally responsible disposal of old pump components
Do not simply discard the old pump. Metal parts should be recycled properly. Check local regulations for electronic waste disposal. Some marine shops may accept old units. Proper disposal prevents harmful environmental contamination.
- Remove plastic components for separate recycling.
- Take the motor to an e-waste facility.
- Recycle metal housing and fittings as scrap.
- Never toss old parts into general trash.

