

That dependable Polyform sphere in your hands isn't ready for duty until it's filled with air. This isn't just about making it round; it's about awakening its ability to absorb impact and provide security. The true goal is to reach that sweet spot where the material is fully engaged yet retains a forgiving flexibility, ready to do its job without fail.
Ditch the old method of pumping until it feels hard. Your success lies in a more precise partnership between your tools and the manufacturer's data. The critical step is to cross-reference your live measurements with the official Polyform inflation chart for your specific product. Locate this chart on the Polyform US support site before you start—this single reference turns inflation from an art into a repeatable science, especially when you’re miles from a calibrated gauge.
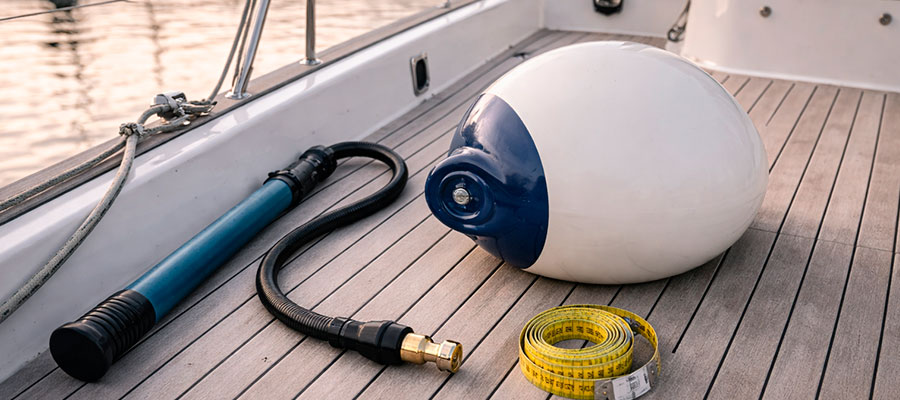
Execution is straightforward. Begin by mating the correct inflation adapter to your pump's hose, if needed, then insert the inflation adapter into the valve opening on the ball with a firm, straight push. Use your hand pump in a steady rhythm, stopping every few strokes to assess progress. Don't just feel it; measure it. Wrap your tape around the widest part and compare it to the chart measurement. You've reached perfection when the numbers match and you can still depress the wall of the buoy or fender about an inch with moderate thumb pressure, signaling it's firm but not strained.
Understanding Polyform Fenders and Buoys
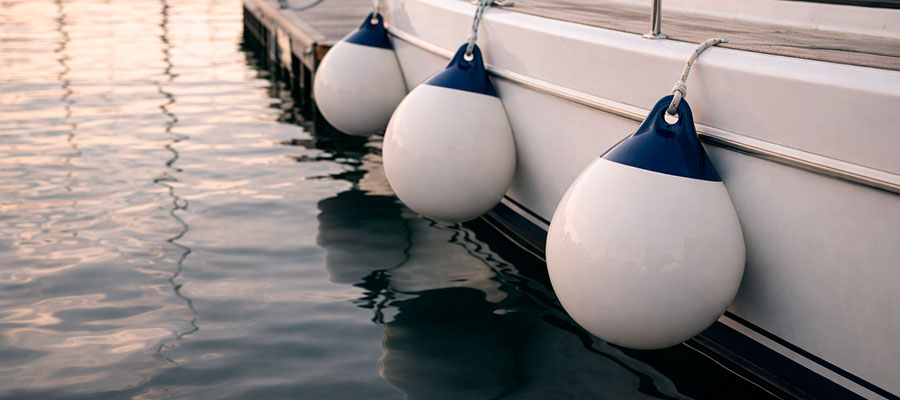
Consider these inflatable components as the primary defense for your vessel’s exterior. Each Polyform product is engineered to withstand direct contact with piers, other boats, or rough surfaces, dissipating force that could otherwise cause visible damage. The variety of forms and dimensions available reflects the diverse demands of different watercraft—from lightweight tenders to substantial cruisers. Selecting the appropriate model involves aligning its cushioning capacity with the mass it must protect, establishing a durable yet forgiving barrier.
Differences between a Polyform fender and a Polyform buoy
To the untrained eye, a Polyform fender and buoy appear nearly identical, but their core purposes diverge significantly on the water. A fender functions as a dedicated impact shield; its role is to be interposed directly between your vessel’s hull and any potential hazard, absorbing collisions to prevent damage. It is specifically rigged to hang in place. Conversely, a buoy acts as a floating reference point or a secure attachment hub, often left to drift for marking locations or providing a tie-off for lines.
You could press a buoy into service as a temporary fender, but its characteristic round or oval geometry does not provide the optimal surface area for side-on protection. Fenders are generally shaped into cylinders or panels to present a wider, more effective buffer zone against the boat's side. Each is constructed from resilient material, but selecting the correct tool for the job is fundamental for achieving reliable results and maximizing its usable life.
How fenders and buoys protect your boat
They act as a sacrificial cushion, taking the scrape and jolt that would otherwise dent your gelcoat or damage your hull. By distributing the force of an impact over a larger, softer area, they prevent concentrated pressure points.
- Their flexible material absorbs and dissipates energy.
- They create a physical buffer zone between your boat and any hard object.
- Properly deployed, they maintain your boat's position without direct, damaging contact.
Common types of Polyform boat fenders and their uses
| Fender Type | Best For |
|---|---|
| Cylindrical | General, everyday protection against dock walls and pilings. Their shape allows for easy vertical adjustment. |
| Low-Profile / Flat-Sided | Boats with straight hull sides. The flat panel maximizes contact area and prevents rolling. |
| Spherical | Multi-directional protection in tight spaces, ideal for bow/stern or as a versatile mooring buoy. |
| Step-Cylinder | Locking a fender into a set position on a piling or dock edge, preventing it from sliding up or down. |
Preparing for the Inflation Process
Before you start pumping, take a moment to gather your tools and find a comfortable spot. You'll want your chosen pump—a reliable hand or foot operated pump is perfect for this—and the correct adaptor from the kit. Lay the fender or buoy on a clean, flat surface to give yourself room to work. Double-check the circumference of the particular product listed in the manual or on the Polyform US website; this number is your target, not a guess. Having this figure in mind from the start makes the whole process of boat fender and buoy inflation much smoother and more precise.
Tools and nozzle types needed for inflation
| Air Supply Tool | Specific Nozzle Needed | Core Function |
|---|---|---|
| Basic Hand Pump | Screw-on brass tip. | Threads into the valve to create a locked, leak-proof pathway for air. |
| Lever-Action Pump | Push-in rubber cone. | Forms a seal through direct pressure and must be held firmly in the valve opening. |
| Modern Electric Inflator | Quick-click coupler set. | Uses a two-part system: a base plugged into the valve and a hose that snaps onto it. |
| External High-Pressure Line | Needle adapter. | Designed to open the valve pin; requires instant on/off control to prevent overfill. |
Checking the valve and fender condition beforehand
Give the entire inflatable a good visual once-over, looking for any cracks, deep scuffs, or suspicious discoloration that might indicate sun damage. Press gently around the valve area with your thumb to feel for any hidden weakness or stickiness that could compromise the seal.
- Inspect for punctures, tears, or UV degradation.
- Ensure the valve cap threads are clean and undamaged.
- Verify the valve core is intact and not bent.
Safety tips before starting to inflate Polyform products
Select a smooth, level area for your work, clear of debris or extreme heat that could compromise the inflatable's surface. Have your equipment organized and close by—specifically the appropriate pump and matching inflation adapter—to maintain a smooth workflow. It is essential to verify the adapter is compatible with Polyform's valve system; an incorrect connector can distort the valve mechanism and cause a swift air loss.
A fundamental rule is to approach any high-volume air source, like a compressor, with deliberate restraint and a means to monitor pressure, as an uncontrolled surge can instantly over-expand and breach the product. Introduce air at a moderate, consistent pace to let the material adapt uniformly, and avoid leaning directly over the unit as it begins to take shape. Keeping the manufacturer's guide or target size measurement nearby from the outset eliminates uncertainty and maintains command of the procedure.
Locating and Using the Inflation Valve
Finding the valve is usually straightforward—look for a small, reinforced plastic port, often with a cap, on one end of the inflatable. Gently unscrew and remove the cap, and you’ll see the valve mechanism inside. Carefully insert the inflation adapter into the valve opening, making sure it sits straight and snug to prevent air from escaping. If you’re using a different pump nozzle, you may need to first attach the nozzle to the adapter for a secure connection. Taking this extra moment to ensure a good seal saves you a lot of frustration later.
Identifying the correct valve on your buoy or fender
Locate a compact, reinforced plastic fitting, most often found on one tip or along a smooth face of the unit. This fitting is commonly sealed with a threaded protective cover that must be rotated off to expose the central valve port, which is the point of connection for your pump.
- It generally uses a standard automotive-style Schrader valve core.
- The valve's base is integrated directly into the product's construction during manufacturing.
Attaching the nozzle securely to the inflation valve
Once the cap is removed, insert the inflation adapter into the valve opening with a firm, straight push until it engages fully. Maintain a steady, direct pressure on the pump to preserve this airtight link throughout the inflation process.
- A proper seal ensures efficient airflow and conserves your energy.
- An unstable or angled fit is the primary reason for air escaping during pumping.
Preventing air leaks during the inflation process
The secret is all in the seal between your tool and the valve. Before you start pumping, ensure the adapter in the valve opening is pushed in fully and held perfectly straight; even a slight angle can let air whistle out. If you're using a hand pump with a screw-on adapter, tighten it by hand until it's snug, but avoid using tools that could strip the threads.
Listen closely as you begin—a hissing sound means you need to reposition the connection immediately. For pumps with a push-on nozzle, you often need to press the nozzle to the adapter and then slide a collar down to lock it, creating a positive seal. Taking these few extra seconds to get the connection right makes the entire task of filling your gear smooth and efficient.
Step-by-Step Inflation Guide
It’s time to begin filling. Once the inflation adapter is seated correctly in the valve, start pumping with a consistent rhythm. Pay attention to the resistance and sound as the unit takes shape, pausing every few cycles to evaluate. The most reliable approach involves taking periodic measurements and verifying them against the manufacturer’s inflation data. Employ a flexible tape to determine the current circumference, targeting the exact figure provided in the instructions. Continue until the surface feels solid yet retains a slight give under pressure—this hands-on assessment proves particularly useful when a dedicated pressure meter is not available.
Proper air pressure for different Polyform fenders
Steer clear of estimates, as the ideal firmness depends entirely on the fender's dimensions, form, and application. The surest technique involves using a flexible tape to measure the girth and cross-reference it with the official Polyform inflation guide for your exact product.
- For tube-shaped fenders, sufficient air is needed to ensure they don't collapse or fold upon impact.
- Panel-style fenders demand adequate pressure to hold their broad, defensive face steady against the hull.
How to avoid over-inflating a Polyform buoy or fender
Resist the temptation to pump until the material feels "rock hard" like a basketball. Instead, stop frequently to use the "press test": you should be able to depress the wall with moderate thumb pressure. Compare it with the inflation chart's recommended circumference measurement as your final, definitive check.
- Over-inflation stresses seams and material, leading to premature failure.
- In hot weather, air expands, so leave a little room for pressure increase.
Ensuring an even shape and firmness after inflation
Once you've hit your target pressure, it's time for a tactile inspection. Run your hands over the entire surface, feeling for any soft spots or unusual bulges that indicate uneven air distribution. Gently roll the fender on a flat surface to see if it wobbles, which can be a sign of a lumpy fill. If you find a soft area, you may need to release a little air, massage the shape gently, and re-inflate to help the air pocket distribute.
The final step to fill the Polyform fender correctly is to let it sit for about ten minutes and then re-check the pressure, as the material can sometimes stretch slightly after the initial fill. A perfectly inflated fender will have a uniform, taut feel without any hard, drum-like sections, ensuring it will perform consistently when you need it.
Maintaining Air Pressure and Performing Deflation
Your fenders will naturally lose a little air over time, especially with temperature swings. Get into a simple habit: before a big day on the water, give each one a firm squeeze. If it feels softer than you remember, it’s time for a quick top-up with your Polyform hand pump. For winter storage or transport, you’ll need to let the air out. Just unscrew the valve cap, press the small pin inside with the tip of the valve screw or a similar tool, and let the air hiss out slowly. Gently press on the fender to help it flatten completely, which prevents stress on the material while it’s packed away.
How often to check inflation levels on boat fenders
Make it a part of your regular pre-departure boat check, just like checking engine oil or fuel levels. Seasonal temperature swings are the biggest culprit, causing air pressure to rise in heat and fall in cooler weather.
- Check before every major outing or at least once a month during the boating season.
- Always check after a significant temperature change.
Easy deflation methods for Polyform buoys
Unscrew the valve cap to access the valve core. Use a small tool like the tip of the valve screw from your inflation kit to gently press down on the tiny pin in the center of the valve—you'll hear the air start to hiss out.
- Apply gentle, steady pressure to the pin to control the airflow.
- Press on the buoy's walls to help push the air out faster.
Re‑inflating or adjusting air pressure as needed
This is a straightforward maintenance task that keeps your gear in top form. If your squeeze test reveals a fender is slightly soft, simply reattach your pump for a quick top-up. Remember to reconnect securely; push the inflation adapter into the nozzle of your pump first if required, then mate it to the valve. The process is the same as initial inflation, but you'll need far fewer pumps.
Go slowly, checking the circumference or firmness after every few strokes to avoid overshooting. If you find a fender is over-pressurized from sitting in the hot sun, briefly depress the valve pin to bleed off small bursts of air until it's back to the proper firmness. Keeping them at their ideal pressure is a simple habit that ensures they're always ready to perform.
Best Practices for Boat Owners
Think of your fenders as part of your crew—they need a little care to perform their best. Always secure them with proper lines, not just by shoving them through a rail. The right move is to set your gauge for pressure by feel and a tape measure, not by guesswork. Rinse them with fresh water after use, especially if you’ve been in saltwater, to keep the valves clear and the material supple. And if you’re ever unsure about something, the boating world on YouTube is full of fellow owners sharing their real-world tips and tricks for perfect polyform inflation. A few minutes of attention makes them last for seasons.
Storing your Polyform fenders and buoys when not in use
Clean and fully deflate them before storage to save space and prevent material stress. Keep them in a cool, dry place away from direct sunlight, chemicals, or sharp objects.
- Store in a breathable bag or bin, not a sealed plastic bag.
- Avoid folding them in the same spot every time to prevent crease lines.
Cleaning and inspecting valves for long-term reliability
After use, especially in saltwater, rinse the entire product with fresh water and use a soft brush around the valve area to remove grit. Periodically, unscrew the valve cap and inspect inside for sand or debris that could prevent a proper seal.
- A clean valve ensures a perfect connection every time you need to inflate.
- A small amount of silicone spray on the valve O-ring can keep it pliable.
Tips to extend the lifespan of your Polyform boat gear
Your fenders and buoys are durable, but a little care goes a very long way. After every trip, give them a quick rinse with fresh water to remove salt, chlorine, or dirt that can degrade the material over time. When not in use, store them deflated in a shaded, cool place, as constant UV exposure is their biggest enemy. Make it a routine to carefully clean and inspect valves for long-term reliability, ensuring no sand or grit is trapped inside to cause a leak during your next inflation.
Never use them as stepping stones or tow toys, as dragging them on rough surfaces can cause unnecessary abrasions. If you need to make minor adjustments, always use the proper adapter, pushing it straight into the valve opening and apply the nozzle pressure evenly. Finally, repairing a small puncture early with a proper vinyl repair kit is much better than letting it grow into a major split.

