

So, you've got that familiar feeling – one hand on the mainsheet, the other firmly gripping the helm, while a gust catches the sail. Suddenly, leaning out to balance your small boat or dinghy feels like a stretch. That's where the simple genius of a tiller extension comes into play. It's not just an accessory; it's your key to better control and comfort, letting you shift your weight aft or to the windward side without losing the ability to steer. For owners of boats like a Sunfish or any spirited dinghy, this tool transforms the sailing experience from a constant wrestling match into a more graceful dance with the wind.When we talk about the Ronstan Battlestick, we're discussing a standout piece of kit designed for exactly these moments. Its construction speaks to thoughtful engineering: a lightweight alloy section forms its core, while its unique fluted profile adds extra rigidity to this lightweight structure, preventing unwanted flex when you need precise control.
The connection point is where the magic of easy handling happens, typically through a urethane universal joint. This component, made from durable urethane or a rubber universal alternative, creates a flexible yet responsive link between the tiller and extension, allowing it to pivot smoothly without compromising your direct feel of the rudder.
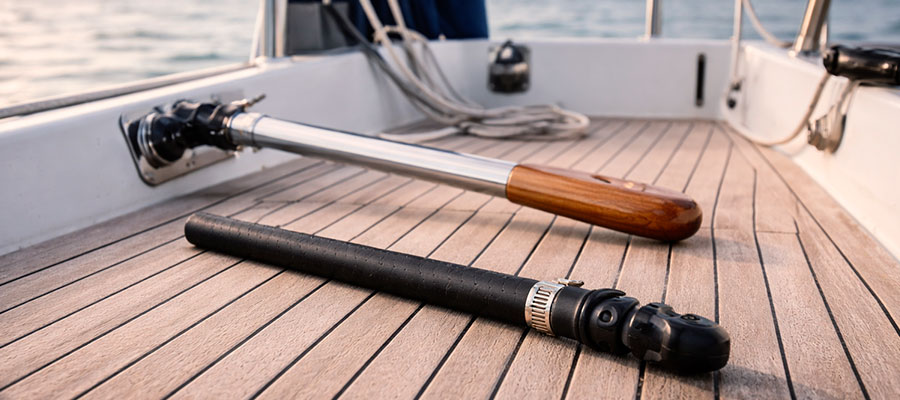
This brings us to the practical heart of the matter: the ability to quickly attach and detach this vital tool. Whether you're stowing gear, coming into a crowded dock, or simply prefer an uncluttered cockpit for casual sailing, knowing the ins and outs of your extension's mounting system is key. The process usually involves the joint at the top of the tiller or the end of the tiller, where a simple mechanism allows you to separate the two. Let's delve into how you can seamlessly manage your Ronstan Battlestick, ensuring it's securely locked in action when needed and just as easily stowed away when the sailing is done.
Understanding the Function of a Tiller Extension
Think of a tiller extension as your remote control for the helm. It lets you steer comfortably from further out in the boat, which is perfect when you need to hike out to keep the boat flat. Having that extra reach makes it far easier to handle the sheets and shift your weight for a smooth tack without scrambling back to the center every few seconds.
How a tiller extension improves sailboat control
A tiller extension fundamentally changes your relationship with the helm, acting as your personal remote control for the boat. It allows you to steer confidently from a position of better balance, whether that's leaning out to windward on a brisk beat or relaxing comfortably aft during a leisurely reach. This newfound reach means you can shift your weight freely to keep the boat flat and efficient without ever losing touch with the rudder.
It turns a potential scramble back to the centerline into a smooth, integrated motion, letting you focus on sail trim and course. Ultimately, it hands you back the freedom to move about the cockpit, transforming steering from a fixed task into a natural part of sailing the boat. The right extension gives you that direct, connected feel to the water flowing past the rudder.
Differences between aluminum and carbon tiller extensions
The main distinction lies in the feel each material transmits to your hand; aluminum delivers a direct, solid feedback, while carbon fiber prioritizes damping vibrations for a smoother experience. This choice often comes down to personal preference for steering sensation and budget considerations for your setup.
- Aluminum offers proven durability and a classic, responsive helm feel.
- Carbon fiber excels at reducing arm fatigue with its exceptional strength-to-weight ratio.
- The rigidity to the lightweight alloy in aluminum models provides a notably immediate and sturdy connection.
Why sailors use removable tiller handles
A removable handle solves several practical problems on the water and at the dock. It allows you to quickly stow the extension to clear the cockpit for guests, gear, or when the sailing doesn't demand it.
- Enables easy storage to prevent damage or obstruction.
- Simplifies the process of stepping the mast or trailing the boat.
- Offers flexibility to adapt the boat's setup for different conditions or sailors.
Exploring the Ronstan Tiller Extension Design
Ronstan's design cleverly merges strength with a feather-light feel. The core is often a carbon tube or a specialized metal shaft, where a fluted profile adds extra rigidity to the lightweight core, so it doesn't feel whippy in your hand. They're built to be dependable companions, offering that solid connection you need when a gust hits and you're leaning way out over the water.
Key features that make Ronstan extensions durable
Ronstan builds its reputation on extensions that can withstand the demanding, salt-soaked environment of sailing. A standout feature is the unique fluted profile adds extra rigidity to the lightweight alloy in their metal shafts, which combats flex and fatigue under load, ensuring a precise feel season after season. Their universal joints, crafted from advanced urethane compounds, are engineered to resist ultraviolet degradation and salt crystallization, maintaining their flexible "wrist" action far longer than basic rubber.
Attention to detail extends to the corrosion-resistant stainless steel in all fasteners and the secure, ergonomic grips that resist slipping even with wet hands. This focus on material science and thoughtful design means you invest in a tool that remains a reliable partner, ride after ride.
How the universal joint allows full movement
The universal joint acts as the agile wrist connecting your steering input to the rudder. It bends and pivots smoothly, allowing you to steer from any position in the cockpit without straining.
- It provides a full range of motion for comfortable steering angles.
- Maintains a positive, direct connection to the tiller head at all times.
Maintenance considerations for regular sailing use
| Consideration | Action & Rationale |
|---|---|
| Post-Sail Rinse | Give the universal joint and mounting clamp a quick freshwater rinse. This simple step flushes away salt and abrasive grit, which are the main culprits behind premature stiffness and wear in moving parts. |
| Connection Point Check | Periodically ensure the clamp securing the extension is firmly snug. A loose connection can lead to slippage or a sudden detachment right when you need steady steering control. |
| Joint Flexibility Test | Before heading out, gently flex the universal joint through its full range. You're listening for any cracking sounds and feeling for gritty resistance, which are early hints that the material may be aging or contaminated. |
| Tube & Grip Inspection | Run your hand along the extension tube and grip. Look for deep scratches, cracks, or a chalky feel, which can compromise the tube's integrity and your grip, especially when your hands are wet. |
| Hardware Review | A visual scan of any screws or fasteners in the mounting hardware for signs of rust or corrosion helps prevent a failure that could leave you holding just half of your steering system. |
How the Universal Joint Works
The rubber joint or urethane universal is the wrist of your tiller extension. This flexible connector bends and pivots as you move, giving you a full range of motion without any hard, awkward angles. This means you can steer confidently with the extension aft while sitting on the side deck, and it simply follows your lead, translating your input directly to the rudder.
Attaching and detaching the universal joint safely
Always ensure the tiller head is clean and dry before pressing the joint's fitting onto it. Listen for a definitive, reassuring click or check that the locking collar is fully secured to confirm a positive connection.
- Clean mating surfaces ensure a secure fit and prevent slippage.
- A visual and tactile confirmation of engagement is essential before sailing.
Checking flexibility and wear on the joint connection
Make it a habit to give the universal joint a gentle but thorough flex through its entire range before you head out. You're feeling for any gritty resistance or hesitation in the motion, which suggests salt or sand has infiltrated the material. Listen closely for any subtle cracking or creaking sounds, which are telltale signs that the urethane or rubber is beginning to age and may be developing internal fractures.
Also, inspect the joint visually for fine surface cracks, significant discoloration, or a change in texture, as these indicate material breakdown from UV exposure. A joint that feels mushy or overly soft has lost its torsional strength and won't provide the crisp steering feedback you rely on. This simple pre-sail check takes seconds but is your best defense against a joint failing unexpectedly when you're leaning out on the wire.
Common replacement parts for tiller systems
| System Component | Typical Wear & Replacement Part |
|---|---|
| The Flexible Joint | The universal joint, whether urethane or rubber, is the most common part to age. Sunlight, salt, and constant flexing can make it brittle or overly soft. A fresh urethane universal joint restores smooth, responsive steering. |
| The Grip | The foam or rubber handle can degrade, becoming torn, slick, or uncomfortable. A new grip sleeve provides secure and comfortable handling, which is vital for maintaining control. |
| The Core Shaft | Though durable, the main tube (a carbon tube or lightweight alloy section) can be damaged by impact. Replacing the shaft is fundamental if it has a significant crack or bend. |
| Connection Hardware | The small pieces that make the big connection matter. The mounting clamp, its internal liner, and the locking pin or screw are key parts that secure the tiller and extension together. |
| Anti-Rotation Pin | Many systems use a small pin to stop the extension from spinning. This pin can shear or fall out. A new stainless steel pin ensures the extension stays in your chosen position. |
Compatibility with Different Sailboat Tillers
Most modern extensions feature a tiller extension universal style fitting, which is designed to work with a wide range of tiller heads. The key is checking that the mounting clamp fits snugly around the tiller without slipping. With a simple adapter or by adjusting the clamp's diameter, you can usually make a solid connection between your specific tiller and the extension.
Matching a Ronstan tiller extension to your existing tiller
Start by examining the head of your current tiller to identify its connection type—whether it's a standard socket, a threaded stud, or a specific clamp size. Most Ronstan systems are designed with adaptability in mind, often using a tiller extension universal base that accommodates common fittings.
- Identify the connection type on your boat's tiller head.
- Select a compatible Ronstan model or the appropriate adapter sleeve.
Factors to consider for carbon tiller compatibility
If you're pairing a carbon extension, ensure the stiffness and flex characteristics complement your boat's steering feel. You also need to verify that the mounting hardware is designed to clamp securely onto a carbon tube without causing damage.
- The flex profile should match your steering preferences and boat size.
- The clamp mechanism must be suitable for carbon to prevent crushing or slippage.
Length and locking mechanism variations across models
Choosing the right length isn't just about your arm's reach; it's about matching the extension to your boat's cockpit layout and your typical sailing position. A model that's too short will have you constantly over-reaching, while one that's overly long becomes an obstacle in the cockpit. Ronstan offers several intuitive locking solutions, from simple friction collars that allow infinite micro-adjustments with a twist, to positive pin-lock systems that give you a set of predefined, secure lengths.
The pin-lock is fantastic for quick, reliable changes, especially when you're hiking hard and need to trust your setup completely. Think about how you sail—do you frequently adjust length on the fly, or do you set it once and forget it? Your answer will point you toward the right locking mechanism for your style on the water.
Practical Handling and On‑Water Use
In action, the extension becomes a natural extension of your arm. You'll find yourself casually moving it around the tiller as you switch sides, letting the universal joint do its flexible magic. It really shines on longer reaches or runs, allowing you to relax aft and steer with just your fingertips, keeping a watchful eye on the sails and the water ahead.
Adjusting the tiller extension during maneuvers
When coming about, a slight pull and twist can quickly shorten the extension for handling in the confined space near the centerline. As you settle onto the new tack, smoothly extend it back out to regain your comfortable steering posture from the windward side.
- Shorten the extension for tighter control during tacks and gybes.
- Extend it fully once settled on course for optimal leverage and comfort.
Using the extension effectively in rough water
In choppy conditions, hold the extension with a slightly looser, more relaxed grip to let your arms absorb shock instead of transmitting it directly to the rudder. Keep the extension angled a bit more aft to give yourself a wider, more stable steering arc to counteract sudden waves or gusts.
- A relaxed grip helps dampen shock from waves.
- Steering from a position further aft provides greater leverage and control.
Quick-release techniques for docking or storage
Mastering a quick release is about building a smooth, one-handed muscle memory that doesn't require you to look down. As you approach the dock, your focus should be on your surroundings, not your fittings. Practice the motion: a firm press of the release button or a swift counter-clockwise twist of the collar, coupled with a slight pulling motion to separate the joint. The goal is to have the extension stowed safely under the deck or in your hand before your first line hits the cleat, keeping your cockpit clear for the delicate dance of docking. This skill turns a potential fumble into a seamless part of your landing routine, projecting confidence and control.
Care, Storage, and Longevity Tips
A quick rinse with fresh water after a sail works wonders, especially to clear any salt or grit from the rubber joint. Storing it out of direct, harsh sunlight helps preserve the materials. Every so often, check the tightness of the mounting clamp and give the universal a gentle flex to ensure it moves freely, which will keep it responding smoothly for seasons to come.
Cleaning and inspecting carbon tiller surfaces
After sailing, wipe down the carbon tube with a soft cloth and mild soapy water to remove salt and contaminants. Regularly inspect its surface under good light for any scratches, gouges, or areas that appear cloudy or dull, which could indicate UV damage or compromised fibers.
- Gentle cleaning preserves the resin surface and gloss.
- Close inspection reveals early signs of wear or impact damage.
How to store the tiller extension when not in use
Ideally, keep it in a cool, dry place away from direct sunlight, which can degrade materials over time. If storing it attached to the boat, ensure it's secured so it cannot swing freely and cause impact damage.
- Protect it from prolonged UV exposure and temperature extremes.
- Secure it to prevent it from becoming a hazard or getting damaged.
Extending the lifespan of the universal joint and fittings
The single most effective habit is a thorough freshwater rinse of the entire joint mechanism after every sail, paying special attention to flushing out grit from the crevices where the moving parts meet. Periodically, you can apply a very small amount of a silicone-based lubricant designed for plastics and rubber to the joint's pivot points; this keeps the material supple without attracting dirt. Avoid storing the boat with the joint bent at an extreme angle for long periods, as this can set a permanent deformation in the material.
Finally, make a seasonal check of all fasteners and the mounting clamp for any signs of corrosion or wear, tightening or replacing them as needed to maintain a solid, slop-free connection that protects the joint from undue stress.

