
Of all the sounds that define life on the water—the creak of lines, the slap of waves—there’s one that speaks of self-reliance and simple comfort: the dependable thump-thump of a manual galley pump. In the tight confines of a sailboat cabin or a cozy van conversion, where every component must earn its keep, a reliable source of fresh water is non-negotiable. Whether you're looking to replace a tired old water pump or install a brand-new system, taking on this DIY project connects you directly to the vital systems that make off-grid living not just possible, but pleasant.This guide will walk you through installing a Whale Gusher foot pump, a favorite among mariners and van life enthusiasts for its robust design and straightforward mechanics.
Unlike an electric pump, which hides silently behind a panel, this manual workhorse puts you in direct control, using a foot pedal to draw water from your water tank with satisfying mechanical certainty. The process is less about complex plumbing and more about careful positioning and secure connections. You’ll learn how to plumb the intake and outlet lines, where to tap into your cold water supply, and how to securely mount the unit underneath a cabinet in your galley.
Before you pick up a drill or a screwdriver, you’ll need to locate the ideal spot for your new pump, ensuring the foot pedal is accessible and the side of the pump ports are easy to reach for tubing. We’ll cover how to properly drain your system, install the necessary valve, and connect everything from the Gusher foot to the galley gusher spout. By the end, you’ll confidently know how to get water flowing with every press of your foot, mastering a key piece of galley pump craftsmanship.
Understanding the Whale Foot Pump System
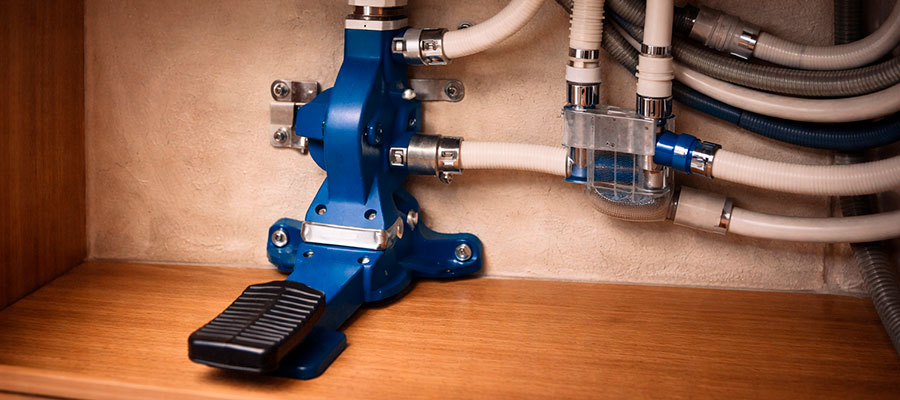
Think of this little mechanical heart in your galley as more than just a gadget; it’s a direct conversation between your foot and a stream of fresh water. Unlike its electric cousins that hum to life with a switch, this system relies on the satisfying mechanical certainty of manual pumps. Getting familiar with how the lever action of the Whale Gusher Galley translates your press into a siphon is the first step to a successful install. It's about feeling the linkage engage and hearing that distinct, reliable gush that tells you everything is connected and working as it should.
How a Whale Babyfoot or Whale Gusher operates
Think of it as a trusty mechanical heart for your galley. When you press down on the foot pedal, it activates a simple yet brilliant piston inside the whale gusher foot pump. This action creates a vacuum that pulls fresh water from your water tank up through the inlet hose. Then, as you release the pedal, the piston pushes that water toward the faucet. It's a completely manual process, giving you direct control over every drop.
The beauty lies in its straightforward, lever-and-seal mechanism that asks for no electricity, just a bit of good old-fashioned elbow grease. Each pump delivers a satisfying gush, connecting your effort instantly to a stream of water at the sink. Understanding this push-pull rhythm is key to using and maintaining it for years.
Benefits of using a manual foot pump in a boat galley
A hand pump like this brings a quiet, reliable simplicity to life on the water. You gain peace of mind knowing your water supply works independently of your boat's often-fickle electrical system.
- Unmatched reliability with no power draw.
- Direct tactile control over water usage.
- Often simpler and more affordable to maintain than an electric pump.
- Provides a consistent, satisfying routine in daily tasks.
Components included in the Whale install kit
| What's in the Box | Its Specific Mission |
|---|---|
| Primary Pump Casing | The sealed main body containing the precision chamber and piston; the non-negotiable core of the system. |
| Foot-Operated Lever Arm | The polished pedal that translates your physical input into hydraulic action with a satisfying mechanical feel. |
| Connection Interface Set | Custom-fitted adapters that act as translators, ensuring a perfect language match between the pump ports and your boat's existing hoses. |
| Anti-Movement Fastening Kit | Hardware specifically chosen to anchor the pump against the unique stresses and vibrations of a marine environment. |
| Isolation Buffer Pads | Soft yet resilient spacers that decouple the pump from its mounting surface, silencing operational hum and preventing "walking." |
Preparing the Galley and Water System
Before any tools come out, have a quiet moment with your space. Clear out the cabinet beneath the sink and really look at where the lines run and where a comfortable spot for your foot would be. This prep work is all about ensuring your new hand pump will have a clean, logical home. A dry fit of the unit now saves a lot of adjustments later. Trace the path from your water tank to the future pump location, and give the whole line a good flush to clear out any sediment that might bother your new Whale Galley pump later on.
Choosing the right location near the sink or faucet
Your aim is to find a home where operating the unit feels completely instinctive, not like a chore. Settle on a space under the counter where you can engage the foot pedal without having to glance down or contort your stance. This positioning should also grant you a clear, unhindered reach to the pump's connection ports for straightforward service down the line.
- The spot must allow for a full, unimpeded press of the pedal.
- Account for the physical bulk of the pump body and the loop of its hoses.
- Factor in the distance to your freshwater reservoir to keep the supply line efficient.
Checking compatibility with your existing water system
Before making any cuts or connections, take a quiet moment to study your current setup. Trace the path from your cold water tank to the planned pump location, noting the type and size of the existing tubing. The goal is to ensure your new whale gusher galley pump can be integrated smoothly without needing a complete system overhaul. This preventive check saves the frustration of mid-project runs for odd adapters or different hose sizes.
Verify the pump's inlet and outlet threads match your hoses, and confirm your water tank has a compatible port for the new intake line. A little planning here ensures the installation feels like a natural upgrade, not a constant battle with incompatible parts.
Tools and accessories needed for installation
| Tool or Accessory | Its Purpose for the Job |
|---|---|
| Adjustable Hose Clamp Tool | For securing hose connections firmly to prevent leaks under pressure. |
| Flexible Potable Water Hose | Food-grade tubing to create the final run from your tank to the pump inlet. |
| Marine-Grade Sealant | A bead of this ensures a watertight seal around any holes or mounting points. |
| Driver Bit Set | To cleanly drive the provided screws into cabinetry or countertop material. |
| Deburring Tool | For smoothing the inner edge of any drilled holes, protecting your hose from abrasion. |
Mounting the Foot Pump in Place
Now, with the spot chosen, it’s time to make it permanent. Hold the pump body securely in place, ensuring the foot pedal has full, unobstructed travel. The key here is a solid foundation—using the right screw for your counter or cabinet material so the unit doesn’t wiggle with every use. Drill your pilot holes carefully to avoid splitting the wood or laminate. A firmly mounted pump doesn't just feel more professional; it becomes a seamless, dependable part of your daily routine, whether you're in a rolling van or a rocking boat.
Securing the pump body to the galley floor
Use the provided screws and brackets to fasten the unit firmly to a sturdy structural point. A solid mount prevents shifting and absorbs the operational forces, making every pump stroke feel secure.
- Pre-drill pilot holes to prevent material splitting.
- Use all mounting points for even stability.
- Consider adding a small rubber pad to dampen sound.
Ensuring correct alignment of the Whale foot pump pedals
The pedal must sit level and square to the pump body for smooth, binding-free operation. Test its full range of motion several times before finalizing the mounting hardware.
- Ensure the pedal linkage moves freely without rubbing the cabinet.
- Adjust the mounting angle so the pedal feels natural underfoot.
Tips for stable installation to minimize vibration
A truly quiet setup depends on decoupling the pump from its surroundings. Start by fabricating or sourcing a rigid mounting plate if your cabinet floor is uneven; this creates a flawless, level foundation. Secure the pump to this plate using all provided hardware, but insert a layer of closed-cell neoprene or proprietary vibration-damping washers between the unit and the mounting surface.
This sandwich technique absorbs operational energy. Then, route your hoses with deliberate, broad curves and anchor them every few inches using cushioned adel clamps, preventing them from carrying sound. Finally, avoid letting any hose or wire rest directly against the pump body, as this can transmit subtle hums into the cabin structure, defeating your careful isolation work.
Connecting the Inlet, Outlet, and Filter
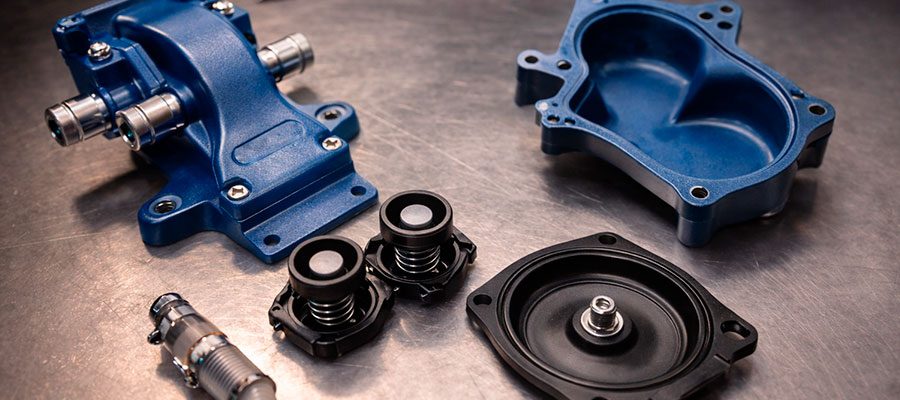
Initiate the plumbing by tackling the outlet run first, securing the hose that will carry water up to your faucet spout. This allows you to manage the most visible line without obstruction. Next, focus on the intake side, cutting and fitting the hose that journeys from your freshwater tank. Intersperse the filter in this intake segment, ensuring its directional arrow points faithfully toward the pump’s heart. This specific placement means every drop is screened for sediment before it enters the precision mechanism, safeguarding its longevity and performance from the very first draw.
How to attach water hoses to the pump and faucet
Achieve leak-proof joints by sliding twin stainless-steel clamps onto each hose segment before attempting any connection. Soften the hose ends with a blast from a heat gun to make them supple, then work them fully onto the barbed fittings until you feel a definitive stop. A heated hose end forms a superior, deeper bond. Once cooled, position the first clamp near the fitting's base and the second a half-inch back, tightening them in an alternating pattern until they are snug and the hose material is slightly compressed but not cut.
- Employ hose certified for potable water contact.
- Trim hose ends squarely with a sharp utility knife for a perfect seal.
- Verify the inlet and outlet ports are correctly matched before final tightening.
Installing a filter to keep the Whale Gusher system clean
Integrate the filter as a sentinel on the intake line, choosing a location that remains accessible for routine inspection. Select a model with a transparent casing, turning maintenance into a simple visual check. A clear housing reveals the system's hidden state.
- Follow the embossed flow arrow meticulously.
- Install it within easy reach for swift cartridge swaps.
- Note the micron rating to ensure it matches your water quality.
Leak testing before final setup
This is the moment of quiet truth before you stow all your tools away. With the hoses connected but the system not yet fully tucked into the cabinet, slowly press the foot pedal a dozen times to pressurize the lines. Then, get down on your hands and knees with a flashlight and meticulously inspect every single connection—the side of the pump fittings, the filter housing, and the faucet shank.
Look for the tiniest bead or film of moisture, not just a steady drip. Let the system sit under this light pressure for ten minutes while you check again; a slow seep often reveals itself over time. Catching a leak now is a simple fix of adjusting a clamp; discovering it later could mean water damage.
Testing and Adjusting Water Flow
The moment of truth! After all connections are snug, press the foot pedal for the first time. You might need a few firm pumps to initially prime the system and draw water up from the tank. Listen and feel for the smooth action and a steady stream from the faucet. If the flow is weak or sputters, check for kinks in the line or a minor airlock. A perfectly tuned Gusher foot pump should deliver a predictable, generous flow with each comfortable press, turning effort into instant reward.
How to pump water effectively through the galley foot pump
Use a firm, full stroke on the foot pedal to prime the system and establish a good siphon from the tank. Once primed, a consistent, rhythmic motion will yield the steadiest stream at the faucet.
- Prime the pump with several rapid, full strokes to draw water up.
- Find a comfortable pumping rhythm for tasks like filling a kettle.
- Remember it's a manual pump—the force you put in dictates the flow you get out.
Adjusting flow rate for consistent pressure at the sink
The flow is controlled by your pumping speed and the pedal's stroke length. A slower, deliberate press delivers a gentler stream, perfect for rinsing a toothbrush.
- Experiment with pedal pressure to find the right flow for different tasks.
- Ensure there are no kinks in the hose that might restrict pressure.
Troubleshooting weak or uneven water output
Begin your investigation at the source by confirming your freshwater tank has ample supply and its vent is completely unobstructed—a blocked vent can mimic a pump failure. Disconnect the inlet hose directly at the pump and lower it into a jug of water; if pumping now yields a strong stream, the issue lies in the supply line or tank.
This bucket test brilliantly isolates the problem. If the flow remains poor, the culprit is likely within the pump itself, such as a worn piston seal or a tired valve. For systems with a filter, bypass it temporarily with a direct hose; a sudden improvement in flow clearly indicts a clogged filter as the bottleneck.
Maintenance and Long-Term Care
Treat this hardy pump like the trusty mechanical friend it is, and it will serve you for years. Every few months, give it a quick visual check for leaks and clear any debris from the filter. If the action ever starts to feel stiff, a drop of food-grade lubricant on the pedal linkage works wonders. Remember, these units are designed to be serviced, not just replaced. Keeping the internal seals supple and the lines clear means that familiar, reliable gush will be there whenever you need it, from making morning coffee to washing up after a meal.
Cleaning the Whale pump and filter regularly
Externally, clean the pump casing with a mild soap and apply a silicone lubricant to the moving parts of the foot pedal mechanism, preserving its smooth, responsive action.
- Flush the lines with a dedicated marine plumbing cleaner.
- Swap the filter element on a schedule dictated by usage.
- Consult your manual for lubrication points specific to your model.
Checking hoses and seals for wear or leaks
Every few months, run your fingers along the hoses feeling for brittleness or soft spots, and inspect the seals at connection points for cracks or flattening. Catching minor wear early prevents a major leak or a sudden failure when you need water most.
- Look for discoloration, cracking, or bulging in the tubing.
- Check for mineral buildup or cracks on the pump's internal seal surfaces.
- Ensure all hose clamps are still tight and free of corrosion.
Replacement options and upgrade advice for boat owners
Even the most reliable whale gusher galley pump will eventually show its age after years of faithful service. When the time comes for a replacement, you have a wonderful opportunity to assess your needs. You might simply install an identical new pump for consistent performance, or consider if your habits have changed. Perhaps your growing family means an upgrade to a higher-output model or adding a second, dedicated pump for hot water is the logical next step.
For some, integrating a small accumulator tank can provide a more consistent flow. Remember, the modular nature of these systems means you can often upgrade components piece by piece, turning your galley pump setup into a custom solution that evolves with your life on the water.

