

Is your onboard water supply suddenly quiet, leaving your faucets dry? That absent hum often points to a water pump ready for retirement, disrupting your self-contained comfort. This guide details the clear steps to install a Flojet pump, reviving reliable water pressure for your sink, shower, and appliances. We’ll cover everything from selecting a compatible model to the final system check, ensuring you can confidently handle this key upgrade or replacement.A successful installation is built on thoughtful preparation. Before beginning, it’s wise to review your vehicle’s specific manual and scout owner forums for any tailored insights.
Assemble your new Flojet unit—or a similar Shurflo pump with a matching flow rate (GPM) and pressure (PSI) rating—alongside essential parts. You’ll want fittings like John Guest connectors, a fresh water filter, hose clamps, and sealant. First, fully drain your freshwater tank and plumbing lines; this step is particularly relevant if the system was previously prepared for winterizing.

The hands-on work involves a logical sequence common to most pump swaps. We'll begin by isolating the 12V power and bleeding off any remaining water pressure through an access valve, often near the water heater. After removing the old pump, you'll mount and plumb the new one, focusing on leak-proof connections for both the inlet and outlet pipes. The final stage involves priming the lines and adjusting the pressure switch to achieve that satisfying, steady flow. Stick with this process, and you'll soon restore the dependable water system your adventures require.
Getting to Know the Flojet Water Pump
Think of your Flojet pump as the dedicated heart of your RV's water system. It's a compact 12V workhorse designed to draw water from your fresh water tank and push it through every faucet and appliance with consistent pressure. Getting familiar with its inlet and outlet ports, as well as its built-in pressure switch, will make the entire installation process feel much more intuitive. You'll quickly appreciate how this little unit reliably delivers every refreshing gallon on demand.
How the Flojet pump works in RV and boat setups
Think of your Flojet pump as the dedicated heart of your mobile water system. In both RVs and boats, its function is elegantly straightforward: it generates a mild vacuum to pull fresh water from your storage tank. Once drawn in, a resilient internal diaphragm pressurizes the water, sending it steadily through all your plumbing lines. The moment you open a faucet, the resulting dip in pressure activates the pump's internal switch, cueing it to restart. This smart, on-demand cycle provides reliable water flow without continuous noise or excessive draw on your 12-volt power, a clever bit of engineering that brings modern hydration to remote places.
Key specifications and features of the Flojet model
Choosing the right pump means understanding a few core numbers that define its capability. Pay particular attention to its flow rate, expressed in GPM, and its maximum pressure output in PSI, as these directly shape your system's performance.
Notable characteristics of these models include:
- A rugged build quality made to endure marine and road environments.
- An automatic self-priming design that simplifies initial setup.
- Low electrical current requirement to be easy on your 12v circuits.
- Built-in dry run prevention to avoid damage if the tank runs empty.
When to replace an old or damaged water pump
A declining pump often announces its need for retirement through clear, audible, and visible cues. Listen for a unit that runs incessantly, produces strange sounds like grinding or whining, or fails to maintain strong flow at your taps, while also checking for any moisture or cracks on the pump body itself.
Plan for a new installation if you recognize any of these specific issues:
- Operation that results in only a feeble stream from your fixtures.
- Frequent, unexplained short cycling when the system is idle.
- Visible rust, corrosion, or evidence of seeping from the housing.
- General unreliable performance after years of dependable service.
Preparing for the Installation Process
A successful installation begins with a methodical and organized approach. My practical advice is to start by fully draining your fresh water lines and tank to prevent any unexpected spills. Unpack your new pump, arrange all your hose clamps, fittings, and wiring terminals within easy reach, and confirm you have the correct tools. Dedicating this brief time to preparation transforms the job from a potential scramble into a controlled, satisfying task.
Tools and fittings required for a proper installation
| Category | Tools & Materials | Key Role |
|---|---|---|
| Grip & Fasten |
Multi-Bit Driver: Handles bracket screws and electrical terminals. Adjustable Pump Pliers: Snugs hose clamps and fittings securely without slipping. |
Secures all mechanical connections with precision to prevent stripped parts or shaky mounts. |
| Seal & Connect |
Sealed-Screw Clamps: Rust-resistant bands for hose ends. Flexible Thread Paste: Forms a lasting, vibration-proof seal on any threaded fitting. |
Creates durable, leak-free joints in your water lines that can handle constant pressure and motion. |
| Contain & Protect |
Shallow Catch Tray: Manages spills in confined spaces under the pump. Pump Inlet Sock: A fine mesh guard that traps sediment before it reaches the new unit. |
Keeps the work area dry for accuracy and adds a layer of filtration for immediate system protection. |
Checking compatibility with your RV or freshwater tank
Guaranteeing a proper match between your pump and your existing setup prevents future complications. First, verify your system's operating voltage; most recreational vehicles and boats use a standard 12v DC supply, which aligns with Flojet pumps. Next, align the pump's flow rate (in GPM) with your needs—a higher rating supports multiple simultaneous uses, while a lower one is fine for simpler systems. Take physical measurements of the installation area to ensure the new one will fit without obstruction.
Also, inspect the port sizes and types on the pump; they must correspond correctly with your current water lines or hose ends, be they threaded or a quick connect style. Spending a few minutes on these checks assures your replacement will integrate without a hitch.
Safety steps before disconnecting power or hoses
Always initiate the process by shutting off the 12v power at the source, such as the main distribution panel or a dedicated cutoff. Subsequently, relieve all residual water pressure within the plumbing by opening a faucet at the system's lowest point and allowing it to drain. Follow these fundamental safety measures:
- Confirm the circuit is dead using a voltage tester before handling any wires.
- Keep a small basin or a bundle of absorbent rags nearby to catch residual drips.
- Perform the work in a well-illuminated space to see all components and connections clearly.
Mounting the Pump in the RV
Identifying the optimal spot for your pump blends practical access with thoughtful placement. You should seek out a location that allows for easy future inspection, yet is shielded from road spray and excessive moisture. Secure the unit using its provided bracket, but installing a slim rubber isolation pad between the bracket and the floor will significantly dampen operational vibrations. A pump mounted with this consideration will operate more quietly and reward you with extended service life over countless journeys.
Choosing the right location near the water tank
Select a position that is readily accessible for any later service and situated as close to the fresh water tank as is reasonably possible. This location must stay dry, be defended from the elements, and remain secure from potential impacts.
A prime location will offer:
- Short, straightforward hose pathways to reduce flow resistance.
- Sufficient room for smooth hose bends without creating sharp angles.
- Stable anchor points on a solid surface for mounting.
- Shelter from extreme heat generated by engines or road friction.
Securing the Flojet pump with vibration-reducing mounts
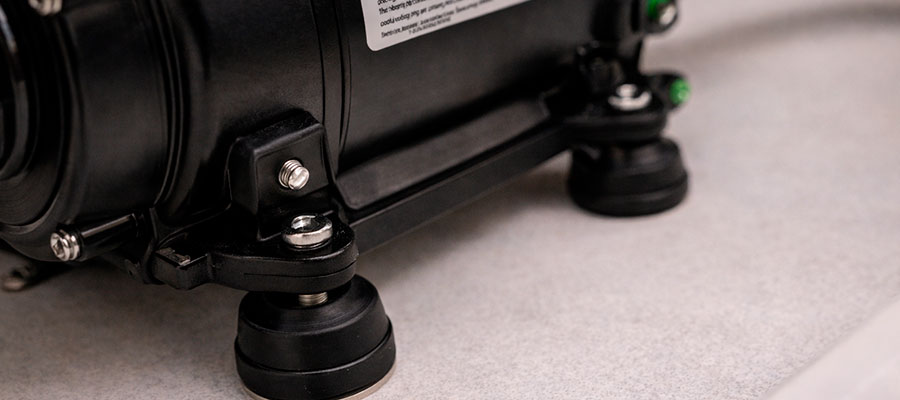
Securing your pump isn't just about bolting it down; it's about giving it a quiet, stable home. Using the provided bracket, position the pump in your chosen location. Placing a rubber isolation pad between the pump's bracket and the mounting surface is a fantastic trick—it absorbs the motor's hum and prevents it from echoing through your RV or boat's frame. Tighten the mounting bolts firmly, but avoid overtightening to the point where you crush the vibration-absorbing pad.
A well-damped pump runs so quietly you might forget it's there, which significantly cuts down on wear and tear over the years. This simple step is a gift to your own peace and quiet.
Aligning inlet and outlet ports for easy hose connection
Before fastening any clamps, briefly orient the pump so its intake and output ports align naturally with the direction of your existing hoses. This foresight prevents sharp bends that can hinder water flow or place strain on the connections.
Proper alignment helps you avoid:
- Kinks or constrictions in the water lines.
- Unwanted stress on the pump's plastic ports.
- The necessity for additional elbow fittings, which can sap pressure.
Connecting Hoses and Water Lines
This step is dedicated to establishing secure, drip-free pathways for your water. Link the supply line from your fresh water tank directly to the pump's inlet port, and then run the output line from the pump to your RV's main distribution pipe. Employing quality hose clamps or reliable quick connect fittings here is a smart practice—it guarantees a snug seal capable of withstanding the pump's rhythmic pulse. One final suggestion: maintain your hose runs as straight and untwisted as possible to preserve the best possible flow rate.
Attaching the suction hose from the tank to the pump inlet
Utilize a sturdy, reinforced hose designed for suction-side applications and connect it from the tank's outlet directly to the pump's inlet port. A clean, straight path here aids the pump in priming itself successfully.
For a dependable link:
- Ensure the hose is cut with a clean, square edge.
- Lubricate the hose interior with a drop of water to ease it onto the fitting.
- Push the hose completely onto the barbed fitting until it seats firmly.
- On larger systems, use two clamps fastened opposite each other for added security.
Connecting the outlet hose to the RV water system
| Connection Point | Action & Method | Pro Pointer |
|---|---|---|
| Pump Outlet Port | Attach a short, reinforced hose using a hose clamp. This first link must handle the pump's direct pulse. | Use a short, stiff hose here to minimize vibration wear. |
| System Main Line | Connect your outlet hose to the RV's primary cold water supply pipe. The fitting type (threaded, quick-connect) will vary. | Follow the existing old pump's hose routing to avoid kinks or strain. |
| Water Heater Bypass | If your system has one, ensure the bypass valve is set to the "normal use" position to allow flow to the heater. | Verify this before testing to avoid sending water to a dry water heater tank. |
| Pressure Regulator | If an adjustable regulator is installed downstream, this is the time to set your desired PSI (e.g., 45-55 PSI). | A gentle setting reduces system strain and conserves water. |
| Final Security Check | Firmly press on all hose connections and gently tug to confirm they are seated and clamped securely. | A visual and tactile check now prevents a damp surprise later. |
Using quality clamps to prevent leaks and pressure loss
Those small bands securing your hoses are the silent guardians of a watertight system. Forgo the generic, plated clamp and select stainless steel hose clamps built to withstand a damp environment. When tightening, employ a screwdriver or nut driver to achieve a firm, even compression—finger-tightening is rarely sufficient to hold against the system's water pressure.
Situate the clamp so it rests squarely over the hose, just behind the fitting's barb, for optimal grip. A correctly installed clamp compresses the hose uniformly without cutting into it, forging a seal that endures for seasons, a minor component that wards off major wet troubles.
Wiring and System Configuration
Handling the electrical side is straightforward if you respect the simple color code. Connect the pump's positive wire (usually red) to your RV's 12V power source and the negative wire (black) to a solid ground. Making a clean, secure connection here is what brings your pump to life. Once wired, you can adjust the pump's pressure switch to your preferred setting, which tailors the system's on-off cycle to match your typical water use.
How to connect the electrical wires to the Flojet water pump
Identify the positive and negative terminals on the pump, typically marked or color-coded. Connect the 12v power wire to the positive terminal and the ground wire to the negative terminal, ensuring each connection is tight and secure. For a professional and lasting connection, follow these steps:
- Use adhesive-lined heat shrink terminals for a superior, waterproof seal.
- Apply a small amount of electrical contact protector to the terminals to inhibit corrosion.
- Secure the wiring harness with nylon straps to prevent fatigue from movement or vibration.
Testing polarity and pump activation before sealing the system
Before you pack up your tools, give the pump a brief moment of power to check its spin direction. You should hear a smooth start-up and feel a slight suction at the inlet.
A correct test shows:
- A smooth, low humming sound from the motor.
- Immediate suction at the inlet hose when disconnected.
- No sparks, smoke, or unusual smells from the electrical connections.
Checking fuse ratings and power switches for safety
This act serves as your ultimate safeguard for the electrical system. Locate the fuse dedicated to the water pump circuit, typically in the main DC panel. Remove it carefully and confirm its amperage rating aligns precisely with the specification found in the pump's manual—installing an oversized fuse voids its protective role. Make sure the fuse seats correctly in its holder and that the contacts are free of corrosion.
Furthermore, double-check that any inline power switches are in the 'off' position before completing the connections. An appropriately rated fuse is a simple yet vital defender for the pump's motor, designed to interrupt the circuit and prevent damage during an electrical fault.
Testing, Replacing, and Maintaining the Pump
The conclusive moment arrives when you restore power and listen for a smooth purr instead of a struggle. Open a faucet and allow the pump to move water through the lines, meticulously examining every joint for moisture. To promote its long-term health, a wise suggestion is to consistently use a cleanable filter and flush a gallon of fresh water through the pipes after winterizing. When the day finally comes for a replacement, the procedure will feel familiar, and installing the new one will seem like a straightforward task you've mastered.
Running a full system test to verify water flow
Now comes the rewarding phase—switch on the power and open a tap. Listen as the pump activates, builds pressure, and then deactivates smoothly. Allow water to circulate for a full minute, scrutinizing each connection you made for the faintest sign of a drip.
Throughout your test, confirm:
- The pump attains its shut-off pressure and ceases operation without short-cycling.
- Water flow is vigorous and consistent at all outlets, including the showerhead.
- The water heater tank fills properly and operates as expected.
- No air pockets or sputtering persists from the lines after the initial purge.
How to replace worn hoses or fittings over time
Even premium hoses will eventually degrade, becoming stiff or developing minute cracks. When you detect a slight leak or a section feels brittle, schedule a swap during your next routine maintenance.
Periodic visual inspections should identify:
- Surface cracks or UV damage on the hose exterior.
- Bulging or softened areas adjacent to fittings.
- Green verdigris or chalky deposits on brass fittings.
- Connections that have loosened over time due to vibration.
Routine cleaning and maintenance for longer pump life
A little periodic care keeps your pump running smoothly for many seasons. Every few months, take a moment to listen to its cycle—a change in sound can be an early warning. If your system has a filter, make a habit of checking and replacing it according to the manual; a clogged filter makes the pump work much harder. Once a year, consider a more thorough check: inspect the external housing for debris, ensure the mounting bolts are still snug, and wipe down any electrical contacts.
This isn't about complex repairs, but about attentive ownership. By preventing small issues, you ensure your pump remains a reliable and quiet companion on all your adventures.

