There's a moment of pure satisfaction when your boat finally finds its groove—the hull lifts, the ride softens, and the engine's pitch settles into an efficient hum. Your Bennett trim tabs are the quiet architects of that moment, subtly shaping the water flow to correct your vessel's posture. But that trust can fray when the little arrow on your switch gauge points down while you watch the starboard tab clearly sit high, or the auto tab feature seems to have developed a mind of its own. Before you suspect a hydraulic pump failure or a bad switch, consider this: the system's brain has simply lost its place.
The good news is you can guide it back. Re-teach your boat's posture.Maybe you've already scoured boating forums or watched a video from someone's channel, only to be left puzzled by cryptic instructions about sun and moon buttons and mysterious blinking lights.
The process of recalibration isn't about complex repairs; it's a conversation with the control box, realigning its internal sensor with the true, physical position of the tabs. This guide will translate that dialogue, walking you through the steps to restore the vital link between your command and the tab's action, ensuring that when you press the switch, your boat responds with perfect understanding.
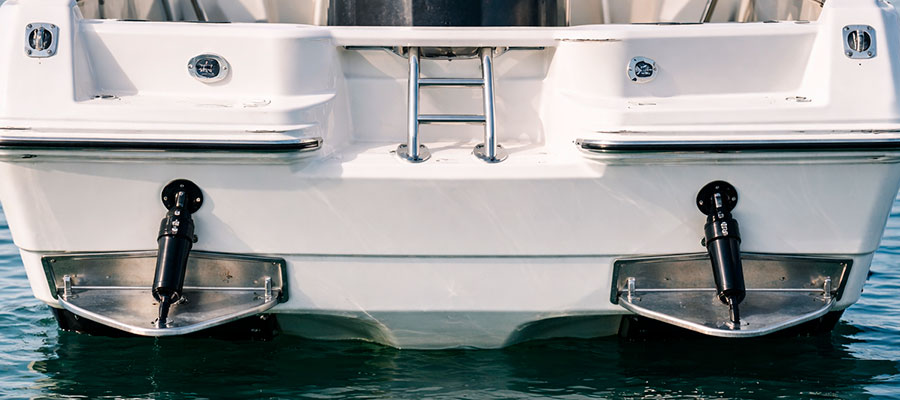
Understanding Your Bennett Trim Tab System
Think of your Bennett setup as a skilled dance between your commands and the hydraulic response below the waterline. When you nudge the rocker switch, it sends a message through a wire to the system's brain, which then tells the pump to shift the tabs. A tiny sensor keeps watch on the tab position, reporting back to create the picture you see on your trim tab indicator. A conversation between switch and water.
Key Components and Their Functions
| Component | Its Unique Contribution |
|---|---|
| The Rocker Switch | This is your direct line of communication, a tactile interface that converts your intention into a precise electrical request for the boat to adjust its stance. |
| The Control Module | Acting as the central nervous system, this unit interprets your commands and manages the power flow, while constantly listening for feedback from the position sensor. |
| The Position Sensor | This silent observer acts as the system's proprioception, continuously monitoring and reporting the exact angle of the tab back to the control module. |
| The Indicator Gauge | Serving as the storyteller, this device takes the raw data from the sensor and translates it into a clear, visual narrative you can instantly understand. |
How Trim Tabs Affect Boat Performance
Imagine your boat struggling to get on plane, with the stern squatting low and a hefty wake dragging behind it. Your trim tabs are the subtle sculptors that reshape this entire dynamic, acting as adjustable underwater wings on the transom. By deploying one side, you can lift a listing hull to level your cruise, making everyone on board more comfortable. Pushing both down together coaxes the bow down, helping the vessel climb onto a plane with less throttle and better fuel economy. They essentially let you fine-tune your hull's running angle long after it's left the shipyard. They sculpt your boat's posture.
Pre-Calibration Safety Checks
Your safety and the safety of your equipment are the first priority before any work begins. A few simple checks can prevent a frustrating mishap or a potential injury.
- Always disconnect the boat's battery to eliminate any risk of electrical shock or accidental actuator movement.
- Ensure the boat is securely supported on a trailer or stands, with the trim tabs clear of any obstructions.
- Work in a well-ventilated area if the control unit is located near battery fumes.
Preparing for the Calibration Process
Before you start, ensure you have a clear and safe workspace, ideally with the boat in the water or on a very level surface. Gather any manuals you have and be prepared to locate the main control box, which is often tucked away in a locker or under a console. This preparation saves you from scrambling mid-process and makes the entire recalibrate procedure much smoother. A calm start is best.
Gathering Necessary Tools and Equipment
You likely have most of what you need already in your toolbox, as this isn't a job that demands specialized gear. The goal is to have everything at your fingertips so you can focus on the calibration process itself.
- Basic screwdrivers and wrenches for accessing panels and tightening connections.
- A multimeter for checking wire integrity and voltage if troubleshooting arises.
- Your owner's manual or a digital copy on your phone for model-specific codes.
Locating the Control Unit and Actuators
Before you can teach your system, you need to find its brain and its muscles. The control unit is often a small, sealed black box that might be tucked away in a console locker or near the helm, a place you might not look at every day. The hydraulic pump or electric actuators will be closer to the transom, mounted near the tabs themselves, and you'll often hear the pump hum when the system is active.
Tracing the wires from your switch at the helm is a reliable way to track down the control unit if you're having trouble. Taking a moment to visually inspect these components for obvious wear or corrosion can save you time later. Find the brain and the muscle.
Establishing a Level Reference Point
Your boat must be on a level plane for the calibration to be accurate, as this is the baseline from which all adjustments are made. An uneven starting point will result in tabs that are constantly fighting to correct a false list.
- Use a reliable digital level across a known flat surface on the hull or gunwale.
- If on a trailer, ensure the trailer itself is level and the boat is sitting squarely on its bunks.
- Check the level from both port and starboard sides to confirm a true horizontal plane.
Step-by-Step Calibration Procedure
The exact steps can vary, but generally, you'll begin by holding down specific buttons, like the "bow up" and "bow down" rockers, to enter a special calibration mode. Watch the indicator lights closely; they will often flash in a new pattern to confirm you've done it right. Then, you'll typically use the switch to command the tabs to move to their upper and lower limits, teaching the control box their full range of motion. Follow the light's story.
Accessing the Calibration Mode
This step is the secret handshake that puts the system into a learning state, and the method can vary. You'll typically need to press and hold a specific sequence on your rocker switch, a process that might feel a bit like a video game cheat code.
- Common sequences involve holding both the "bow up" and "bow down" buttons simultaneously for several seconds.
- Watch for a confirmation signal, such as the bennett trim tab indicator lights flashing in a new pattern.
- Refer to your manual for the exact sequence if the standard method doesn't work.
Setting the Neutral Position
You are now teaching the system what "home" feels like for your specific boat. This neutral setting is the default position the tabs will return to when the auto retract feature is activated or when no input is given. You'll use the switch to guide the tabs to their fully stowed position and then lock that memory into the control unit. Getting this right ensures your tabs create minimal drag when they're not actively correcting your ride. Define the true stowed position.
Adjusting the Full Retract and Deploy Limits
You are now setting the physical boundaries for how far your tabs can travel in both directions. These limits prevent the actuators from straining against their mechanical endpoints, which can cause premature wear.
- Use the switch to cycle the tabs to their fully raised position and set the upper limit.
- Repeat the process for the fully deployed, or "bow down," position to set the lower limit.
- Ensure the tabs move freely through their entire range without binding.
Verifying Calibration Accuracy
The real test comes after you've completed the calibration sequence and exited the programming mode. Operate the switch and carefully observe if the starboard tab and port tab now move in perfect sync with the commands you're giving. Watch the needle on your gauge or the lights on your switch to see if they accurately reflect the actual, physical position of the tabs in the water. Trust, but always verify.
Testing Tab Movement on Dry Land
Before you hit the water, this is your dress rehearsal to confirm everything is communicating correctly. Operate the switch through its full range and watch the physical tabs for a synchronized and responsive dance.
- Listen for any unusual grinding or whining from the actuators that suggests a problem.
- Verify that the indicator accurately reflects the actual, physical angle of the tabs.
- Confirm that the auto tab function engages and disengages as expected.
Conducting On-Water Performance Checks
The calm of the marina is one thing, but the true test of your calibration happens when your boat meets the resistance and dynamics of open water. Take her out on a day with a gentle chop, bring the engine up to a comfortable cruising speed, and feel how the hull settles onto a plane. Watch the wake behind you; a symmetrical, clean V-shape often indicates a well-trimmed vessel, while a messy, one-sided wash tells a different story.
This is where you move from theoretical calibration to practical, hands-on tuning, feeling how the boat responds to minor tab inputs. Pay close attention to the steering; a boat that no longer pulls to one side is a sure sign of a successful recalibrate. The water tells the final story. Listen to the engine's pitch as well, as a smoother, more relaxed sound can indicate reduced drag and better efficiency from a perfectly adjusted attitude.
Fine-Tuning for Optimal Boat Attitude
Even a well-calibrated system might need a final personal touch to match your specific load and preferences. Pay attention to how the boat behaves with your usual gear and passengers on board.
- Note if one tab consistently needs more deployment than the other to maintain level.
- Make small, incremental adjustments and observe the effect on handling and efficiency.
- Trust your feel for the boat; the perfect attitude is often a sensation, not just a number.
Troubleshooting Common Calibration Issues
If you've attempted to calibrate but the trim tab indicator is still misbehaving, don't get discouraged. A common hiccup is failing to enter the programming mode correctly, so double-check the initial "press and hold" sequence for your specific model. If the tabs are moving erratically or not at all during the process, it's worth checking the wiring connections at the control box and pump for a loose plug. Patience reveals the problem.
Resetting the System to Factory Defaults
If you've tried to calibrate and the results are a confusing mess, a factory reset can be a fresh start. This wipes the slate clean, erasing any previous incorrect settings or corrupted data in the control unit.
- Consult your manual for the specific reset procedure, which often involves bridging terminals on the control unit.
- Be aware that a reset will require you to perform the entire calibration sequence from the beginning.
- This is a useful step if you've purchased a used boat with poorly configured tabs.
Addressing Uneven Tab Movement
Nothing is more frustrating than pressing the switch and watching one tab respond while the other lags behind or doesn't move at all. This points to a problem isolated to one side of the system, and your calibration efforts will be futile until it's resolved. The culprit could be anything from a trapped air bubble in a hydraulic line to a failing electric actuator or simply a corroded wire connection on one side. Before you attempt to recalibrate again, you need to play detective and find out why one tab isn't pulling its weight. Solve one side at a time.

Solving Control Unit Error Codes
Modern systems often communicate problems through blinking indicator lights or specific error codes. These flashes are the system's way of telling you it has detected an internal fault it cannot resolve on its own.
- Count the pattern of flashes and consult your owner's manual for a diagnostic chart.
- Common codes can point to issues like a sensor failure, over-temperature pump, or short circuit.
- If the code persists after checking wiring, the control unit itself may need replacement.
Maintaining Proper Calibration
Your trim tabs will generally hold their calibration well, but it's wise to check it during your seasonal commissioning each spring. If you ever need to replace the control switch or the sensor, you'll definitely need to run the tabs through a fresh calibration sequence. Keeping electrical connections clean and dry helps maintain this alignment for seasons to come. Preserve the system's memory.
Seasonal Re-Calibration Recommendations
| Scenario | Why It's Worth Your Time |
|---|---|
| Spring Recommissioning | Winter storage can allow minor electrical gremlins to appear; a spring calibration catches them early and ensures your first outing is a sharp one. |
| Noticing a Performance Lag | If the boat feels sluggish or doesn't plane out as expected, the tabs might be holding a position you didn't request, making recalibration a powerful fix. |
| After Hitting Submerged Debris | A sudden impact can physically jar the tabs or sensor, knocking their shared sense of position out of alignment and requiring a fresh handshake. |
| Replacing a System Component | Installing any new part, especially a switch or sensor, introduces a new voice to the conversation that must be taught the system's current limits. |
Protecting Against Corrosion and Wear
The marine environment is relentless, and a little preventative care can greatly extend the life of your entire trim tab system. A simple annual ritual can keep everything functioning smoothly for years.
- Spray electrical connections with a dedicated marine-grade corrosion inhibitor.
- Inspect the actuator boots for cracks or tears that could let in saltwater.
- Keep the tabs and actuators clean of barnacles and other marine growth.
When to Seek Professional Service
There comes a point when determination meets a hard limit in expertise or tools, and knowing that line saves time and money. If you've followed calibration instructions meticulously, checked every wire, and the system still refuses to cooperate with persistent error codes, it might be time to call Bennett.
Likewise, if you discover a hydraulic leak or a physically seized actuator, these are clear signs that professional hands with specialized knowledge are needed. There's no shame in seeking help; a certified technician can often diagnose and fix in an hour what might take a weekend of forum searching and guesswork. Know your limits for efficiency.