
In the vast, unpredictable world of marine navigation, the polyform buoy emerges as a resilient inflatable device made from tough vinyl, serving as an essential mooring marker, underwater signal, or floatation aid for boaters and divers. Originating from innovative designs in the 1960s, these buoys have become indispensable for water safety professionals due to their durability against currents, algae, and abrasion. Mastering the swelling process transforms a compact package into a buoyant guardian, ensuring reliable performance on the water. Whether you're a seasoned sailor or a weekend kayaker, following step-by-step methods with a focus on safety prevents issues like overpressurization.

Understanding Your Polyform Buoy
To get started safely, familiarize yourself with the basics of your inflatable marine float. These vinyl markers are key tools for boaters needing secure anchoring points. Each model from Polyform Products comes with a specific design for stability in water. Check the product's label for details on size and intended use. Avoid confusing it with protective cushions; remember, this is about marking waterways, not cushioning hulls. Always handle the item gently to prevent premature wear. Before any steps, ensure you have the right tools handy. Knowing these fundamentals sets you up for success.
Identifying the Correct Valve Type
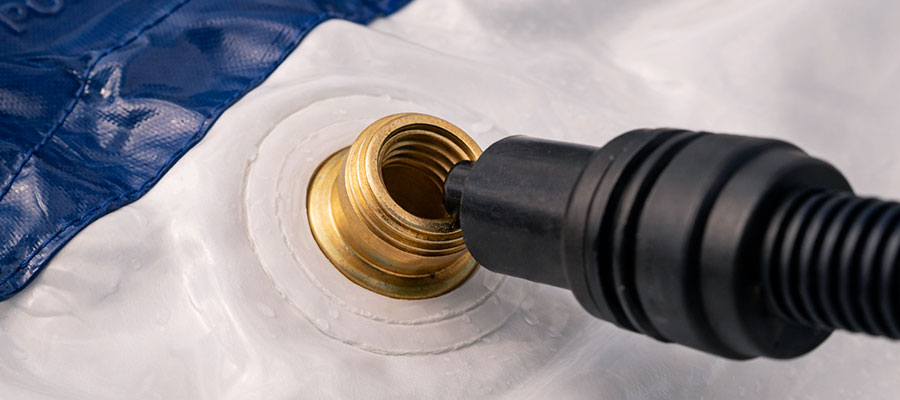
First, locate the small opening on your device where air enters. This is usually capped by a screw or flap and varies by product. Polyform Products offer different systems, so match it to your needs carefully. Flip over the fare to find the inflation valve clearly marked. If unsure, consult the user manual from Polyform Us for guidance.
Pay close attention here: selecting the wrong valve can lead to ineffective performance and wasted time.
For example, some models feature a threaded insert, while others use a rubber seal. Press gently to test if it depresses easily for airflow. In case of doubt, compare against similar items like Buoys And Boat Fenders. Finally, once identified, prepare the nozzle accordingly for connection. Proceeding without this check might cause unnecessary frustration.
Differentiating Between Buoys and Fenders
| Aspect | Buoys | Fenders |
|---|---|---|
| Primary Function | Floating markers or anchors, such as mooring buoys that hold boats in place or indicate navigable waters. (e.g., Polyform buoys for anchoring.) | Protective cushions that absorb impacts, placed between a boat's hull and docks, piers, or other vessels to prevent scratches or dents. |
| Shape and Design | Typically spherical, cylindrical, or conical (e.g., inflatable vinyl spheres) with a flat bottom for stability. Often include ropes, chains, or markers. | Oval, round, or tubular shapes designed to be hung vertically or horizontally; made of rubber or inflatable materials for flexibility. |
| Inflation and Material | Inflated with air to float atop water; materials like vinyl for durability against currents and marine life. | Inflatable or solid; when inflatable, filled with air for shock absorption but placed contact surfaces. |
| Usage Environment | Used in open water, harbors, or for underwater signaling; may integrate with anchors or chains. | Used in docking areas, marinas, or when boats are tied up alongside structures or other boats. |
| Key Types | Polyform, mooring buoys, navigation buoys; can be permanent or temporary. | Boat fenders, dock fenders; variations like foam-filled or pneumatic. |
| Maintenance Focus | Ensure proper swelling to maintain buoyancy; check for leaks or wear from water exposure. | Inspect for deflation or damage from abrasion; adjust placement to avoid overloading. |
Pre-Inflation Inspection and Safety Check
Before beginning the process of filling your Polyform Us product, it's essential to perform a thorough visual and functional check to ensure safety and longevity. This preparation helps prevent issues during use and avoids potential voids in warranties related to improper handling.
- Examine the buoy closely for any signs of tears or punctures using your fingertips.
- Use soap and water if needed to clean the surface before starting.
- Test all attachment loops by pulling gently to confirm they hold firm.
- Wear protective gloves to avoid skin irritation from chemicals or dirt.
- Inspect the nozzle for any debris or obstructions and confirm the adaptor fits securely without forcing.
- Measure the diameter accurately, check it against the inflation chart, and ensure your workspace is stable; never proceed if the valve shows damage.
Selecting the Right Inflation Method
Picking the ideal approach for adding air to your Polyform fender involves weighing options like manual devices or powered tools. Many users prefer methods that allow gradual filling to avoid overstretching the material. A straightforward choice often centers on equipment you can operate without electricity. Consider how the technique impacts the item's durability over time. Hand-operated tools provide steady pressure without rushing the process. Always double-check compatibility with your specific Polyform product's specifications. This careful selection can mean the difference in how long your gear lasts on the water. Exploring manual ways first might save you from common mistakes later on.
Choosing Between Hand Pumps and Air Compressors
Deciding on whether to use a hand tool or a machine compressor comes down to your setup and comfort level. Hand-operated options offer portability and require no power source, perfect for remote spots. They're simpler to control, letting you build up air gradually without fear of sudden bursts. Machines, on the other hand, speed things up but might need fuel or outlets. For safety, manual tools suit beginners who want to monitor progress closely. Always prepare your workspace to avoid slips or accidents during the task.
Balanced pressure application helps maintain the integrity of your floating device against wear.
Electric alternatives can be loud and less forgiving if not handled right. Ultimately, stick to what's easy to manage for consistent results. Testing different styles beforehand will guide your preferences over time.
Why Controlled Manual Inflation is Recommended
Opting for a step-by-step manual approach ensures even expansion of your Polyform gear without risking tears. This method lets you adjust force delicately to match recommended levels. Sudden rushes from heavy-duty equipment can strain attachment points unnecessarily. Manual control also reduces warranty concerns tied to uneven filling. Following this path promotes long-term reliability for boating essentials.
- Start with gentle pulls on the pump to avoid overloading seals.
- Pause often to check the expanding size against product guidelines.
- Avoid machines if they lack built-in safety limits for soft materials.
- Feel the tension in walls to steer clear of exceeding capacity.
- Combine patience with accuracy for smoother, safer outcomes.
Tools You'll Need for Proper Inflation
Gather essential items ahead to make expanding your inflatable buoy efficient and smooth. A dependable pump forms the core of your setup, chosen for ease of use. Don't forget protective gear to keep hands clean during the job. Measurement aids help confirm you're hitting just the right amount of air. Having these ready prevents delays and ensures a professional finish.
- A manual pump you can grip comfortably for steady output.
- Gloves to shield against grime or potential irritation from surfaces.
- A tape measure for verifying the girth matches chart values.
- An adapter specifically designed to fit securely into the intake.
- A clear, flat area to anchor your item while working.
Step-by-Step Inflation Process
Begin by laying out your polyform fender or buoy on a flat surface for stability. Next, locate the valve opening and apply the nozzle or adapter into the nozzle first. Make certain you can depress the vent to initiate airflow gently. Use a hand or foot operated pump to add air steadily. Measure around and check it against the inflation chart for proper pressure regularly. Align with the chart measurement to avoid issues with your polyform boat gear. Once full, remove the pump and replace the screw cap securely. Double-check the fender inflation to ensure everything feels firm without excess stress.
Preparing the Valve for Air Intake
Clean the air inlet opening on your bumpers and floats to remove dirt. Inspect for signs of damage to the valve that could cause leaks. Gently twist or press the valve screw to access the intake point. Ensure the adapter in the valve opening fits snugly without forcing. Connect the nozzle to the adapter properly for a tight seal. Test by depressing slightly to confirm air can start flowing. Wipe away any moisture to prevent blockages inside. Position your fill the polyform fender upright for easier access.
Adapter into the nozzle first helps create a secure link for reliable supply.
Switch to portable options if power sources are unavailable nearby. Verify measurements post-connection to catch mismatches early. Rinse components if exposed to salt water residues. Stock up on extras adapters for variety in boat fender and buoy inflation tasks. Practice on smaller items first to build confidence in valve prep.
Techniques for Consistent Air Flow
Ensure steady air delivery by holding the pump handle firmly. Operate at a pace that lets you feel changes in tension. Pause to compare the increasing circumference against guiding charts. Move around the item to distribute pressure evenly. Switch hands when using a hand or foot setup to reduce fatigue.
- Depress to start the air flowing in controlled bursts.
- Pump slowly to match the chart measurement on your tool.
- Alternate between pumping and measuring circumference for accuracy.
- Use a seal lubricant on adapters to prevent air escape.
- Steady your stance for better balance during long sessions.
Monitoring Pressure During Inflation
Watch how the walls expand as you add air to your gear. Compare it with the inflation chart often to stay within limits. Avoid rushing since inflating without a pressure gauge risks over-filling. Measure the circumference and compare after every few pumps. Match the chart measurement exactly for best results. Stop if you feel more resistance than usual early on. Check for even bulge across the entire surface area. Consult guides like world on youtube for visual demos. Double-measure to ensure your polyform fender matches safety standards.
Achieving Optimal Inflation Levels
Start by consulting the inflation guide to understand your specific needs. Use a clear area to inflate polyform safely away from obstacles. Open the seals carefully to avoid punctures during setup. Follow the steps to insert the inflation adapter smoothly. Check that the inflation adapter in the valve fits tightly. Pump air in steady amounts to build pressure gradually. Monitor as the buoy or fender expands evenly. Stop when you reach the recommended size for your setup.
Recognizing the Perfect Firmness
Look for signs that your equipment feels just right under your hands. Press gently to gauge how much resistance it offers natural. Watch for even stretching across all surfaces without bulges. Test bouncing slightly to see if it responds solidly. Compare visually with images of properly filled items online. Feel for a balance where it's not too hard or soft. Ensure the weight of the boat doesn't cause unexpected shifts. Practice on one side first to get a sense. Polished workmanship in polyform products are designed to hold shape well.
Adapter and depress to start helps kicking off the process accurately.
Take notes on how it changes with each pump cycle. Observe color fading or material stress if present. Smell or listen for unusual sounds indicating issues. Compare firmness to a tennis ball's bounce. Rotate the item to check multiple areas. Ensure it's stable enough for marine use. Test in warm water if possible. Mull over factors like wear from previous trips.
Dangers of Over-Inflation and Under-Inflation
Pushing too much air can lead to bursting, ruining your gear. Under-inflating leaves it vulnerable to dents and scratches easily. Both extremes create hazards during boating adventures. Too firm increases risk of slipping from mounts. Too soft fails to absorb impacts properly. Check guides to spot signs like uneven walls. Uneven pressure might cause weak spots over time. Always measure circumference after adjustments for safety.
Seasonal Adjustments for Temperature Changes
Adjust levels as weather warms to prevent excess pressure buildup. In cooler months, add air since materials contract more. Monitor how gas station or portable air affects density. Check expansion after long exposure outdoors. Readjust after trips through varying conditions.
- Pump lightly for summer heat to avoid overheating.
- Add extra for winter cold to maintain bounce.
- Use portable tools in remote areas safely.
- Measure circumference regularly year-round.
- Store indoors when not using for long periods.
Valve Maintenance and Care
Regular checks prevent issues during your boating trips. Clean the opening with a soft cloth gently. Inspect for any small tears that might occur. Apply a bit of silicone lubricant if dry. Twist carefully to ensure smooth operation. Store in a dry place away from direct sun. Test each season before heavy use. Replace worn parts promptly to keep everything safe.
Keeping Valves Clean and Functional
Start by rinsing off salt residue quickly. Use mild soap for tough spots without scrubbing hard. Dry completely before reassembling. Avoid harsh chemicals that could damage. Check alignment during reinstallation. Lubricate moving parts for better flow. Seal areas that look vulnerable. Practice removal and reattachment on extras.
Inflation adapter into the nozzle ensures a proper fit every time.
Keep accessories in separate compartments. Examine under light for hidden dirt. Flush with fresh water after saltwater exposure. Store upright to avoid bending. Test seal by pressing gently. Wipe with alcohol for deeper cleaning. Replace if stiffness increases. Monitor for leaks during idle periods. Label items for easy identification.
Storage Tips to Maintain Inflation
Hang upright in a cool, shaded area for long-term upkeep. Cover with a breathable cloth to dust protection. Avoid extreme temperatures that cause expansion. Inspect monthly for any pressure loss. Label with date and size for reference.
- Deflate partially if storing compressed.
- Place in garages free from moisture.
- Use vacuum bags for compact options.
- Separate items to prevent rubbing.
- Check annually before reuse.
Identifying When Re-inflation is Needed
Watch for signs that pressure might be dropping. Feel the surface to sense any give. Measure size changes over time accurately. Listen carefully for subtle air loss. Compare to how it feels when fresh. Track shifts after rough handling always.
- Push on areas to check firmness levels.
- Note any wrinkles forming on sides.
- Test bounce in a controlled spot.
- Look for fading colors indicating stress.
- Pump slowly to gauge needed amounts.
Troubleshooting Common Issues
Start by checking if the seal breaks easily. Look for dirt blocking pathways during attempts. Ensure you don't force tools into tight spots. Clean surfaces gently with a cloth before starting. Test pressure slowly to avoid sudden bursts. Measure against charts to spot discrepancies. Avoid over-pumping to prevent damage. Report patterns to manufacturers for advice.
Dealing with Stuck or Leaky Valves
Gently wiggle the part to free any obstruction. Rinse with water if residue builds up. Dry thoroughly to remove moisture quickly. Tap lightly to dislodge stuck elements. Apply lubricant sparingly for smoother action. Check threads for damage closely. Replace gaskets if they seem worn out. Test seals by pressing down evenly.
Buoy until the walls feel firm under pressure.
Inspect connections for misalignment issues. Twist carefully without excessive force. Store components in protective wraps. Reinsert the inflation adapter into the nozzle securely. Monitor for air escape regularly. Wipe internals with soft materials. Avoid solvents that corrode materials. Practice fixes on similar models. Note successful methods for future use.
Methods for Adding Air to Partially Inflated Buoys
First, detach any attachments hindering access. Prepare your pump for steady delivery. Insert the tip slowly to avoid harm. Inflate gradually while watching the form. Stop midway if resistance feels unusual. Rotate the item to ensure even spread. Check the circumference of the particular product often. Match expansion to expected standards. Erase any bubbles by gentle massage.
When to Seek Replacement vs Repair
Examine damages that seem beyond quick fixes. Consider age as it affects durability. Weigh cost of parts against new purchases. Test strength after minor adjustments. Look for manufacturer warnings ahead. Decide based on safety first. Persistent leaks signal need for change. Expert advice helps clarify doubts. Damage from misuse voids promises. Frequent issues indicate replacement timing. Pick options that save time overall.

