Waxing your fiberglass boat offers many benefits. It helps protect the surface from damage. A good wax adds a shiny finish.
This keeps your boat looking its best. Regular waxing prevents fading from UV rays. The process is simple and straightforward. Start with a clean surface for best results. Choose a quality wax made for fiberglass. Apply wax in a shaded area for effectiveness.

Work in small sections for even coverage. Allow the wax to dry completely before buffing. Enjoy your boat's enhanced appearance and protection.
When Should You Wax a Fiberglass Boat?
Wax every 3-6 months for best protection. Saltwater boats need frequent applications. Check for water beading as your guide. Spring prepares for summer use. Fall waxing aids winter storage. New boats need immediate protection. Rewax when shine diminishes. Hot climates demand more applications. Dark colors show wear faster. Regular waxing saves money long-term.
How Often to Wax Your Boat for Optimal Protection
Wax twice a year minimum for protection. Saltwater boats need three applications annually. Check your boat's finish regularly for wear. Dark hulls show oxidation faster than light. High-traffic areas may need spot treatments. New boats deserve immediate protection. Summer sun demands extra care. Winter storage benefits from thick coatings. Trailered boats stay protected longer. Consistent care prevents costly repairs.
Seasonal Waxing: Spring Preparation vs. Winter Storage
Spring requires hull cleaner for salt removal. Summer needs UV-resistant products. Fall prep prevents debris buildup. Winter demands thick coatings for storage. Use PTEF formulas for waterlines. Spring waxing removes winter grime. Summer applications resist water spotting. Winter formulas tolerate cold snaps. Seasonal approaches maximize results. Your boat stays protected year-round.
Signs Your Fiberglass Hull Needs Waxing
Your boat tells you when it's thirsty. Look for these oxidize warning signs. Time to grab the protectant:
- Water stops beading on the surface
- Chalky white film appears
- Color looks faded in sunlight
- Scratches show more easily
- Salt sticks stubbornly after rinsing
- Last coat of wax wore off
- Surface feels rough to touch
- Morning dew clings unevenly
- Year old boat needs refresh
- Shining like new? Not anymore
What Supplies Do You Need for Boat Waxing?
Gather marine-grade wax first. You'll need microfiber towels for buffing. A foam applicator ensures even coverage. Include boat soap for prep work. Add a clay bar for contaminants. Have multiple clean buckets ready. Use soft brushes for cleaning. Protect trim with masking tape. Quality supplies make the job easier. Don't forget sunglasses and gloves.
Best Boat Wax Types for Fiberglass Hulls
Not all waxes work the same. Choose these high gloss champions. Your hull deserves the best.
- Collinite Fleetwax - 6+ month protection
- 3M Marine Wax - UV blockers included
- Meguiar's Flagship - Enhances color depth
- Star brite Premium - PTEF formula
- Turtle Wax Hybrid - Ceramic infusion
- Use a product called Rejex for longevity
- Coat of smoove white cloud for winter
- Marine 31 - Nano technology
- Easy to apply liquid versions
- Paste wax for show-quality finish
Essential Tools: Buffers, Wool Pads, and Cotton Towels
The right gear makes all the difference. Skip the surface debris traps. Invest in quality instead.
- Harbor Freight DA polisher for beginners
- Makita rotary for professionals
- Wool pads cut through oxidation
- Foam pads finish beautifully
- Microfiber towels beat cotton
- Buff the wax with clean towels
Cleaners and Prep Products for Before Waxing
Start with boat cleaner for basic washing. Use abrasive compounds carefully. 3M rubbing compound handles oxidation. Star brite removes tough stains. Restorers revive faded surfaces. Avoid polishes before waxing. Foam pads work better than wool. Rinse with fresh water always. Dry completely before waxing. Proper prep ensures perfect results.
How to Properly Wax a Fiberglass Boat: Step-by-Step Guide
Start with a clean surface. Apply wax in thin layers. Work in small sections systematically. Use circular motions for coverage. Let wax haze before buffing. Remove with clean microfiber towels. Inspect under different lighting angles. Repeat for complete coverage. Finish with final buffing. Enjoy your like-new shine.
Preparing the Hull: Cleaning and Removing Oxidation
Dirty hulls waste good wax. Remove surface debris properly. Start with these steps:
- Wash and wax base cleaner first
- Degreaser for waterline scum
- Oxidation remover for chalky areas
- Compound heavy spots
- Clay bar entire surface
- Rinse thoroughly after each step
- Dry completely before waxing
- Tape off sensitive areas
- Inspect under good lighting
- Test spot checks methods
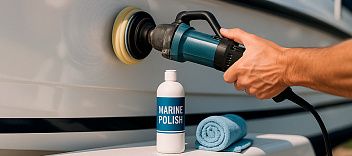
Applying Boat Wax: Techniques for Different Products
| Product Type | Best For | Application Tool | Key Tip |
|---|---|---|---|
| Paste Wax | Show-quality finish | Foam applicator | Use small circles |
| Liquid Wax | Quick application | Microfiber pad | Wipe on thin layers |
| Spray Wax | Maintenance between coats | Soft cloth | Mist then buff immediately |
| Moderate oxidation | Wool pad | Let haze fully form | |
| Ceramic Coating | Longest protection | Sander for prep | Needs perfect surfacefirst |

Buffing Tips to Achieve Maximum Gloss
Use orbital buffers for safety. Set RPMs between 1000-1400. Work one section at a time. Apply two coats for depth. Buff while wax remains slightly wet. Quality polishers make a difference. Keep pads flat against surfaces. Clean pads prevent swirl marks. Proper technique creates mirror finishes. Your hull will shine brilliantly.
Common Boat Waxing Problems and Solutions
Hazy residue means too much product. Streaks indicate uneven application. White powder suggests old wax buildup. Fish eyes come from contaminants. Fix haze with quick detailer. Remove streaks with fresh towels. Eliminate powder with proper stripping. Prevent fish eyes with clay bar. Always work in shade. Test products in small areas first.
Dealing with Heavy Oxidation and Stains Before Waxing
Start with 800 grit wet sanding. Progress to 2000 grit for smoothing. Collinite Fleetwax protects after restoration. Use rubbing compound for severe cases. Power buffers save effort. Remove light stains first. Rinse between each polishing step. Dry completely before waxing. Test methods on hidden areas. Severely damaged surfaces may need pros.
Troubleshooting Hazing and Dull Spots After Waxing
Haze means wax to use less product. Dull spots suggest incomplete removal. Fix with quick detailer. Reapply to problem areas carefully. Follow the directions precisely next time. Ensure surface was clean first. Check for contaminants under wax. Store products in moderate temps. Top posts on boating forum help. Proper technique prevents most issues.
Waxing Difficult Areas: Tips for Tight Spaces
Tight spots test every boater's patience. These proven methods conquer cramped areas. Your hard-to-reach places will shine.
- Use finger cots for precise application
- Trim pads fit around cleats
- Detail brushes work in corners
- Q-tips perfect for hardware edges
- Wrap sandpaper around dowels
Polymer Polish vs. Traditional Boat Wax: Which is Better?
Polymer sealants last longer. Carnauba wax gives warmer shine. Sealants resist UV damage better. Waxes enhance color depth. Polymers work well for trailers. Carnauba suits show boats. Hybrid products offer both benefits. Choose based on your needs. Saltwater favors sealants. Freshwater works with either.
Comparing Durability and UV Protection
| Wax Type | Durability | UV Protection | Best Use Case |
|---|---|---|---|
| Paste Wax | 2-3 months | Good | Show boats |
| Liquid Wax | 1-2 months | Moderate | Frequent use boats |
| Polymer Sealant | 4-6 months | Excellent | Saltwater boats |
| Ceramic Coating | 1+ year | Superior | High-end yachts |
| Cleaner Wax | 6-8 weeks | Fair | Quick touch-ups |
Application Differences and Required Effort
Paste wax gives deepest shine. Liquids work faster. Sprays offer quick touch-ups. Cleaner wax combines two steps. Gel coat needs special care. Elbow grease matters with hand application. Machines save time and effort. Nu Finish works on all surfaces. Apply and remove carefully. Choose based on your boat's needs.
Cost-Benefit Analysis of Polymer vs. Paste Wax
Polymer sealants last longer. Paste wax gives warmer shine. Gloss polymer resists UV better. Colonite offers both benefits. 3M products work reliably. High tech formulas cost more. End of the season matters most. Consider your boat every factor. Balance cost versus results. Your hull deserves proper care.
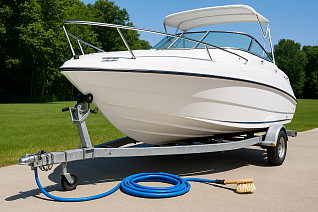
Professional Waxing vs. DIY: Is It Worth Hiring Pros?
Pros save time and effort. They spot hidden problems early. DIY costs less upfront. Professionals use commercial-grade products. Home methods work for maintenance. Large boats justify pro service. Small craft DIY easily. Consider your skill level. Balance cost versus convenience. Either way, wax regularly.
Cost Comparison Between DIY and Professional Services
Money talks when waxing your boat. DIY saves upfront costs. Pros deliver showroom finishes.
- DIY costs: 50−150 for supplies
- Pro services: 300−800 average
- Buffer purchase pays over time
- Quality wax lasts longer
- Time investment varies by skill
- Mistakes cost more to fix
- Large boats justify pro care
- Small crafts DIY easily
- Tool rental cuts expenses
When to Consider Professional Boat Detailing
Large boats need pro service. Old gel coat may require experts. Surface tension issues baffle beginners. Topsides often need special care. Marine polish applications differ. Waxed hull shows professional touch. Rights reserved for complex jobs. Trouble signing your work? Call pros. The Hull Truth recommends certified detailers. Sometimes paying more saves money.
Top Boat Wax Mistakes to Avoid
Never wax in direct sun. Avoid using household cleaners. Don't apply to dirty surfaces. Skip wax buildup in corners. Prevent swirl marks with clean pads. Don't rush the haze time. Overlook non-skid surfaces carefully. Use proper ventilation always. Read product labels thoroughly. Your boat deserves proper care.
Common Application Errors That Waste Time and Product
Avoid these time-wasters when waxing. Smart techniques boost efficiency. Work smarter, not harder.
- Applying too thick creates haze
- Skipping prep leads to streaks
- Wrong pads cause swirl marks
- Dirty surfaces ruin results
- Sun baking sets wax too fast
- Rushing buffing leaves residue
Harmful Practices That Can Damage Your Gelcoat
Some habits destroy surfaces slowly. Avoid these gel coat killers. Protect your boat's skin.
- Household cleaners strip protection
- Steel wool scratches deeply
- Pressure washers blast off wax
- Automatic car washes are too harsh
- Sanding dry creates gouges
- Acid cleaners etch surfaces
Waxing the Bottom: Why You Should Never Wax Below the Waterline
Bottom paint needs bare surface. Wax creates slick coating. Antifouling paint won't stick properly. Wax a boat bottom? Never. Boat polish belongs above water. Put a coat only on topsides. Wax the hull carefully. Terms of use vary by product. Your bottom paint lasts longer unwaxed.