Setting the schedule on a Webasto is one of its best features, yet it can be confusing without the manual or a clear guide. This article will walk you through the process, from basic adjustments to creating a recurring schedule. The goal is to get your device to operate automatically, providing heat exactly when you need it without having to manually start the unit. We'll cover the standard digital control so you can master your Webasto heater. This also applies to a water-based system designed to pre-heat an engine by warming the coolant with a small electric water pump.

Introduction to Webasto Heater Timer Function
Before diving into the steps, it's important to understand what the scheduling function is and which models support it. The feature is essentially an automatic switch that tells your device when to turn on and, in some cases, for how long to run.
Why Use the Timer Feature on Your Webasto Heater?
Using the automated start is all about convenience and efficiency. You can:
- Wake up to a warm vehicle cabin or boat interior.
- Pre-heat your vehicle's motor, reducing wear during cold starts.
- Melt ice and snow off your windows before you even step outside.
- Ensure the heater runs only when needed, saving resources.
Understanding the Webasto Control Panel Interface
Most Webasto digital schedulers feature a small screen and a few inputs. The main input is typically a rotary knob that you can turn to navigate menus and press to confirm a selection. There will also be a dedicated icon or button to instantly start or stop the device, often marked with a flame symbol. Understanding this basic interface is key to programming the system.
Types of Webasto Heaters That Support Timer Settings
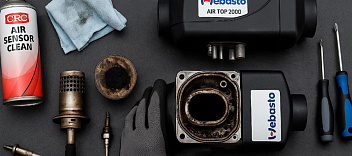
Most modern Air Top and Thermo Top models come with a digital interface that includes a scheduling option. Older models with a simple rotary thermostat (a rheostat) do not have this function. You must have a digital interface to create a schedule.
Step-by-Step Guide to Setting the Timer
Programming the device is a logical sequence of steps. We will break down each part of the process so you can confidently set up your unit to run.
Accessing the Timer Menu on the Webasto Control Panel
First, you need to navigate to the correct menu on the control panel. With the display active, press the main rotary knob. This will bring up the main menu icons. Turn the knob until you highlight the icon that looks like a clock, which represents the scheduling menu. Press the knob again to enter this section.
How to Program Start and Stop Times
Inside the menu, you'll see several programme slots, usually labeled P1, P2, and P3. Select an unused slot. The system will then guide you through setting the start time, day by day. You will turn the knob to set the hour and press to confirm, then set the minutes and press to confirm. After defining the start time, the next setting is the run duration. This effectively sets the stop time. You can choose how long the device will run, for example, 30 minutes.
Saving and Confirming Your Timer Settings
After you have selected the run duration, the event is automatically saved in that slot. However, this does not mean the function is active. This is a critical step many people miss. You must go back one level in the menu where you see your saved event listed. You then have to select an "Activate" or a checkbox next to it. Once selected, a small clock icon will appear on the main display, confirming that a programmed start is armed and ready.
Advanced Timer Settings for Optimal Use
Once you master the basics, you can use the function more effectively. Advanced adjustments allow you to tailor the system's operation to your specific weekly schedule.
Setting Daily vs. One-Time Schedules
When creating a schedule, you can often choose a specific day of the week for a one-time event or select a block of days (Monday-Friday) for a recurring task. This is perfect for pre-heating your car every workday but leaving the weekends free.
Using the Timer for Parking Heaters in Cold Weather
The most common use for this feature is as a parking device. Scheduling the unit to run for 20-30 minutes before you leave for work will completely de-ice your windows and warm the cabin, saving you from scraping ice in the freezing cold.
How to Override or Cancel a Timer Setting
If you have a schedule set but want to start the device manually, simply press the instant-on flame icon. This will start a continuous heating cycle that overrides the programmed event. To cancel a set event without starting the system, navigate back into the scheduling menu, select the active programme, and choose the "Deactivate" choice.
Troubleshooting Common Timer Issues
Sometimes, the scheduler doesn't behave as expected. Here are some common problems and solutions you can find discussed on any related forum.
| Problem | Possible Cause | Solution |
| Schedule is set, but device doesn't start. |
1. Low battery power. 2. No fuel in the tank. 3. The schedule was not activated. |
1. Check/charge the vehicle's battery. 2. Check the fuel level. 3. Go back into the menu and ensure the event is activated. |
| System tries to start but then shuts down. |
1. Fault code triggered. 2. Blocked exhaust or air intake. 3. Issue with the burner or plug. |
1. The interface will display a fault code. Check the instruction book for its meaning. 2. Inspect the intake and exhaust pipes for obstructions. |
| The display is blank. | No power to the interface. | Check the main wire and harness connecting the controller to the main unit. Check the fuse. |
Why Isn’t My Webasto Heater Following the Timer?
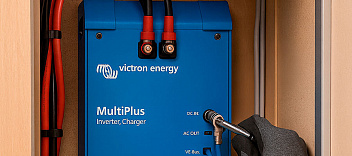
The most common reason a scheduled start fails is an inadequate power supply. The heater performs a self-check before starting, and if the battery voltage is too low, it will not attempt to fire up to avoid draining the power source completely. This is a safety feature.
Resetting the Timer to Factory Defaults
If your saved schedules become corrupted, you can usually perform a factory reset. The method for this is often found in the troubleshooting section of the product literature. It typically involves navigating to a system menu and selecting "Reset." This will erase all your saved events.
When to Check the Diesel Heater’s Power Supply
If the system fails to start multiple times, you must check its lifelines. This means ensuring the diesel heater has a clear line to the vehicle's fuel tank and that the electrical supply from the power source is stable. A loose cable or corroded connection can prevent the unit from starting.
Maximizing Efficiency with Timer Settings
Using the scheduler wisely can significantly reduce your resource consumption and extend the life of the device.
Best Practices for Diesel Heater Timer Use
Don't set the system to run longer than necessary. For a typical car, 20-30 minutes is more than enough to warm the cabin and clear the windows. Running it for an hour when only 15 minutes is needed just wastes resources.

Energy-Saving Tips for Parking Heaters
Set the target temperature to a comfortable level, not maximum. The device uses the most fuel during startup. Once the cabin reaches the set temp, the system will cycle to a lower power level to maintain it, saving energy. The internal temperature sensor manages this process.
Pairing Timer Settings with Remote Control Options
For ultimate flexibility, you can pair the scheduler with a remote control. Set a recurring event for your workdays, but use the remote to start the device on demand during weekends or at irregular times. The fob sends a signal to the main system, overriding any scheduled setting.
Frequently Asked Questions About Webasto Timers
Here are some quick answers to common questions.
Can You Set Multiple Timer Events in a Day?
Yes, most digital interfaces allow you to install and save up to three different events. You could have one for the morning, one for the evening, and a third for weekends.
Does the Timer Work in All Webasto Heater Modes?
The scheduler is primarily used to activate the heating mode. On some advanced interfaces, you may be able to program it to start in ventilation-only function (to circulate air), but the primary purpose is to generate warmth.
How to Sync Timer Settings with Other Vehicle Systems
In most aftermarket installations, the Webasto system is self-contained. However, in some factory-installed or advanced setups, the heater can connect to the vehicle's CAN bus system. This allows the device to get data from an external sensor or be controlled by the main vehicle infotainment screen, but this requires a professional install.