

There are few sounds as comforting as the steady, electric grind of your Lofrans windlass effortlessly raising the anchor after a long day. It’s a piece of machinery that embodies pure muscle, making a heavy task feel almost effortless. But when the time comes for maintenance, or you need to replace a worn chain gypsy, this robust unit can present a formidable challenge. That gypsy, the toothed wheel that guides your chain, is designed to stay put through gales and rough seas, and convincing it to let go often feels like a battle of wills. You might have searched through owners forums, read the manual, and even given it a few tentative taps, only to find it remains stubbornly in place.
A stubborn but manageable task.This isn't just about brute force; it's about understanding how the windlass thinks. The main shaft, clutch cone, and various bolts all work in concert to hold the gypsy securely against the immense forces of raising and lowering your anchor.
The process of removal is a deliberate dance of loosening, tapping, and persuading, requiring a blend of the right tools and a little bit of marine ingenuity. Whether you're working on a Lofrans Tigres or another model, the goal is to coax the gypsy free without damaging the delicate components beneath. Let's walk through the steps to respectfully disassemble this workhorse and get your ground tackle system back in flawless working order.
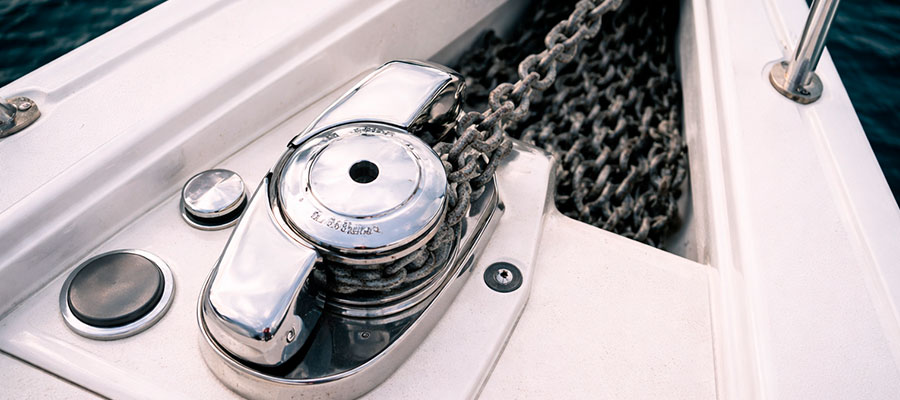
Understanding Your Windlass Assembly
Before you start pulling things apart, take a moment to understand how this powerful winch is put together. The gypsy is essentially the heart of the operation, mounted on a main shaft and often held in place by a clutch mechanism and a central bolt or screw. Looking at a diagram for your specific model, like the Lofrans Tigres or Progress, reveals how the gear, bearings, and other parts interact as a whole unit. Know the machine's anatomy.
Identifying the Gypsy and Its Components
Before you begin, it's helpful to understand exactly what you're looking at on your deck. The gypsy is the notched wheel, often made of hardened steel, that directly engages with the links of your anchor chain to pull it in or let it out. It's mounted on a central shaft and is typically secured by a large central nut or a snap ring, hidden beneath a protective cap or plug.
On many Lofrans models, the entire assembly is part of a clutch system that allows you to disengage the motor and lower the anchor by free-spooling the chain. Taking a moment to find the product description or a diagram for your specific unit can save a lot of confusion later. Know the parts you're handling.
Different Models: Tigres and Other Lofrans Variations
While the core principle is the same, the specific steps can vary between models like the robust Lofrans Tigres windlass and the vertical Lofrans Progress. Knowing your model ensures you approach the task with the right expectations and tools.
- The Tigres often has a side-mounted clutch, while the Progress uses a top-action mechanism.
- The size and type of the central retaining fastener can differ significantly.
- Always verify the correct replacement part number for your specific model.
Safety Precautions Before Starting Work
Your safety is the first and most non-negotiable part of this entire process. A sudden activation of the powerful electric motor or a slipping chain under tension can cause serious injury in an instant.
- Always disconnect the battery power at the source before touching any wiring.
- Ensure the anchor is securely set or the chain is tied off to a strong point on the boat.
- Wear safety glasses to protect your eyes from rust flakes and metal debris.
Preparing for Gypsy Removal
A little preparation makes the entire process much smoother and prevents frustrating setbacks. Gather your tools, including a sturdy winch handle that fits the clutch, and ensure you have a clean, well-lit workspace on deck. This is also the time to consult the manual for the correct part number and any model-specific warnings. Preparation prevents parts flying.
Gathering Necessary Tools and Equipment
There's a particular frustration in being halfway through a job and realizing you're missing one key tool, especially when you're wedged in an anchor locker. You'll likely need a set of sturdy wrenches or sockets that perfectly fit the central nut, along with a soft-faced mallet for gentle persuasion.
A gear puller can be a lifesaver for a stubborn gypsy that refuses to slide off its shaft, and having a wire brush and penetrating oil on hand is wise for any sailing equipment. Taking ten minutes to gather everything before you start makes the workflow smooth and keeps your focus on the task, not on searching for a tool. The right tool for the right job.
Disconnecting Electrical Power to the Windlass
This is the single most vital step to ensure your physical safety during the procedure. Simply turning off the switch at the helm is not enough, as a faulty switch or an accidental bump could energize the unit.
- Locate the main circuit breaker or fuse for the windlass and disconnect it.
- For absolute safety, disconnect the primary positive and negative cables at the battery bank.
- Use a voltmeter to confirm there is no power at the windlass motor terminals.
Accessing the Windlass Compartment
Getting clear access is half the battle, as these units are often installed in tight spaces. You may need to remove a deck plate or open up a section of the forward locker on your cruiser to see the motor and wiring.
- Clear out any gear, fenders, or lines stored in the anchor locker.
- Look for and remove any screws or bolts securing an access panel.
- Ensure you have enough light to see the components clearly and safely.
Step-by-Step Removal Process
The general sequence involves disengaging the clutch to free the shaft, then removing the central fastener that locks the gypsy in place. You might need to gently tap around the gypsy with a soft-faced mallet to encourage it to break free from the shaft without damaging the stainless components. If it's stubborn, a specialized puller can apply even, controlled force to slide it off. Methodical force wins the day.
Removing Retaining Pins or Fasteners
This is often the first real mechanical challenge in the process, where you transition from preparation to active disassembly. Locate the main retaining bolt or pin in the center of the gypsy; it might be hidden under a small plastic or metal plug that you can gently pry out. Use a well-fitting socket or wrench to apply steady pressure, ensuring the tool is fully seated to avoid rounding the edges of the fastener.
If it resists, a sharp, firm tap on the end of the wrench handle with the heel of your hand can often shock the threads loose without needing excessive force. A firm hand defeats resistance.
Separating the Gypsy from the Shaft
Once the central fastener is removed, the gypsy should ideally slide off the shaft, but this is rarely the case after years of service. The goal is to break the corrosion weld without damaging the precision-machined splines that transfer torque from the motor.
- Apply steady, firm pressure by hand, trying to wiggle the gypsy side-to-side.
- If it won't budge, use a gear puller positioned on the solid body of the gypsy.
- Never attempt to pry it off from behind with a screwdriver, as this can warp the metal.
Handling Stuck or Corroded Components
A completely seized gypsy can test your patience, but it's a common issue for any piece of marine hardware. The combination of dissimilar metals, salt, and constant pressure creates a powerful bond that requires a strategic approach to break.
- Soak the joint between the gypsy and shaft with a quality penetrating fluid and let it work for several hours.
- Use a soft-faced mallet to deliver sharp, angled taps around the gypsy's circumference.
- Alternate between applying the fluid and tapping to help it wick into the microscopic space.
Dealing with Common Challenges
A seized gypsy is a frequent hurdle, often caused by salt and corrosion bonding the parts together over time. If you're unable to remove it with simple tools, applying a penetrating fluid and letting it soak can work wonders to loosen the grip. Avoid the temptation to use excessive prying force, as this can easily damage the deck plate or the windlass housing itself. Patience over brute force.
Overcoming Corrosion and Salt Buildup
| Challenge | A Practical Approach |
|---|---|
| A Seized Central Fastener | Apply a dedicated marine penetrating fluid and allow it to dwell for several hours, even reapplying, before attempting to turn the screw with a perfectly fitting tool. |
| The Gypsy Fused to the Shaft | Use a soft-faced mallet to deliver sharp, persuasive taps around the gypsy's circumference to fracture the corrosion, rather than relying on a steady prying force. |
| General Stiffness in the Assembly | A thorough cleaning with a vinegar solution or dedicated rust dissolver can break down salt crystals, followed by a rinse with fresh water and careful drying. |
Proper Techniques for Stubborn Components
When standard methods fail, it's time to bring in specialized tools and a little more ingenuity. A two or three-arm gear puller is your best friend here, applying even, mechanical pressure directly to the gypsy while pushing against the center of the shaft.
As you tighten the puller, you can gently heat the body of the gypsy with a heat gun; the different expansion rates of the metals can break the corrosive grip. The key is to apply steady, increasing pressure and listen for a satisfying "crack" that signals victory. Apply controlled, mechanical persuasion.
Avoiding Damage to the Windlass Motor
The motor is the most expensive and complex part of the assembly, so protecting it is paramount. Any hammering, prying, or pulling force must be isolated to the gypsy and shaft only.
- Never use the motor housing as a fulcrum for a pry bar or a backstop for hammer blows.
- When using a puller, ensure the pushing screw is centered on the shaft end, not on the motor's input seal.
- Shield the motor from any penetrating fluid or debris that could compromise its electrical integrity.
Post-Removal Inspection and Assessment
With the gypsy off, you have a golden opportunity to inspect the parts that are normally hidden from view. Carefully check the main shaft for any scoring or wear and examine the bearing surfaces for smooth rotation. This is also the time to clean out old, hardened grease and debris from the hole in the gear. Inspect the hidden story.
Examining the Gypsy for Wear and Damage
With the gypsy finally free, you can hold it in your hands and perform a thorough inspection. Look closely at the chain pockets; they should be sharp and well-defined, not rounded over or "hooked" at the edges, which would prevent the chain from releasing cleanly.
- Check for cracks, especially around the base where the stress is highest.
- Look for uneven wear patterns that might indicate a misalignment with the chain or wildcat.
- Compare the wear to the manufacturer's specifications or a new part.
Checking the Shaft and Spline Condition
The shaft is the gypsy's partner, and its condition is just as vital for a smooth operation. Wipe it clean and run your fingers along the splines; they should feel sharp and distinct, not worn down or twisted. Any galling or deep grooves on the shaft will prevent a new gypsy from seating properly and can lead to rapid wear. If the shaft is damaged, installing a new gypsy is only a temporary fix. Inspect the foundation for damage.
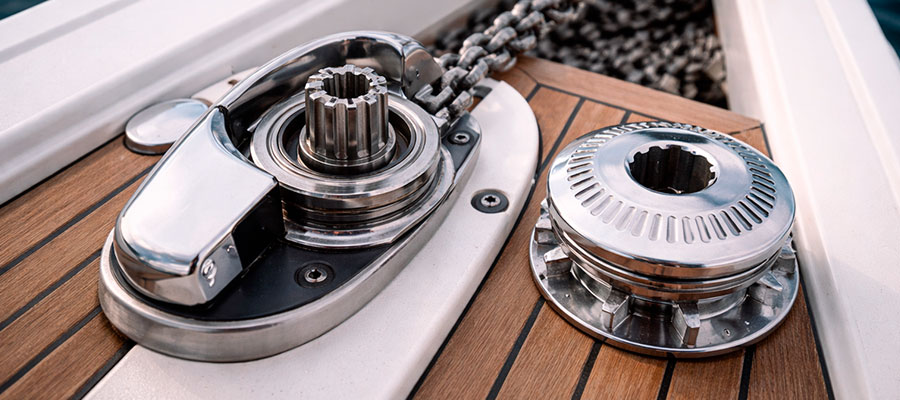
Determining Need for Repair or Replacement
This is the decision point where your inspection findings dictate the next steps. A slightly worn gypsy might be serviceable for a season, but one with hooked pockets is a safety risk that can jam during a critical anchor retrieval.
- Minor surface corrosion on the shaft can be cleaned with a fine abrasive cloth.
- Damaged splines on the shaft typically require professional machining or replacement of the drive unit.
- When in doubt, replacing a worn gypsy is a wise investment in reliable ground tackle.
Reassembly and Testing
Reassembly is the reverse of disassembly, but with a generous application of fresh, marine-grade grease on the shaft and bearings. Before you put any load on it, test the windlass by running it to raise and lower a little rope without the anchor to ensure everything moves smoothly. A successful test means you've restored a vital piece of your cruising kit to full health. Grease, reassemble, and verify.
Installing the Gypsy or Replacement Part
Reassembly is a satisfying process of putting the puzzle back together, this time with preventative measures for the future. Apply a thin layer of marine-grade anti-seize compound to the shaft splines; this will make the next removal infinitely easier.
- Carefully align the gypsy's internal splines with those on the shaft.
- Slide it on by hand, ensuring it seats fully and evenly.
- Install and torque the central fastener to the manufacturer's specification.
Verifying Proper Alignment and Operation
| Check | The Confirmation of Success |
|---|---|
| Chain Engagement and Release | The chain should seat itself neatly into the gypsy pockets without jamming and release cleanly without requiring a forceful pull to free it. |
| Smooth Clutch Operation | Engaging and disengaging the clutch should feel positive and require a moderate effort, without any grinding sensations or a disconcerting slip. |
| Free-Spinning Under No Load | With the clutch disengaged, the gypsy should spin freely by hand without any wobble, binding, or gritty feelings that suggest misaligned bearings. |
Final Testing Under Load Conditions
The true test of your work isn't a quiet spin by hand; it's the sound and feel of the windlass under the actual strain of your anchor. Reconnect the battery power and use the windlass to raise the anchor all the way up, listening for any unusual noises like grinding or clicking that weren't there before. Watch how the chain feeds into and out of the gypsy, ensuring it seats and releases cleanly without binding.
This final, real-world check is what gives you the confidence that your ground tackle is ready for the next season of sailing. Prove its strength with weight.

