A properly mounted transducer gives you accurate depth readings. Start by choosing the best location away from hull strakes. Clean the mounting area with rubbing alcohol first.
Dry-fit the bracket to check for obstructions underneath. Use marine-grade sealant to prevent water intrusion around screws. Drill pilot holes slightly smaller than your fasteners. Secure the bracket firmly without overtightening the screws. Route the cable carefully to avoid kinks or sharp bends. Test the unit in water before finalizing the installation.
Adjust the angle if needed for optimal performance. Keep the transducer parallel to the water’s surface. Your fishfinder will now deliver reliable readings every trip.

What Type of Transducer Mount is Best for a Fiberglass Boat?
For most fiberglass boats, transom mounts work well and install easily. Through-hull models give better readings but need drilling. In-hull mounts let you avoid holes in your boat. Consider your fishing style when choosing a mount type. Speed needs affect which transducer performs best. Deep water fishing demands more powerful units. Check your boat's hull shape before deciding. Some mounts work poorly on steep V-hulls. The hull truth forums offer good comparisons. Manufacturers' websites often have selection guides.
Transom Mount vs. Through-Hull Transducer Options
Transom-mount transducers install easily on most boats. Thru-hull models need holes in the transom but perform better. Consider your boat's water line when choosing. Fiberglass boats handle both options well. Transom mounts work for most fishing needs. Through-hull units excel in deep water. Check hull truth for your specific boat model. Some owners prefer not drilling new holes. Gel coat damage worries many boat owners. Read your manual before deciding.
Side Imaging Transducer Mounting Considerations
Location affects performance. Mount transducers where water flow stays smooth. Avoid turbulent areas behind strakes.
Key factors:
- Distance from propellers
- Clearance from hull features
- Water flow direction
- Depth below hull
- Accessibility for maintenance
- Interference with other gear
- Transducer angle
- Boat speed range
Trolling Motor Mount Alternatives for Fiberglass Boats
Mount the transducer on your trolling motor. This avoids holes in my transom completely. Use clamshell covers to protect the unit. The starboard side often works best. Secure wiring along the motor shaft. Humminbird makes good trolling motor mounts. Test position before final tightening. Keep water flow clean for best readings. Some installers prefer this for small boats. Difficult to remove if you change motors.
How Do I Install a Transom Mount Transducer on My Fiberglass Boat?
First, find the best mounting location near the stern. Avoid areas with turbulent water flow. Mark the spot with wax pencil before drilling. Use marine-grade sealant to prevent water leaks. Drill pilot holes first to prevent cracking. Tighten screws firmly but don't strip them. Angle the transducer slightly downward for best results. Leave enough cable length for steering movement. Test in water before final tightening. Adjust position if you get poor readings.
Selecting the Ideal Mounting Location Below the Waterline
| Consideration | Good Spot | Bad Spot |
|---|---|---|
| Water Flow | Smooth hull area | Near strakes/chines |
| Access | Near inspection ports | Hard-to-reach areas |
| Structure | Reinforced section | Thin hull material |
| Clearance | Away from prop | Close to rudder |
| Fairing | Minimal curves needed | Complex curves |
Proper Drilling Techniques for Fiberglass Without Damaging Gelcoat
Clean holes prevent cracks. Start small and increase bit size gradually. Sharp bits make cleaner cuts.
Drilling steps:
- Mark position precisely
- Use masking tape
- Begin with pilot hole
- Step up bit sizes
- Drill slowly with steady pressure
- Back out frequently
- Deburr edges carefully
- Clean dust completely
Transducer Cable Routing and Management Tips
Neat cables prevent problems. Route wiring away from moving parts and heat. Secure every few feet.
Routing best practices:
- Follow existing wire runs
- Use zip ties loosely
- Avoid sharp bends
- Protect from chafing
- Label both ends
- Leave slack for movement
- Waterproof all connections
- Test before final securing
Can I Mount a Transducer Without Drilling Holes in My Fiberglass Boat?
Yes, try epoxy mounting for a no-drill solution. Some stick-on pads work for temporary installations. In-hull models glue inside the boat's bottom. Stainless steel brackets can clamp to the transom. These methods avoid compromising your hull's integrity. Performance may not match drilled installations though. Rough water can loosen non-permanent mounts. Test any temporary mount carefully before trusting it. Some fishfinders come with no-drill options. Check west marine for mounting alternatives.
Using Stern Saver and Other Mounting Plates
Stern Savers prevent damage to your gel coat. These plates spread mounting pressure evenly. Drill into the plate, not your transom. Works well with existing holes. 4200 adhesive secures plates permanently. Lets you reposition the ducer later. Protects when you need to remove transducers. Popular on boating forum discussions. Fits most transducer install situations. Much cleaner than multiple screw holes.
Adhesive Options: Marine Epoxy, 3M 5200, and Sikaflex
Marine epoxy creates strong, watertight bonds. 3M 5200 stays flexible but grips tight. Sikaflex works great for temporary mounts. Choose based on how permanent you need it. Resin-based adhesives work with fiberglass best. 4200 works when you might remove later. Apply sealant around all mounting holes. Let cure fully before getting wet. Prevents water intrusion long-term. Check working properly after a few trips.
Inside the Hull Mounting Methods for Fiberglass Boats
Shoot-through works well. Choose locations with solid laminate below. No air bubbles between layers.
Installation tips:
- Find solid fiberglass area
- Test with water first
- Use slow-cure epoxy
- Eliminate all air pockets
- Maintain proper orientation
- Allow full cure time
- Mark location permanently
- Record settings adjustment
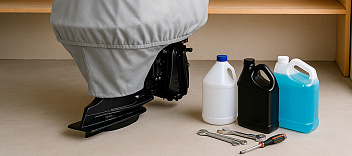
What Tools and Materials Do I Need for Transducer Installation?
Gather marine sealant, drill, and appropriate bits first. You'll need a screwdriver set for mounting hardware. Have silicone grease for cable connections ready. Rubbing alcohol cleans the mounting surface well. Measuring tape ensures proper placement. A level helps with correct alignment. File smooths any rough drill holes. Cable ties keep wiring neat and secure. Have a helper for tricky installations. Don't forget the manufacturer's instructions.
Essential Tools for Drilling and Mounting on Fiberglass
Right tools make clean work. Gather everything before starting the installation. Quality matters for marine work.
Tool checklist:
- Variable speed drill
- Step drill bits
- Center punch
- Safety glasses
- Dust mask
- Tape measure
- Level
- Sealant gun
Recommended Marine Sealants for Waterproof Installation
Sealants prevent leaks. Choose products designed for underwater use. Different materials need different sealants.
Top options:
- 3M 5200 (permanent)
- 3M 4200 (removable)
- Sikaflex 291
- Life-Calk
- BoatLife Life-Seal
- Marine-Tex
- Pettit PoxyShield
- West System epoxy
Transducer Brackets and Mounting Hardware Selection
Stainless steel brackets last longest in saltwater. Plastic clamshells protect the end of the transducer. Match bracket size to your ducer. Raymarine units often need specific hardware. Tighten enough to prevent vibration loosening. Starboard material makes good custom brackets. Use nylon washers to prevent gel coat cracks. Fine tuning easier with adjustable brackets. Hardware should withstand constant water exposure. Avoid difficult to remove corrosion later.
How Do I Fine-Tune My Transducer Mount for Optimal Performance?
Start by checking the water flow behind your boat. Adjust angle until you see clean readings. Lower the transducer depth if getting spray. Raise it if hitting debris frequently. Watch your display while making small changes. Mark the perfect position before final tightening. Test at different speeds for consistency. Calibrate your fishfinder after installation. Some units need specific depth offsets. Post questions on boating forum if stuck.
Avoiding Turbulence: Proper Transducer Positioning
Mount away from strakes and hull irregularities. Keep clear of motor turbulence areas. The water line affects reading quality. Test different positions before final install. Bubbles mean you're in turbulent water. Most work best on starboard side. Smooth water flow means better sonar. Watch your display while testing positions. Hull truth members share ideal spots. Adjust until you get clean returns.
Adjusting Transducer Angle and Depth for Best Results
Start with the transducer parallel to water. Slight downward angle often works best. The end should just touch water. Too deep creates spray and drag. Too high gives poor readings. Fine tuning takes patience and testing. Mark ideal position with wax pencil. Small changes make big differences. Check at various speeds. Manual usually suggests starting angles.
Testing and Troubleshooting Common Mounting Issues
First check all wiring connections. Poor readings often mean bad position. Air bubbles cause erratic sonar returns. Re-seal if you see water intrusion. Loose mounts vibrate and give noise. Test in calm water first. Compare to manual's expected performance. Visit boating forums for specific fixes. Sometimes remounting solves everything. Don't ignore persistent problems.

What Are Common Mistakes When Installing Transducers on Fiberglass Boats?
Many people choose poor mounting locations with bubbles. Drilling too large holes causes leaks. Forgetting sealant leads to water damage. Overtightening cracks the fiberglass. Wrong angles give false depth readings. Leaving cables loose risks snags and damage. Rushing the job creates problems later. Not testing in water wastes time. Ignoring manufacturer specs affects performance. Skipping the manual causes avoidable errors.
Improper Sealing Techniques That Lead to Water Intrusion
Skipping sealant invites leaks. Apply around all screw holes. Don't overtighten and squeeze out sealant. 5200 makes removal difficult later. Check for gaps after curing. Water stains indicate existing leaks. Re-do any questionable seals immediately. Proper sealing keeps water out permanently. Starboard side often gets most spray. Monitor after first few launches.
Mounting Errors That Affect Sonar Performance
Small mistakes cause big problems. Avoid these common transducer installation errors. Proper setup ensures accurate readings.
Common mistakes:
- Mounting too close to prop
- Angling transducer incorrectly
- Poor cable connections
- Inadequate sealing
- Vibration from loose mount
- Air bubbles in epoxy
- Interference from other electronics
- Ignoring manufacturer specifications
Damage Prevention: Protecting Your Boat's Fiberglass During Installation
| Risk | Prevention Method | Tools Needed |
|---|---|---|
| Cracks from drilling | Apply masking tape first | Painter's tape |
| Gelcoat splintering | Use sharp carbide bits | Rotary tool |
| Structural weakness | Mix resin for repairs | Fiberglass kit |
| Water intrusion | Bed hardware properly | Marine sealant |
| Stress fractures | Support both sides | Backing plate |