

The importance of maintaining propeller shaft seals in marine vessels cannot be overstated, as these components prevent water ingress into the hull while accommodating shaft movement. PSS shaft seals, renowned for their reliability and ease of installation, utilize a rubber bellows that wears over time under constant exposure to water and motion. Replacing this bellows is a critical maintenance task that boat owners often tackle to restore optimal functionality and extend the seal's lifespan. Despite common concerns about the feasibility of this replacement, numerous marine enthusiasts and professionals have successfully performed the procedure using straightforward tools and following manufacturer's guidelines. This hands-on approach not only saves costs compared to complete seal replacement but also empowers owners with a deeper understanding of their vessel's systems. In this article, we delve into step-by-step methods, essential precautions, and real-world tips for safely and effectively replacing the bellows on a PSS shaft seal.
Understanding the PSS Dripless Shaft Seal System
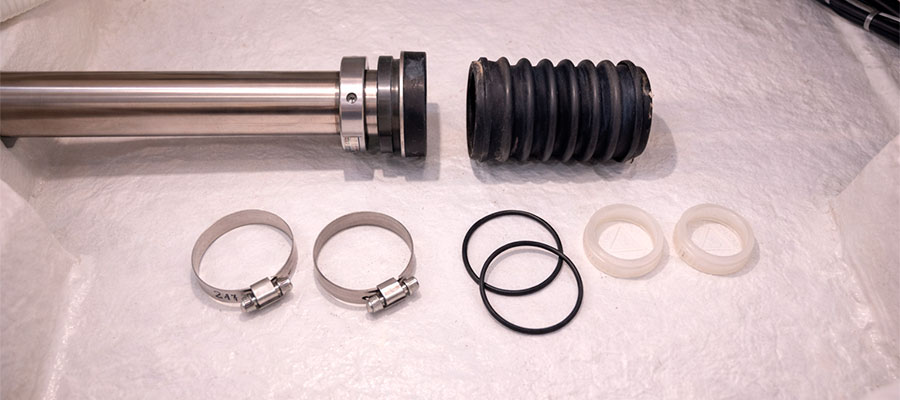
The PSS shaft seal represents a modern innovation in marine technology, designed to prevent water entry into boats. It operates without the traditional stuffing box, which often drips and requires frequent adjustments. Manufacturers like PYI developed this system to offer a reliable, low-maintenance alternative. At its core, the PSS system uses a bellows mechanism to accommodate shaft movement. This design ensures a face seal that remains watertight even under varying pressures. Users appreciate how it eliminates the need for constant tweaking. The pss pro variant builds on this foundation with enhanced durability. Installation typically involves mounting the rotor onto the prop shaft. Technicians recommend attaching the stainless steel rotor securely with set screws. Overall, the PSS seal integrates seamlessly with existing shaft couplings. Its dripless nature significantly reduces onboard moisture issues. Boat owners often report fewer bilge pump activations after switching.
How the Bellows Creates a Watertight Seal
The bellows in a pss seal plays a crucial role in forming a watertight barrier. It consists of flexible rubber that compresses around the prop shaft. This compression creates a pressure-tight interface, blocking water penetration. When the shaft moves axially, the bellows expands and contracts accordingly.
A key function is its lip seal design, which maintains constant contact despite motion.
Manufacturers ensure the bellows withstands tidal forces and shaft vibration. O-rings within the system enhance sealing integrity during rotations. Proper installation prevents leaks that traditional packing glands couldn't avoid. Users must check for chemical deterioration periodically. The pys system emphasizes preventative maintenance to prolong seal faces. Ultimately, the bellows' adaptability supports long-term boating efficiency.
The Role of the Bellows in the Dripless Design
The bellows serves as the backbone of the PSS system's dripless functionality, avoiding common leaks. It replaces the messy stuffing box by providing a clean, adjustable seal. This component absorbs thrust and axial shifts without introducing moisture. Boat enthusiasts value how it integrates with the shaft coupling for smooth operation. The design promotes easier shaft movements, enhancing overall vessel performance. Manufacturers advocate for selecting high-quality replacements to sustain reliability.
- Ensures compression maintains face seal integrity under stress.
- Prevents waterline breaches that packing glands often cause.
- Accommodates prop shaft rotations with minimal friction.
- Supports regular inspections to detect early deterioration.
- Facilitates quick replacements using the PSS shaft seal maintenance kit.
Signs Your Bellows May Need Replacement
Watching for wear on the PSS bellows helps boat owners maintain safe voyages. Visible cracks or tears indicate potential issues with the seal. Unusual drips into the bilge signal weakening integrity. Shaft movement that feels erratic may stem from bellows failure. Owners should note any worn o-rings during routine checks. Chemical exposure from marine environments accelerates deterioration.
- Increased leaks around the stern tube suggest compression loss.
- Bilge pump overworking points to inadequate sealing.
- Audible noises from the prop shaft indicate internal wear.
- Stains on the stern tube reveal slow water ingress.
- Difficulty moving the shaft hints at bellows stiffening.
Recognizing When Replacement is Necessary
Boat owners should stay alert to changes in their marine sealing systems. Understanding subtle signs helps avoid bigger problems on the water. Regular checks prevent costly breakdowns during trips. Experts suggest reviewing components after rough voyages. Environmental factors like salty air can cause early failures. Noticing unusual smells or sights around the seal area matters. Timely action keeps water out of the vessel. Professionals recommend using diagnostic tools for accurate assessment. Scheduling annual reviews supports long-term reliability.
Visible Wear and Tear on the Bellows Material
Inspecting the expandable component reveals important insights about seal health. Look for surface changes that indicate aging. Physical damage often appears after harsh conditions. Sailors share stories of catching issues early. Experts advise gentle probing to assess elasticity. Consistent monitoring leads to safer journeys.
- Cracks starting at edges warn of impending breakdown.
- Fading colors from exposure hint at material weakening.
- Bubbles under the surface show internal stress points.
- Separation at joints signals need for urgent care.
- Ridges forming unevenly suggest uneven pressure effects.
Identifying Leaks and Loss of Dripless Performance
Leaks undermine the core promise of leak-proof designs. Spotting drips helps diagnose underlying problems. Owners report noticing moisture in unexpected places. Troubleshooting starts with visual daily walks. Comparing with past performance aids detection.
- Damp spots on the shaft log indicate entry points.
- Rising levels in the bilge signal ongoing seepage.
- Stains near the coupler show slow but steady flow.
- Increased noises hint at compromised barriers.
- Difficulty maintaining pressure points to wear signals.
Age and Service Life Considerations
Seals endure various stresses over time, affecting their lifespan. Manufacturers provide guidelines based on usage patterns. Many sailors track their setups for optimal timing. Environmental impacts like tide fluctuations play a role. Routine evaluations catch age-related declines.
Recommends that the bellows every few years enhances safety.
Spare parts availability makes planning easier. Users often consult forums for real experiences. Balancing cost with reliability guides decisions. Considering professional installations improves outcomes. Communities share successes from proactive approaches.
The Bellows Replacement Process
Replacing components in marine systems requires careful planning and tools. Sailors often share tips on DIY upgrades for better reliability. Start by securing your vessel to avoid unexpected tides. Gather the parts replacement kit for pyi pss systems. Ensure access to screws in the stainless steel areas. Removing the shaft helps clear space for work. Adjusting the bellows demands patience to prevent damage. Good seal maintenance extends equipment life. Always inspect for sign of wear before starting. Professional guidance can simplify complex steps.
Gathering the Necessary Tools and Parts
| Item Category | Specific Tools/Parts Needed | Key Role in the Procedure | Where to Source or Alternative Notes |
|---|---|---|---|
| Basic Hand Tools | A refined 10mm hex key for fasteners and a robust adjustable wrench measuring up to 12 inches. | These facilitate loosening or tightening bolts and clamps with precision, minimizing damage to marine-grade components. | Obligatory to have set options from a local hardware store; opt for chrome-plated versions to resist saltwater corrosion. |
| Specialized Seal Kit | PSS-engineered replacement bellows module, inclusive of gasket materials and alignment rings. | Serves as the heart of the swap, replicating the original membrane to block fluid flow while allowing axial shaft motion. | Acquire directly from PSS manufacturers or authorized distributors; verify model compatibility with your vessel's shaft diameter. |
| Lubricants and Protectants | Supreme non-toxic marine silicone lubricant and corrosion-resistant penetrating fluid. | Aids in disassembling stuck parts and reassembling with ease, ensuring impermeable seals against aquatic pressures. | Prefer eco-friendly formulations to avoid harming marine life; check for approvals from boating regulatory bodies. |
| Clamping and Fastening Hardware | Heavy-duty stainless steel hose clamps ranging from 1.5 to 3 inches in diameter, plus self-tapping screws. | Securely holds hoses and assemblies in place, preventing slippage during operation and environmental stresses. | Source high-grade 316 stainless to endure saline exposure; measure existing fittings for exact sizing. |
| Cleaning Supplies | Microfiber cleaning cloths and synthetic abrasive scrub pads, paired with deionized water. | Eliminates residue and contaminants from the shaft and surrounding areas, promoting flawless adhesion and longevity. | Use gentle, non-abrasive options to avoid scratching surfaces; integrate into pre-replacement inspections. |
| Safety and Measurement Gear | Protective nitrile gloves, safety spectacles, and a digital caliper for exact measurements up to 6 inches. | Guards against sharp edges and chemical splashes while ensuring accurate fitments during installations. | Essential for personal protection in boatyard settings; digital tools provide superior precision over analog counterparts. |
Step-by-Step Removal of the Old Bellows
Understanding the removal sequence prevents mistakes during maintenance. Boat enthusiasts recommend marking parts for easy reassembly. Use appropriate tools to avoid scratching metal surfaces. Pulling the shaft out carefully maintains alignment. Sailors note that cuts can occur if rushed. Checking set screws in the stainless ensures safety.
- Loosen and remove flange connections slowly.
- Disconnect the shaft coupler from the drive.
- Slide the rubber hose below waterline out gently.
- Wipe down around the shaft to clean debris.
- Store parts replacement kit for new components securely.
Installing and Seating the New Bellows
Setting up fresh components restores full dripless functionality. Align everything precisely to match original positions. Compressing the bellows properly creates a tight barrier. PYI recommends testing seals after adjustments. Spare seals keep boats ready for offshore trips.
- Position the new shaft onto the coupler steadily.
- Tighten screws in the stainless steel incrementally.
- Compress the bellows until shaft when tightened securely.
- Lubricate o-rings for smoother operation.
- Verify alignment with a cutlass bearing if needed.
- Run initial checks to stop the leak immediately.
Common Challenges and Solutions
Marine upkeep often presents unforeseen hurdles during component swaps. Sailors encounter issues with stuck parts from corrosion buildup. Moisture infiltration complicates removal of old parts. Experts advise pre-lubrication to ease operations on boats. Tides can accelerate wear, requiring quicker responses. Replacement parts kits simplify sourcing missing items. Regular inspections reveal early signs before major failures. Practice runs with dummies help build confidence. Community forums offer real-world fixes for common jams. Patience prevents damage to surrounding components. Hydraulics sometimes need gentle persuasion to cooperate.
Dealing with a Stubborn or Stuck Shaft Seal
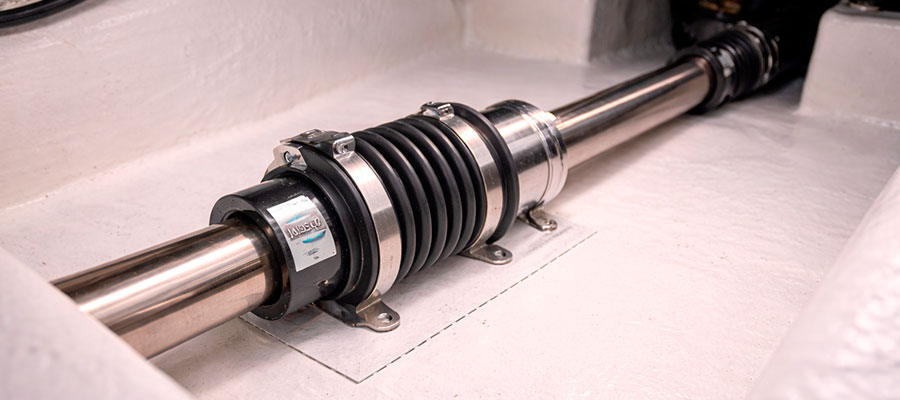
Managing jammed connections needs gentle marine tricks. Corrosion builds up, making disconnection tough after long use. Technicians share strategies for releasing tight grips. Penetrating solvents ease stuck fixtures on watercraft. Boat users caution against brute force to prevent cracks. Appropriate instruments facilitate safer extraction.
- Apply moderate heat near bonded zones carefully.
- Gently hammer with a rubber tool for release.
- Employ pry bars for uniform force application.
- Clean residue to enhance handling ease.
- Refer to guides for exact turning strengths.
Ensuring Proper Alignment During Reassembly
Reassembling demands accuracy for optimal performance recovery. Misplacements cause fluid leaks and quick breakdowns. Vessel owners stress measuring components beforehand. Employing jigs supports exact matching to originals. Specialists advocate turning for balanced installation tests. Gauges confirm clearances without guesswork. Greasing promotes effortless entry without strain.
- Indicate center marks prior to taking apart.
- Fasten brackets gradually at reduced strength.
- Fine-tune placements during movement verification.
- Insert guides if included in kits.
- Perform preliminary tests for stability early.
Avoiding Common Installation Mistakes
Setup blunders can cut down gear durability considerably. Neglecting lubrication generates excess drag right away. Hurrying through phases results in skewed setups. Watercraft drivers urge breaks to confirm progress. Overlooking adjustments prompts future repairs underway. Excessive screw tightening damages delicate threads possibly. Omitting o-ring swaps invites water intrusion. Equipment lacking measurers creates rough fits.
Years on our pss require routine refreshes effectively.
Adopting lessons from errors boosts success rates. Reviewing checklists sidesteps expensive errors. Sequential methods guarantee successful integrations. Weighing haste against precision halts disappointments.
Post-Installation Verification
After fitting new components, verification confirms everything works right. Sailors often run quick checks to spot issues early. Use simple tests for peace of mind on your vessel. Dripless functionality should hold without drips below deck. Inspect connections visually for any loose spots. Replacement parts should fit snugly without gaps. Years on our setup highlight the need for thorough reviews. Kit contents include extras for unexpected tweaks. Bellows must be inspected right after assembly too. Bellows be replaced once every few seasons confirms longevity.
Testing for Leaks and Proper Seal Function
Ensuring no water enters demands post-check routines on sailboats. Dripless seal performance shines through basic water trials. Owners test in calm conditions to mimic real voyages. Leaks suggest air bubbles or pressure flaws. Tides seals hold firm against waves if done correctly. Bellows must be inspected regularly for subtle weaknesses.
- Fill the area with water and watch for escapes.
- Pressurize lightly to simulate engine strains.
- Rotate gently and note any unusual vibrations.
- Dry surfaces then retest after a short pause.
- Use dye if needed to trace hidden paths.
Checking Shaft Rotation and Alignment
Smooth motion verifies the core setup on your boat. Alignment keeps vibrations low during runs. Sailors measure clearances with basic tools. Bellows compressed evenly supports free turns. Replace the shaft if drags appear during spins. Onto the shaft, new parts slide without binds.
- Measure gaps around the entry points carefully.
- Spin by hand for even resistance levels.
- Check for side-to-side wobbles under light load.
- Align marks from earlier disassembly steps.
- Note any grinding sounds for further probes.
Final Adjustments for Optimal Performance
Tweaking ensures long-term smoothness on the water. Sailors fine-tune for quiet operations over miles. Shout must be inspected one last time here. Every six years, such checks prevent surprises. Also recommended that the o-rings stay fresh. Replaced once every 6 years keeps things reliable.
Parts replacement kit comes handy for these steps.
Adjusting tensions avoids future strains. Sailboat handlers swear by balanced finals. Bellows compressed just right boosts efficiency.
Maintenance Tips for Longevity
Owners can extend service life with smart habits. Clean components regularly to avoid buildup. Apply quality lubricants for smoother operations. Check fits annually during off-season reviews. Use gentle tools to prevent scratches. Monitor for unusual noises during use. Rotate parts to distribute stress evenly. Store extras in dry spots aboard. Schedule updates based on usage patterns. Parts replacement kitfor replacements ensures compatibility. Adjust tensions without overdoing it.
Routine Inspection and Cleaning Procedures
Start by preparing your workspace safely on deck. Gather basic tools like rags and brushes. Wipe surfaces gently after each trip. Look for dirt accumulation in key areas.
Regular checks catch issues before big problems.
Flush debris with mild solutions carefully. Dry everything thoroughly to prevent rust. Note any changes in feel or sound. Follow up with a quick function test.
Factors That Accelerate Bellows Wear
Harsh marine environments speed up material fatigue quickly. Exposure to saltwater erodes flexibly over time. Vibrations from engines contribute to early breakdown. Frequent docking scrapes sensitive spots unintentionally. Extreme temperatures make expansion tricky to handle. Improper installation adds undue stress right away.
- Salt particles cling and corrode if not rinsed.
- Engine hum transmits jolts that weaken bonds.
- Sharp impacts from waves cause micro-tears.
- Heat shifts alter how materials behave inside.
- Poor fits amplify movements during turns.
- Neglected storage invites environmental attacks.
When to Seek Professional Assistance
Experienced mariners know when DIY limits appear. Persistent leaks despite fixes signal deeper troubles. Unusual vibrations might indicate alignment faults. Tarnished surfaces after treatments need expert eyes. Frequent adjustments suggest manufacturer defects possibly. Lost parts during tweaks prompt kit renewals. Cloudy liquids around fittings warn of contaminants. Grinding feels during spins require precise diagnostics. Overheated components after runs demand cooling checks. Unresponsive movements post-cleaning hint at jams. Factory guidance becomes vital for warranties. Official centers offer tools beyond home setups.

