

Is your onboard water supply suddenly quiet, leaving your faucets dry? That absent hum often points to a water pump ready for retirement, disrupting your self-contained comfort. This guide details the clear steps to install a Flojet pump, reviving reliable water pressure for your sink, shower, and appliances. We’ll cover everything from selecting a compatible model to the final system check, ensuring you can confidently handle this key upgrade or replacement.A successful installation is built on thoughtful preparation. Before beginning, it’s wise to review your vehicle’s specific manual and scout owner forums for any tailored insights.
Assemble your new Flojet unit—or a similar Shurflo pump with a matching flow rate (GPM) and pressure (PSI) rating—alongside essential parts. You’ll want fittings like John Guest connectors, a fresh water filter, hose clamps, and sealant. First, fully drain your freshwater tank and plumbing lines; this step is particularly relevant if the system was previously prepared for winterizing.

Keep your boat in top shape with simple routines. Wash the hull monthly to prevent grime buildup.
Check fluid levels before every outing. Inspect propellers for dings after shallow water trips. Lubricate moving parts to avoid corrosion. Clean bilge areas to spot leaks early. Test navigation lights before night voyages. Store ropes and gear properly to prevent mildew. Cover your boat when not in use.
Charge batteries regularly to maintain power. Replace worn parts before they fail. Consistent care keeps your vessel ready for adventure.

In every boater’s life there comes a moment when hauling lines by hand feels like a chore rather than a joy. You glance at your deck, at that sturdy Lewmar manual winch, and wonder: could I upgrade my manual winch into something that works at the push of a button? That question echoes across many a boat install forum where seasoned sailors and rookies alike debate the merits of a Lewmar electric winch conversion.The idea of converting a manual winch to electric is no longer science fiction — Lewmar themselves offer an Ocean winch electric conversion kit and even an EVO electric winch kit, which show that this transformation is feasible for certain models.
But it’s not a one-size-fits-all affair: wiring, marine gearbox alignment, electrical upgrade constraints, battery capacity, and compatibility with the existing winch housing all play a role.
You’ll often see on the forum Lewmar electric winch threads sailors asking whether their specific model can be retrofitted, or if a complete new winch is the only route.In this article, we’ll explore: which Lewmar models can realistically undergo a Lewmar electric winch conversion, which ones are better left manual, and what it takes — wiring, motor choices, mechanical compatibility — to make that switch. By the end, you’ll have a clearer sense whether your winch needs a complete overhaul or just a clever upgrade to electric.

Victron GX vs Cerbo GX is more than a model comparison—it’s about choosing the right power maestro for your setup. Venus GX handles basic data logging and system coordination with quiet confidence. Cerbo GX, by contrast, kicks into high gear when you need more ports, processing muscle, and slick remote access. Whether you’re wiring a modest solar array or orchestrating a complex off-grid network, this guide will help you zero in on the controller that fits your ambitions—and your budget.

Victron Energy’s slim, sealed GX Touch displays have become a favorite among van builders, boat owners, and off-grid system installers because they integrate so naturally into a power setup. Instead of feeling like an add-on screen, both the five-inch GX Touch 50 and the seven-inch GX Touch 70 behave like part of the system’s core interface. Each screen gives quick access to settings and live data, linking to the Cerbo GX through a single cable that keeps wiring neat and simple.
Once connected to a Cerbo GX MK2 or a MultiPlus-II system, the display comes to life with real-time information arranged in a layout that is easy to interpret. When paired with the Cerbo GX, the menus react smoothly and feel very direct. Using VRM online tools and the Cerbo’s various communication options, the system can also be checked or adjusted remotely through Bluetooth, VE.Direct, HDMI, Lynx Smart BMS connections, and other Victron interfaces.
The GX lineup and its touchscreen displays create a straightforward way to oversee and adjust an energy system that stays tidy, responsive, and user-friendly day after day. Whether installed in a compact van build or a large battery bank project, both display sizes offer quick navigation and a consistently smooth interaction.

Regular upkeep prevents breakdowns and extends your boat's life. Check engine oil monthly and change it every 100 hours.
Inspect coolant levels before each outing during summer months. Clean seawater strainers after every trip to avoid clogs. Examine belts for wear and proper tension each season. Lubricate steering components to maintain smooth operation. Test bilge pumps weekly to ensure they work when needed. Replace impellers annually to prevent cooling system failures.
Keep fuel tanks full to minimize condensation buildup. Wipe down the engine bay to spot leaks early. Winterize thoroughly if you live in cold climates. Simple habits save you from costly repairs later.

Before you launch for a race or a training session, make sure your Ronstan ClearStart™ watch or race timer is properly set. This 50mm sailing timepiece was engineered with competitive sailors in mind, offering a blend of rugged durability and racing precision. Its large, high-contrast digits and distinctive audible signals ensure you always know when each minute ticks over — even when your focus is locked on the start line.
Created to thrive in tough marine environments, the ClearStart™ is both impact-resistant and water-ready, rated to 5ATM. The flexible silicone strap provides comfort and security through constant motion, spray, and salt exposure. If the start sequence changes mid-race, you can easily resync your countdown and stay perfectly timed — because in sailing, staying in rhythm makes all the difference.

Navigating the realm of energy oversight gadgets can feel overwhelming, especially when you're eyeing tools to track your power reserves effectively. This piece dives into a head-to-head between two prominent offerings from a top-tier renewable energy firm: the reliable 700 edition and its enhanced sibling, the 702 edition. We'll break down their core strengths, subtle differences, and practical perks to help you decide which one suits your setup best. Whether you're powering a cozy home system or a rugged mobile rig, understanding these nuances ensures you invest wisely in longevity and efficiency. Let's explore what sets them apart without the fluff.

Yes, Victron MPPT chargers work with lithium batteries. Modern solar setups often use lithium iron phosphate batteries. These batteries need specific charging care. Your Victron solar charge controller can manage this well. Its programming allows custom lithium battery profiles. You can set precise voltage parameters easily. This ensures safe and efficient solar power charging. It protects your battery investment from damage.
Victron SmartSolar models offer useful Bluetooth connectivity. You can adjust settings via a smartphone app. Select your battery type from the menu. Choose LiFePO4 for lithium iron phosphate models. Then input your battery's exact voltage limits. Always follow your battery manufacturer's guidelines. Correct settings maximize battery life and performance. They prevent overcharging during absorption phases.

Launching your boat shouldn’t feel stressful. With the right steps, you’ll glide into the water smoothly. Preparation saves time and avoids last-minute panic. Patience keeps you and others safe at crowded ramps. Teamwork helps—bring a buddy if you can. Confidence grows with practice, so take it slow.
Back your trailer straight down the ramp. Secure the boat’s bow line before unhooking. Gently ease the boat off the trailer. Park your vehicle clear of the ramp. Now, enjoy the water—you’ve nailed it!
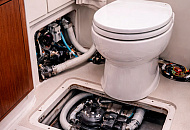
Many boat and RV owners tire of the Tecma’s electric pump and yearn for the simplicity of a straight-drop bowl. Yet replacing that powered macerating unit with a standard gravity model is closer to a mini-remodel than a parts change. You’ll need to run a new 3-inch waste line, relocate water supply fittings, and modify the black-tank inlet to suit a direct fall. Factor in cabinetry access and floor-flange adjustments, and the job quickly moves from “afternoon project” to a full plumbing upgrade.

Boating isn’t just about steering—you’re constantly accountable for safety and navigation. Even with modern electronics at your fingertips, a magnetic compass remains an essential fail-safe. In many jurisdictions, maritime rules still mandate having a compass aboard, especially for self-propelled vessels or those venturing beyond protected or visually familiar waters. Omitting one isn’t merely risky—it may run afoul of regulatory requirements. In this article, we’ll begin by exploring why that simple, timeless instrument continues to matter, both for legal compliance and practical peace of mind.

When it comes to choosing a reliable tender or small raft for your adventures, many boat owners turn to Plastimo for their balance of performance and affordability. These compact inflatables have become a familiar sight alongside yachts and sailboats, but one question often comes up — are Plastimo dinghies made of PVC or Hypalon?
The answer lies in understanding the material used in their construction, as it determines how the boat handles exposure to UV rays, abrasion, and saltwater. Most Plastimo tenders are made of quality PVC fabric.
This type of inflatable boat fabric is lightweight, easy to weld, and simple to repair with a basic repair kit or adhesive if needed. Unlike older PVC models that suffered under harsh sunlight, today’s designs feature advanced coatings to resist UV degradation and maintain air tightness over time. Whether you’re inflating a rigid hull tender or a simple roll-up hypalon inflatable boat, understanding your boat’s material can make all the difference in how you maintain it and how long it lasts.

Setting the right time on your Barigo watch might seem simple, yet this mechanical instrument deserves a bit of care and understanding. Born in Germany’s legendary Black Forest, Barigo marine instruments combine precision engineering with a timeless nautical spirit. Whether your model features an altimeter, hygrometer, or barometer display, each dial tells more than just hours — it tells the story of air pressure, altitude, and changing skies.
Before diving into time setting, take a moment to look closely at your dial and the small button or screw that lets you press the s2 or switch between time mode, altimeter mode, or alarm mode. Every indicator, from the compass ring to the thermometer scale, is designed to help you measure and interpret your surroundings, whether you’re adjusting your Barigo marine watch on a boat or checking local weather at sea level.

The importance of maintaining propeller shaft seals in marine vessels cannot be overstated, as these components prevent water ingress into the hull while accommodating shaft movement. PSS shaft seals, renowned for their reliability and ease of installation, utilize a rubber bellows that wears over time under constant exposure to water and motion. Replacing this bellows is a critical maintenance task that boat owners often tackle to restore optimal functionality and extend the seal's lifespan. Despite common concerns about the feasibility of this replacement, numerous marine enthusiasts and professionals have successfully performed the procedure using straightforward tools and following manufacturer's guidelines. This hands-on approach not only saves costs compared to complete seal replacement but also empowers owners with a deeper understanding of their vessel's systems. In this article, we delve into step-by-step methods, essential precautions, and real-world tips for safely and effectively replacing the bellows on a PSS shaft seal.

Hey, boat lover! Eager to upgrade your vessel with a dependable onboard restroom? This guide breaks down the step-by-step setup of a top-brand freshwater unit built for sea life. We'll cover tools, assembly, and checks for safe, easy success. Skip common errors with our tips, no matter your experience. Always put safety first and follow regs. Let's get going!
Preparation and Planning Instructions
Before starting your toilet installation, ensure the boat is safe. Check for any existing sanitation issues. Gather all jabsco manuals beforehand. Plan the route for sanitation hoses carefully. Consider the hull's angle for proper fit. Jabsco manual toilet pump is essential for marine use. Test fresh water supply in advance. Double-check for seal integrity to prevent leaks.

There's that sinking feeling when you hear the distinct sound of a rip in your favorite sail or kite. Whether it's a sharp tear on a corner or a long rip along a seam, the urgency to fix it before the wind catches it again is real. For sailors and kite enthusiasts, a reliable roll of PSP spinnaker repair tape 50mm is as essential as any piece of gear.
This isn't just any sticky patch; it's a specialized self-adhesive ripstop nylon tape designed to bond instantly with your fabric, creating a strong, effective repair that gets you back on the water fast.
The process is straightforward: find the damage, ensure the surface is clean and dry, and firmly press the tape into place. But when you're mid-trip or in a remote location, knowing where to find this specific 50mm x 4.5m lifesaver becomes the most pressing question. Finding your quick fix is the key to minimizing downtime and maximizing your time enjoying the breeze.

Ronstan lashing blocks are versatile tools for modern sailing. These blocks offer strength and reduce weight on your boat with high style for racing. This guide explores how to choose, use, and maintain them for optimal performance. Learn how to harness their potential.
Understanding Lashing Block Fundamentals
Lashing blocks offer effective rigging alternatives. They simplify your sailing gear setup. Grasping the basics is very important. A lashing line must secure the block correctly. This eliminates older methods using shackles. Blocks are designed for lines like a control line setup. They improve performance on your sailboat. Block must be lashed properly for safety in high load situations.

Harnessing solar energy efficiently demands a sophisticated regulator to manage the flow of power from your panels. The Victron MPPT controller stands out for its advanced Maximum Power Point Tracking technology. This intelligent device optimizes energy harvest from your photovoltaic array under varying conditions. A correct installation is fundamental to unlocking the controller's full potential and ensuring system longevity. This process involves careful planning, precise electrical connections, and initial configuration. Proper setup not only guarantees safety but also maximizes the return on your solar investment. The following guide provides a structured approach to this critical procedure. Adhering to these steps will lead to a robust and high-performing solar charging system.

There are few sounds as comforting as the steady, electric grind of your Lofrans windlass effortlessly raising the anchor after a long day. It’s a piece of machinery that embodies pure muscle, making a heavy task feel almost effortless. But when the time comes for maintenance, or you need to replace a worn chain gypsy, this robust unit can present a formidable challenge. That gypsy, the toothed wheel that guides your chain, is designed to stay put through gales and rough seas, and convincing it to let go often feels like a battle of wills. You might have searched through owners forums, read the manual, and even given it a few tentative taps, only to find it remains stubbornly in place.
A stubborn but manageable task.This isn't just about brute force; it's about understanding how the windlass thinks. The main shaft, clutch cone, and various bolts all work in concert to hold the gypsy securely against the immense forces of raising and lowering your anchor.
The process of removal is a deliberate dance of loosening, tapping, and persuading, requiring a blend of the right tools and a little bit of marine ingenuity. Whether you're working on a Lofrans Tigres or another model, the goal is to coax the gypsy free without damaging the delicate components beneath. Let's walk through the steps to respectfully disassemble this workhorse and get your ground tackle system back in flawless working order.